 Using the control panel
Using the computer
To find out more information about the control panel button functions in Copy mode, see Using the control panel.
Using the control panel
- Load the document face down on the scanner glass. For help, see Loading a document on the scanner glass.
- Press Mode until the Copy light comes on.
- To adjust the image before copying, press Menu.
If you want to:
- Press Black or Color.
Change the blank paper size
The default blank paper size is Letter or A4.
- Press Mode until the Copy light comes on.
- Press Menu.
The Copy Menu opens with Blank Paper Size highlighted.
- Press the left or right arrow to scroll to the blank paper size for the photo or document.
- Press Select to accept the changes.
Setting the copy quality
- Load the document face down on the scanner glass. For help, see Loading a document on the scanner glass.
- Press Mode until the Copy light comes on.
- Press Menu.
The Copy menu opens with Copy Quality highlighted.
- Press the left or right arrow to select the appropriate copy quality for the document.
- Automatic—The All-In-One sets the print quality according to the paper type loaded.
- Draft—For a quick copy.
- Normal—Recommended for most types of documents.
- Photo—Best for photos and documents with graphics.
- Press Select to save the changes.
Lighten or darken a copy
- Load the document face down on the scanner glass. For help, see Loading a document on the scanner glass.
- Press Mode until the Copy light comes on.
- Press Menu.
The Copy menu appears.
- Press the down arrow to highlight Brightness, and press Select.
- Press the left or right arrow to lighten or darken the document as needed.
- Press Select to save changes.
Repeat an image on one page
- Load the document face down on the scanner glass. For help, see Loading a document on the scanner glass.
- Press Mode until the Copy light comes on.
- Press Menu.
The Copy menu appears.
- Press the down arrow to highlight Repeat Image, and press Select.
- Pressing the left or right arrow, select how many copied images you want on each page.
Choices are 1x, 4x, 9x, or 16x.
- Press Select to save the choice.
Using the computer
- Load the document face down on the scanner glass. For help, see Loading a document on the scanner glass.
- Open the Lexmark Imaging Studio. For help, see Using the Lexmark Imaging Studio.
- Click the Copy button.

The All-In-One Center appears with the Scanning & Copying section expanded.
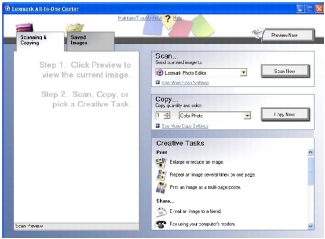
- Click Preview Now in the upper right corner of the All-In-One Center.
An image of the scanned item appears in the preview section.
- Click and drag the dotted line box to select a specific area of the preview image to copy.
- Select copy settings.
- Click Copy Now.