 Printing an index page
Printing selected photos
Printing all photos
Selecting special features from the control panel menu
Adjusting page preview before print
Using a PictBridge-enabled camera to control printing
To find out more information about the control panel button functions in Photo Card mode, see Using the control panel.
Printing an index page
- Load paper. For help, see Loading paper.
- Insert a memory card. For help, see Inserting memory cards.
The I Want To... menu appears.
- Press Menu.
The Photo Menu appears.
- Use the down arrow button to scroll to Print Index Page.
- Press Select.
If Preview before Print is on, a preview of the print job appears. Press Color or Black to print the photos.
If Preview before Print is off, the photos print immediately.
Note: To adjust the preview setting, see Adjusting page preview before print.
Printing selected photos
- Load photo paper. For help, see Loading paper.
- Insert a memory card. For help, see Inserting memory cards.
The I Want To... menu appears with View Photos or Print highlighted.
- Press Select.
- Press the left or right arrow to browse through the photos.
- Press Select to select the currently displayed photo.
- Press Stop/Clear to deselect the currently displayed photo.
- Press Stop/Clear twice, and then press Select, to deselect all selected photos.
- Press Color or Black.
If Preview before Print is on, a preview of the print job appears. Press Color or Black to print the photos.
If Preview before Print is off, the photos print immediately.
Note: To adjust the preview setting, see Adjusting page preview before print.
Printing all photos
- Load photo paper. For help, see Loading paper.
- Insert a memory card. For help, see Inserting memory cards.
The I Want To... menu appears.
- Press the down arrow to scroll to Print All X Photos, where X is the number of photos on the memory card.
- Press Select.
If Preview before Print is on, a preview of the print job appears. Press Color or Black to print the photos.
If Preview before Print is off, the photos print immediately.
Note: To adjust the preview setting, see Adjusting page preview before print.
Selecting special features from the control panel menu
Change the blank paper size
The default blank paper size is Letter or A4. Make sure you change the blank paper size for smaller prints, such as 4x6 photos.
- Press Mode until the Photo Card light comes on.
- Press Menu.
The Photo Menu opens with Blank Paper Size highlighted.
- Press the right or left arrow to scroll to the blank paper size for the photo or document.
- Press Select to accept the changes.
Change the photo size
- Insert a memory card. For help, see Inserting memory cards.
The I Want To... menu appears with View Photos or Print highlighted.
- Press Select.
- Press the right or left arrow to scroll to the photo you want to adjust.
- Press Resize until you find the photo size you want to use.
- Press Select to accept the changes.
Note: To see how the photo size you selected will look on the blank paper size you selected, press Page Preview.
Lighten or darken a photo
- Insert a memory card. For help, see Inserting memory cards.
The I Want To... menu appears with View Photos or Print highlighted.
- Press Select.
- Press the right or left arrow to scroll to the photo you want to adjust.
- Press Menu.
The Photo Menu appears.
- Press the down arrow to scroll to Brightness.
- Press Select.
- Press the left or right arrow to make the photo lighter or darker.
- Press Select to accept the changes.
Crop a photo
- Insert a memory card. For help, see Inserting memory cards.
The I Want To... menu appears with View Photos or Print highlighted.
- Press Select.
- Press the right or left arrow to scroll to the photo you want to adjust.
- Press Menu.
The Photo Menu appears.
- Press the down arrow to scroll to Crop.
- Press Select.
- Adjust the crop box over the photo.
- Press the arrows to move the crop box.
- Press Resize to change the size of the crop box.
- Press Rotate to rotate the crop box from portrait to landscape.
- Press Select to accept the changes.
Print a DPOF selection
The Digital Print Order Format (DPOF) is an option available on some digital cameras. If you take pictures with a camera that supports DPOF, you can specify which photos to print and the number of copies of each photo to be printed while the memory card is still in the camera.
- Load photo paper. For help, see Loading paper.
- Insert the memory card. For help, see Inserting memory cards.
The I Want To... menu appears.
- Press the down arrow button to scroll to Print DPOF Selection.
- Press Select.
If Preview before Print is on, a preview of the print job appears. Press Color or Black to print the photos.
If Preview before Print is off, the photos print immediately.
Note: To adjust the preview setting, see Adjusting page preview before print.
Viewing a slide show of photos on the control panel display
- Insert the memory card. For help, see Inserting memory cards.
The I Want To... menu appears.
- Press the down arrow to scroll to Slide Show.
- Press Select.
Note: Press Stop/Clear when you are finished viewing the slide show.
Adjusting page preview before print
- Press Mode until the Photo Card light comes on.
- Press Menu.
The Photo Menu appears.
- Press the down arrow to scroll to Preview before Print.
- Press the left or right arrow to scroll through the settings. Choices are On or Off.
- Press Select to save the choice.
Using a PictBridge-enabled camera to control printing
You can connect a PictBridge-enabled digital camera to the All-In-One, and use the buttons on the camera to select and print photos.
Connecting the All-In-One to a PictBridge-enabled camera
- Insert one end of the USB cable into the camera.
Note: Use only the USB cable that came with the camera.
- Insert the other end of the cable into the PictBridge port on the front of the All-In-One.
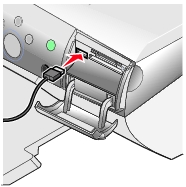
- See the instructions included with the camera for PictBridge connection and usage information.
Note: Make sure the PictBridge-enabled digital camera is set to the correct USB mode. See the camera documentation for more information.