 Scanning an item
Customizing a scan job
Use your All-In-One to perform basic or custom scan jobs.
Scanning an item
- Open the top cover of the All-In-One.
- Place the item you want to scan face down on the scanner glass. Make sure the upper left corner of the front of the item aligns with the arrow.
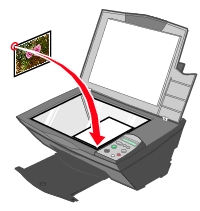
- Close the top cover.
- Open the All-In-One Main Page using any of these methods:
The last method not only starts the program, it also scans the item on the scanner glass.
- The All-In-One Main Page displays. From the Send scanned image to: drop-down menu, select a program.
- Customize your scan settings. See Customizing a scan job.
- Click Scan Now to complete your scan.
Customizing a scan job
- From the Scan section, click See More Scan Settings.
- Choose what is being scanned.
- Choose how the scan will be used.
- Click Display Advanced Scan Settings to change advanced options.
- Click the tabs to make any changes.
Note: When auto-cropping is selected, there is no additional white space around the border of the scanned image. The scanner only scans the object on the scanner glass.
|
Click this tab
|
To
|
|
Scan
|
- Choose the color depth and scan resolution.
- Choose whether to auto-crop more or less of the scanned image.
- Select the area to be scanned.
- Choose to convert your scanned item to text for editing.
- Choose to scan multiple images before output.
- Update the list of programs to send scans to.
- Update the default fax driver.
|
|
Image Enhancements
|
- Choose whether to sharpen or blur your images.
- Adjust the brightness of your image.
- Adjust the color correction curve (gamma) of your image.
|
|
Image Patterns
|
- Smooth the conversion of a gray image to a black and white dot pattern (dither).
- Remove image patterns from magazines or newspapers (descreen).
- Select whether to process with Best quality or Best speed.
- Reduce more or less of the background noise on your color document.
|
- When you are finished customizing your scan settings, click OK to save the changes, then click Scan Now.
Scanning photos
- Place your photo face down on the scanner glass. See Scanning an item.
- Double-click the Lexmark All-In-One Center icon on your desktop.
The All-In-One Main Page appears.
- Click Preview Now.
Note: Step 3 is unnecessary if you open the All-In-One Center by pressing the Scan button  on the All-In-One's control panel, since the preview takes place automatically.
- Adjust the dotted lines to fit around the portion of the image you want to scan.
- Select your scan destination from the drop-down box.
Note: If the program you want to use is not listed, select Search for more... in the drop-down box. On the screen that follows, click Add to locate and add your program to the list.
- Change any settings. See Customizing a scan job.
- When you are finished customizing your image, click Scan Now.
When your document has finished processing, it will open the program to which you chose to send the image.
E-mailing a scanned image or document
You can send scanned items to people through e-mail:
- Place the item face down on the scanner glass.
- Double-click the Lexmark All-In-One Center icon on your desktop.
The All-In-One Main Page appears.
- Click Preview Now.
- From the Creative Tasks area, click E-mail an image to a friend.
- From the What is being scanned? menu, make a selection.
- Follow the instructions on the screen to prepare the item for e-mail.
- Click Next.
- Write a note to accompany the attached item, and then send it.
Editing scanned text using Optical Character Recognition
- Double-click the Lexmark All-In-One Center icon on your desktop.
The All-In-One Main Page appears.
- From the Send scanned images to: drop-down menu, select a word processing or text-editing program.
- From the How will the scan be used? drop-down menu, select To edit text (OCR and 300 DPI).
- Click Scan Now.
The scanned text appears on your screen.
 Programs