From the control panel, you can perform many tasks using the standalone capabilities of the All-In-One. The control panel has three menus:
Navigate these menus from the control panel. The illustration and table below explain the control panel buttons and their functions.
| Note: | The menus and settings shown on the control panel display are available in various languages. To choose your preferred language, see Choosing a language setting for the control panel display. |
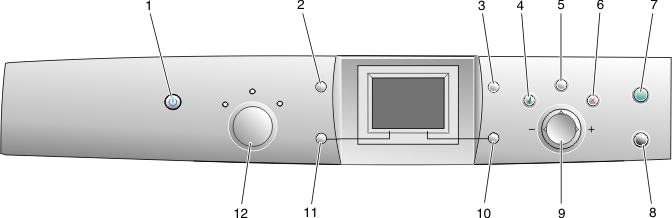
1 Power Turn the All-In-One on or off. Pressing the Power button also stops the print, scan, or copy process. 2 Rotate Rotate the image on the control panel display 90 degrees. 3 Page Preview Preview an image before it is printed, scanned, or copied. Multiple previews can be made before scanning. In Photo mode, you can preview multiple pages. Use the arrow buttons to scroll through the images. 4 Select 5 Menu 6 Stop/Clear Press Stop/Clear twice to: 7 Color Start a color copy, scan, or photo print job, depending on which mode is selected. In order for a photo print job to start, a memory card must be inserted, or a digital camera must be connected to the All-In-One. If there is DPOF information on the inserted memory card, the entire list of photos specified on the order form is printed. 8 Black Start a black-and-white copy, scan, or photo print job, depending on which mode is selected. In order for a photo print job to start, a photo card must be inserted, or a digital camera must be connected to the All-In-One. If there is DPOF information on the inserted memory card, the entire list of photos specified on the order form is printed. 9 Up arrow Right arrow (+) Down arrow Left arrow (-) 10 Resize In Copy mode, enlarge or reduce an image. In Photo mode: 11 Number of Copies Increase the copy count in Copy and Photo modes. 12 Mode Select Copy, Scan, or Photo mode.
50%100%200%Custom%Fit to Page2x2 Poster3x3 Poster4x4 Poster2 1/4x3 1/2 in.3x5 in.3 1/2x5 in.4x6 in.5x7 in.8x10 in.8 1/2x11 in.8 1/2x14 in.A6A5B5A4L2LHagaki6x8 cm.10x15 cm.13X18 cm.
Note:
This button does not function in Scan mode.
Note:
The current selection is indicated by one of the three indicator lights.
Navigating the menus on the control panel