 Printing your photos with a computer
Finding your photos
Printing an index of photos
Printing photos from a memory card
Viewing a slide show of memory card photos
Printing borderless photos
Saving memory card photos to your computer
Resizing a photo
Cropping photos with a computer
Cropping photos without a computer
Editing photos with a computer
Sharing photos
Printing a poster
Sending a fax
Adding text captions under your photos
Printing a DPOF selection
Printing your photos with a computer
- Open the Lexmark Imaging Studio. For help, see Working with the Lexmark Imaging Studio.
- Click the Print Album Page button.

- Click Show Folders.
- Select the folder where your photos are stored.
- Select a paper size for your photos.
- Select a page layout from the Create a page from saved photos section.
- Click Change the category of layouts listed above to select picture package layouts, scrapbook page layouts, borderless layouts, greeting card layouts, or purchased template layouts.
- To add text to your page layout, select a layout with a black box shown. Click inside the black box to add text. A dialog box opens. Enter your text.
- Drag your photos onto the page.
- Click Print Now to print your photos.
Note: To prevent smudging, remove each photo as it exits and let it dry completely before stacking.
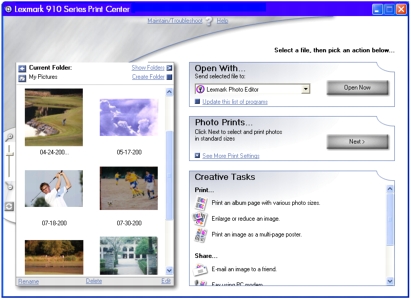
Finding your photos
On your computer
- Open the Lexmark Imaging Studio. For help, see Working with the Lexmark Imaging Studio.
- Click the Browse & Edit Photos button.

The Lexmark Print Center appears.
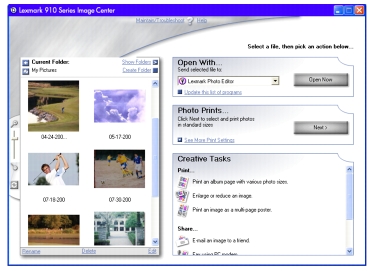
- Click Show Folders.
- Select the folder where your photos are stored.
On your camera's memory card
|
With a computer
|
Without a computer
|
- Load paper. See Loading paper.
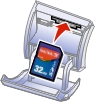
- Insert a memory card. See Matching your card to the printer.
Note: Do not remove the digital camera memory card while the light is blinking.
The Lexmark Fast Pics appears on your computer screen.
- From here you can:
For help, see Learning about Lexmark Fast Pics.
|
- Load paper. See Loading paper.
- Insert a memory card. See Matching your card to the printer.
Note: Do not remove the digital camera memory card while the light is blinking.
The I Want To menu appears with View Photos or Print highlighted.
- Press Select.
- Use the left and right arrows on the toggle button to view your photos.

|
|
Printing an index of photos
An index of photos shows thumbnails of all of the photos stored on your memory card.
- Load paper. See See Loading paper..
- Insert a memory card. See Matching your card to the printer.
The I Want To menu appears.
- Press the Menu button.
- Scroll using the down arrow on the toggle button until Print Index Page is highlighted on the display.
- Press Select to print the index page.
Printing photos from a memory card
Printing selected photos
|
With a computer
|
Without a computer
|
- Load paper. For help, see Loading paper.
- Insert a memory card. For help, see Matching your card to the printer.
The Lexmark Fast Pics dialog box appears.
- Click Print Them.
The Lexmark Fast Pics main page appears.
- Select the photos that you want to print by clicking the box next to the photo.
- You can reduce or enlarge the thumbnails using the control bar near the bottom of the screen. Changing thumbnail sizes will not change the size of the printed images.

- Specify the print size for each photo, the paper size in the printer, and the number of prints.
- Click Print Now.
|
- Load paper. For help, see Loading paper.
- Insert a memory card. For help, see Matching your card to the printer.
The I Want To menu appears on the printer's display, with View Photos or Print highlighted.
- Press Select.
The first photo on the card is displayed.
- Press Select to include it for printing.
- Move to the next photo using the right arrow on the toggle button.
- Continue selecting photos you want.
To unselect a previously selected photo, press Stop/Clear.
The size that the photo will print is shown in the bottom right corner of the display. To change the size:
- When you finish browsing, press Start to print your selected photos.
|
|
|
|
|
|
Printing all photos
|
With a computer
|
Without a computer
|
- Load paper. See Loading paper.
- Insert a memory card. For help, see Matching your card to the printer.
The Lexmark Fast Pics dialog box appears.
- Click Print Them.
The Lexmark Fast Pics main page appears.
- Click the Select all files button.
- Specify the size for each photo, the paper size in the printer, and the number of prints.
- Click Print Now.
|
- Load paper. See Loading paper.
- Insert a memory card. For help, see Matching your card to the printer.
The I Want To menu appears.
- Scroll to Print All Photos and press Select.
|
|
Viewing a slide show of memory card photos
- Insert a memory card. For help, see Matching your card to the printer.
The I Want To menu appears on the printer's display.
- Use the up and down arrow buttons to scroll to Slide Show.
- Press Select.
If the memory card was already inserted, press Menu until the Photo Card Menu appears. Scroll to Slide Show and press Select.
Note: To stop a slide show, press Stop/Clear.
Printing borderless photos

- Load paper. For best results, load photo paper into the paper support. For help, see Loading paper.
- Open the Lexmark Imaging Studio. For help, see Working with the Lexmark Imaging Studio.
- Click the Browse & Edit Photos button.
- From the Creative Tasks section, select Print an album page with various photo sizes.
- Click Change the category of layouts listed above.
- Select Only Borderless from the Selected Layouts dialog box.
- Click OK.
- Select a paper size for your photos.
- Select a page layout from the Create a page from saved photos section.
- Drag your photos onto the page.
- Click Print Now.
Saving memory card photos to your computer
Once photos are stored on the computer, you can delete them from the memory card. This creates space on the card so you can reuse it.
Note: Make sure your printer is connected to a computer.
|
Using your computer's software
|
Using your printer's control panel
|
- Insert a memory card. For help, see Matching your card to the printer.
- Use the Lexmark Fast Pics to save your photos. For help, see Learning about Lexmark Fast Pics.
|
- Insert a memory card. For help, see Matching your card to the printer.
The I Want To menu appears on the printer's display.
- Use the down arrow buttons to scroll to Save to Computer.
- Press Select.
- If the memory card was already inserted, press Menu until the Photo Card Menu appears.
- Scroll to Save to Computer and press Select.
|
|
|
Resizing a photo
Resizing a photo already on your computer
- Open the Lexmark Imaging Studio. For help, see Working with the Lexmark Imaging Studio.
- Click the Browse & Edit Photos button.
- Verify the previewed image is the one you want to print. If it is not, click Saved Images to find the photo, then click the image to select it.
- Click the method you want to use for resizing:
Note: If you want to print a borderless photo, click Fill selected size completely.
Click Printer Settings if you want to change the print quality.
- Click Print Now.
Resizing a photo on your memory card
|
With a computer
|
Without a computer
|
- Insert a memory card. For help, see Matching your card to the printer.
- Click Start
 Programs Lexmark P910 Series Lexmark Imaging Studio. Programs Lexmark P910 Series Lexmark Imaging Studio.
- Click the Browse & Edit Photos button.
The Lexmark Print Center displays.
- Click Show Folders.
- Locate your memory card drive, click the + symbol beside it to expand the folder, and click the folder to display your photos.
- Click Hide Folders, then click once on the photo you want to resize.
- From the Creative Tasks menu, click Enlarge or reduce an image.
- Click the method you want to use for resizing:
If you want to print a borderless photo, click Fill selected size completely. Click Printer Settings if you want to change the print quality.
- Click Print Now.
|
- Insert a memory card. For help, see Matching your card to the printer.
The I Want To menu appears with View Photos or Print highlighted.
- Press Select.
- Use the left and right arrows on the toggle button to browse your photos.
- When the photo you want to resize appears, press Select.
The size of the photo is shown in the lower right corner of the display.
- To change the size, press Resize.
- Use the left or right arrow buttons to change sizes.
- When the size you want is displayed, press Select.
- Press Start to print your photo.
|
|
Cropping photos with a computer
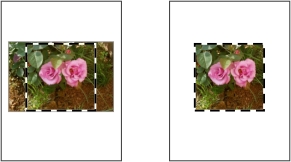
- Open the Lexmark Imaging Studio. For help, see Working with the Lexmark Imaging Studio.
- Click the Browse & Edit Photos button.
- Double-click one of the photo thumbnails.
Note: If your photos are not displayed, click Show Folders to locate them.
The photo opens in the Lexmark Photo Editor.
- Using the arrow pointer, draw a rectangle around the area you want to keep.
Move your cursor to the frame of the editing window, and then click and drag the frame to resize it.
- Click the scissors or crop tool to crop the image.
- Verify the crop is to your satisfaction, then click OK.
- Save your changes.
- Click File Save As.
Note: If you click File Save, the changes you made overwrite your original photo.
- Enter a file name and a file type, and then click Save.
- Select your Quality Options.
- Click OK.
- Click File Print Properties or Preferences.
- From the Paper Setup tab, select a paper size.
- Click OK.
- Click Print.
Cropping photos without a computer
- Insert a memory card. For help, see Matching your card to the printer.
The I Want To menu appears.
- Press Menu.
- Use the down arrow on the toggle button until Crop is highlighted, then press Select.
- Press Resize to select a magnification.
- Use the arrow buttons to position to select the cropping area, then press Select.
- Press Start to print the cropped photo.
Note: This cropping method prints the image as selected, but does not save the changes to the memory card.
Editing photos with a computer
- Open the Lexmark Imaging Studio. For help, see Working with the Lexmark Imaging Studio.
- Click the Browse & Edit Photos button.
- Double-click one of the photo thumbnails in the Preview section of the window.
Note: If your photos are not displayed, click Show Folders to locate them.
- The photo opens in the Lexmark Photo Editor.
Note: You can edit only one photo at a time.
- Edit your photo with the tools available.
- Save your changes.
- Click File Save As.
Note: If you click File Save, the changes you made overwrite your original photo.
- Enter a file name and a file type, and then click Save.
Sharing photos
Note: Make sure your printer is connected to a computer.
- Open the Lexmark Imaging Studio. For help, see Working with the Lexmark Imaging Studio.
- Click the Share Photos button.

- Select the image or images to send, then click Attach Now.
Your computer launches your e-mail program and opens a new message, then attaches your photos to the message.
- Click Send to e-mail your photos.
Note: Some e-mail providers only allow you to attach one photo per e-mail.
Note: For faster sending, reduce the image dimensions before you send them.
Printing a poster
Note: Make sure your printer is connected to a computer.
- Open the Lexmark Imaging Studio. For help, see Working with the Lexmark Imaging Studio.
- Click the Print Photos button.

- If the previewed image is not the one you want to print, click Show Folders to find the photo, then click the image to select it.
- From the Creative Tasks menu, click Print an image as a multi-page poster.
- Rotate the photo if necessary.
- Select your poster size:
- Select the size of your poster: 2 x 2 (four pages total), 3 x 3 (nine pages total), or 4 x 4 (16 pages total).
- Select Print Crop Marks if you want help cutting the edges of your pages.
- Click Print Now.
Sending a fax
You can fax a photograph using your computer's modem:
Note: You cannot fax using a broadband cable connection.
- Open the Lexmark Imaging Studio. For help, see Working with the Lexmark Imaging Studio.
- Click the Browse & Edit Photos button.

The Lexmark Print Center opens.
- From the Creative Tasks menu, click Fax using PC modem.
- Select the photo you want to fax from the left side of the screen, then click Next.
Note: If your photo is not displayed, click Show Folders to locate them.
- Follow the instructions on the computer screen.
Adding text captions under your photos
- Open Lexmark Imaging Studio. For help, see Working with the Lexmark Imaging Studio.
- Click the Browse & Edit Photos button.
- From the Creative Tasks section, select Print an album page with various photo sizes.
- Click Change the category of layouts listed above.
- Select Only Scrapbook Pages from the Selected Layouts dialog box, then click OK.
- Select a paper size for your photos.
- Select a page layout from the Create a page from saved photos section, and drag your photos onto the page.
- Click inside the black box. A dialog box opens.
- Enter your text and click Print Now.
Printing a DPOF selection
The Digital Print Order Format (DPOF) is an option available on some digital cameras. If you take pictures with a camera that supports DPOF, you can specify which photos to print and the number of copies of each photo to be printed while the memory card is still in the camera.
- Insert a memory card. For help, see Matching your card to the printer.
The I Want To menu appears.
- Press Menu twice on the control panel to return to the default Photo Card Menu screen.
- Scroll to Print DPOF Selection.
- Press Select.
- Press Start.