Using the control panel
 Working with the Lexmark Imaging Studio
Learning about Lexmark Fast Pics
Using the Lexmark Solution Center
|
|
Use |
To |
|---|---|---|
|
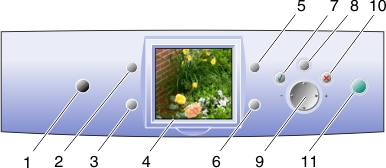
1 |
Power |
Turn the printer on and off. |
|
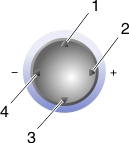
2 |
Rotate |
Change the orientation of your photo. |
|
3 |
Number of Prints |
Change the number of copies you want to print. |
|
4 |
Display |
View photos stored on a memory card. |
|
5 |
Print Preview |
See how your photos will print on the page. |
|
6 |
Resize |
Change the size of your photo. |
|
7 |
Select |
Choose a displayed photo for printing. |
|
8 |
Menu |
Select paper size, print quality, and print color. |
|
9 |
Toggle |
Browse photos and choose menu options using the left, right, up, and down arrows. For more information, see Using the arrows on the Toggle button. |
|
10 |
Stop/Clear |
Cancel a print job before it begins printing. |
|
11 |
Start |
Begin printing your photos. |
The Lexmark Imaging Studio is a software program that lets you:
Use one of these methods to start the Lexmark Imaging Studio:
 Programs Lexmark P910 Series Lexmark Imaging Studio
The Lexmark Imaging Studio appears on your desktop.

|
Click |
To |
Details |
|---|---|---|
|
|
Print photos
|
Print common photo sizes from saved images on your computer. See Resizing a photo. |
|
|
Share photos |
E-mail a saved image from your computer. See Sharing photos. |
|
|
Use memory card photos |
Save or print photos from your installed photo memory card. See Printing photos from a memory card. |
|
|
Print an album page |
Print an album page with various photo sizes. See Printing your photos with a computer. |
|
|
Browse and edit your photos |
View saved photos on your computer. See Finding your photos. |
|
|
Enlarge/Reduce
|
Make your photos larger or smaller for printing. |
|
Click |
To |
|
|---|---|---|
|
|
Visit the Lexmark Web site. |
|
|
|
Find out more about what you can do with the software. |
|
|
|
Use tools in the Lexmark Solution Center to keep your printer working optimally. See Using the Lexmark Solution Center. |
|
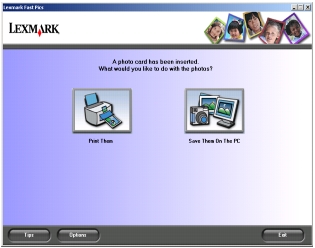
Lexmark Fast Pics is part of the Lexmark Imaging Studio. It gives you several options for printing and transferring photos from your memory card.
Note: To use Lexmark Fast Pics, your printer must be connected to a computer.
Lexmark Fast Pics appears.
Note: If your digital camera does not support DPOF printing (see Printing a DPOF selection), the DPOF button will not be displayed.
From here you can:
The following dialog box appears.
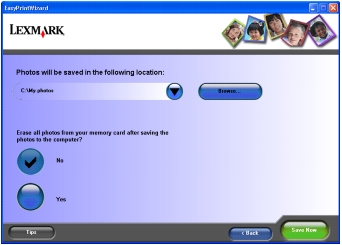
Note: Do not select Yes unless you want to delete the photos from the memory card permanently.
The Lexmark Solution Center (LSC) is a valuable information resource.
To open the LSC:
The LSC appears.

The LSC consists of six tabs: Printer Status, How To, Troubleshooting, Maintenance, Contact Information, and Advanced.
|
From this tab |
You can |
|---|---|
|
Printer Status (Main dialog box) |
|
|
How To |
Learn how to: |
|
Troubleshooting |
|
|
Maintenance |
|
|
Contact Information |
|
|
Advanced |
Note: For more information, click Help at the bottom of the screen.
Your printer has a paper type sensor that detects these media types:
By default, the paper type sensor is on. However, if you want to turn the paper type sensor off and select your paper type:
Print.
The Print dialog box appears.
Note: Your printer can detect the type of paper you are using. It cannot detect the paper size.
Print.
The Print dialog box appears.
Note: For more information, click Help at the bottom of the screen.
Print Properties is the software that controls the printing function. You can change the settings in Print Properties based on the type of project you want to create. You can open Print Properties from most programs:
Print.
The Print Properties screen displays along with the I Want To menu.

Changes made to the settings apply only to the file you have open.
Print Properties can also be accessed from the Printers folder without opening any other program:
Settings Printers.
Changes made to the printer settings from the Printers folder become the default settings for most programs.
The I Want To menu displays when you open Print Properties. It contains a variety of task wizards-printing a banner, printing a poster, printing an envelope, printing on both sides of the paper- to help you select the correct print settings for your project. Close the menu for a full view of the Print Properties dialog box.
All of the print settings are on the three main tabs of the Print Properties software: Quality/Copies, Paper Setup, and Print Layout.
Note: For additional information about these settings, right-click a setting on the screen, and then select the What's This? item.
From the Save Settings menu, you can name and save the current Print Properties settings for future use. You can save up to five custom settings.
Use the Options menu to make changes to the Quality Options, Layout Options, and Printing Status Options settings. For more information on these settings, open the tab dialog box from the menu, and then click the Help button on the dialog box, if the button is available.