Printer configurations
 CAUTION—TIPPING HAZARD:
 Installing one or more options on your printer or MFP may require a caster base, furniture, or other feature to prevent instability causing possible injury. For more information on supported configurations, see
www.lexmark.com/multifunctionprinters.
 CAUTION—TIPPING HAZARD:
 To reduce the risk of equipment instability, load each tray separately. Keep all other trays closed until needed.
You can configure your printer by adding optional 250-, 550-, or 2100-sheet trays. For more information, see Installing the 550-sheet tray or Installing the 2100-sheet tray.
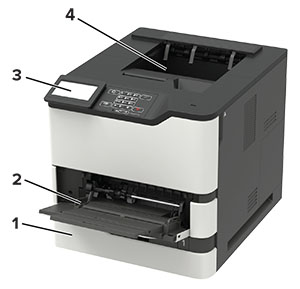
Basic model
1 | Standard 550-sheet tray |
2 | Multipurpose feeder |
3 | Control panel Note: The appearance may vary depending on your printer model. |
4 | Standard bin |
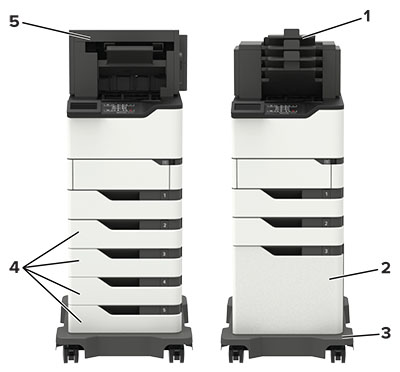
Fully-configured model
1 | 4-bin mailbox | |
2 | Optional 2100-sheet tray | None |
3 | Caster base | None |
4 | Optional 550-sheet tray | Optional 250-sheet tray |
5 | Staple, hole punch finisher | Output expander High-capacity output 4-bin mailbox Staple finisher
|
The staple, hole punch finisher must not be combined with any other output options.
In a configuration with two or more optional finishers:
The staple finisher must always be on top.
The high-capacity output expander must always be at the bottom.
The output expander is the only option that can be placed on top of the high-capacity output expander.
The output expander and mailbox may be installed in any order.
When using optional trays:
Always use a caster base when the printer is configured with a 2100-sheet tray.
The 2100-sheet tray must always be at the bottom of a configuration.
A maximum of four optional trays may be configured with the printer.
The optional 250- and 550-sheet trays may be installed in any order.
 CAUTION—TIPPING HAZARD: Installing one or more options on your printer or MFP may require a caster base, furniture, or other feature to prevent instability causing possible injury. For more information on supported configurations, see www.lexmark.com/multifunctionprinters.
