Installing and updating software, drivers, and firmware

Installing the printer software

Notes:

  1. Obtain a copy of the software installer package.

  2. Run the installer, and then follow the instructions on the computer screen.

Adding printers to a computer

Before you begin, do one of the following:

For Windows users
  1. Install the print driver on the computer.

    Note:  For more information, see Installing the printer software .
  2. Open Printers & scanners , and then click Add a printer or scanner .

  3. Depending on your printer connection, do one of the following:

    • Select a printer from the list, and then click Add device .

    • Click Show Wi-Fi Direct printers , select a printer, and then click Add device .

    • Click The printer that I want isn’t listed , and then from the Add Printer window, do the following:

      1. Select Add a printer using an IP address or hostname , and then click Next .

      2. In the Device type field, select TCP/IP Device .

      3. In the Hostname or IP address field, type the printer IP address, and then click Next .

        Notes:

        • View the printer IP address on the printer home screen. The IP address appears as four sets of numbers separated by periods, such as 123.123.123.123.
        • If you are using a proxy server, then temporarily disable it to load the web page correctly.
      4. Select a print driver, and then click Next .

      5. Select Use the driver that is currently installed (recommended) , and then click Next .

      6. Type a printer name, and then click Next .

      7. Click Finish .

For Macintosh users
  1. Open Printers & Scanners .

  2. Click Add Printer, Scanner, or Fax , and then select a printer.

  3. From the Add Printer menu, select a print driver.

    Notes:

    • To use the Macintosh print driver, select either AirPrint or Secure AirPrint .
    • If you want custom printing features, then select the Lexmark print driver. To install the driver, see Installing the printer software .
  4. Add the printer.

Exporting a configuration file

  1. Open a web browser, and then type the printer IP address in the address field.

    Notes:

    • View the printer IP address on the printer home screen. The IP address appears as four sets of numbers separated by periods, such as 123.123.123.123.
    • If you are using a proxy server, then temporarily disable it to load the web page correctly.
  2. From the Embedded Web Server, click Export Configuration .

  3. Select a configuration to export.

  4. Note:  Depending on the configuration that you selected, the files are either exported in a ZIP or CSV format.

Importing a configuration file

  1. Open a web browser, and then type the printer IP address in the address field.

    Notes:

    • View the printer IP address on the printer home screen. The IP address appears as four sets of numbers separated by periods, such as 123.123.123.123.
    • If you are using a proxy server, then temporarily disable it to load the web page correctly.
  2. From the Embedded Web Server, click Import Configuration .

  3. Browse to the location that the file is saved.

    Note:  The files are either saved in a ZIP or CSV format.
  4. Click Import .

Adding available options in the print driver

For Windows users

  1. Open the printers folder.

  2. Select the printer that you want to update, and then do either of the following:

    • For Windows 7 or later, select Printer properties .

    • For earlier versions, select Properties .

  3. Navigate to the Configuration tab, and then select Update Now - Ask Printer .

  4. Apply the changes.

For Macintosh users

  1. Open Printers & Scanners .

  2. Click Add Printer, Scanner, or Fax , and then select a printer.

  3. Choose a print driver.

  4. Apply the changes.

Updating firmware

Updating the firmware using the control panel

Using the notification center

This method is applicable only in some printer models.

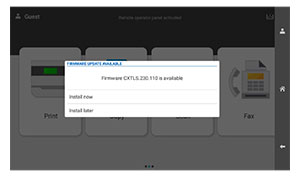
  1. From the control panel, navigate to the notification center, and then select Firmware update available .

    The notification center is at the top of the control panel.
  2. Select Install now .

    A dialog appears on the display about the available firmware update.

The printer reboots automatically after the update.

Using the Settings menu
  1. From the control panel, navigate to Settings > Device > Update Firmware .

  2. Depending on your printer model, select Check for updates or Check for updates now .

  3. If a new update is available, then select Install now .

The printer reboots automatically after the update.

Updating the firmware using the Embedded Web Server

Before you begin, make sure that:

Warning—Potential Damage:  Make sure that all printers receiving firmware updates are turned on during the entire firmware update process. Turning off a printer during a firmware update can severely damage it.

If the printer is connected to the network when checking for updates, then downloading the firmware is not required.

  1. Open a web browser, and then type the printer IP address in the address field.

    Notes:

    • View the printer IP address on the printer home screen. The IP address appears as four sets of numbers separated by periods, such as 123.123.123.123.
    • If you are using a proxy server, then temporarily disable it to load the web page correctly.
  2. Click Device .

  3. Scroll down, and then click Update Firmware .

  4. Depending on your printer model, click Check for updates or Check for updates now .

    If a new update is available, then click I agree, start update .

The printer reboots automatically after the update.