Managing printer servicing

Managing policies

A policy lets you specify how ticket creation and e-mail notifications are handled for various printer-related conditions and tasks. These events fall into three categories: service, maintenance, and supplies.

A master policy covers all printers and groups of printers, and can be customized as needed. You can also create a custom policy for a printer or group, overriding the policy of any parent groups that the printer or group belongs to.

Understanding policies

There are three types of policy events:

The following table shows the policies for each policy event:

Service

Maintenance

Supplies

  • Cover Open

  • Door Open

  • Device Down

  • Input Tray Empty

  • Input Tray Missing

  • Device Jammed

  • Marker Supply Missing

  • Device Offline

  • Output Full

  • Output Near Full

  • Output Tray Missing

  • Overdue Maintenance

  • Service Requested

  • Clean Device

  • Replace Fuser

  • Replace Maintenance Kit

  • Replace Device

  • Replace Toner

  • Maintenance Kit Level Alert

  • Paper Low

  • Paper Out

  • Photo Conductor Level Alert

  • Toner Level Alert

  • Toner Low

  • Toner Out

  • Toner Replaced Level Alert

  • Waste Toner Box Level Alert

  • Waste Toner Full Alert

  • Waste Toner Nearly Full Alert


You can configure what happens when each policy event is triggered using the following:

When Fleet Tracker receives a new data rollup, printer conditions such as changes in usage or status trigger policy events. The policy event is triggered the first time the condition is detected and is not retriggered until the condition is resolved. So if the condition persists for subsequent rollups, then no new e-mail notifications or tickets are generated until the condition is reset and occurs again.

The following flowchart illustrates the life cycle of a printer condition as it applies to policy events (maintenance events not included):

 A workflow showing policy events

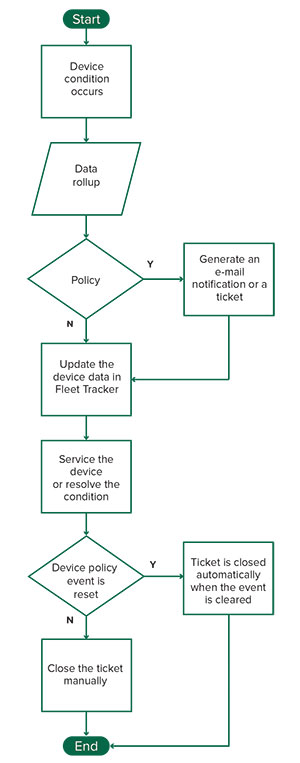
You can trigger policies either by date or by rollup. Scheduled maintenance policies occur at the specified date. Rollups trigger all other policies. After the data from a rollup is saved, all newly discovered printers are evaluated to see if any policy conditions are met. Tickets and e-mails are generated as indicated by the printer policies. If a ticket or e-mail is generated, an internal flag is set to avoid duplicate tickets and e-mails.

Creating a group policy

  1. From the Fleet Tracker web portal, click Manage > Fleet > Policies.

  2. Select a client or group. For more information, see Selecting a client or group.

  3. Click Create Policy.

  4. Customize the policy for the appropriate service, maintenance, and supply events.

  5. If necessary, from the Maintenance tab, create a custom activity type.

  6. Click Ok.

Creating a printer policy

  1. From the Fleet Tracker web portal, click Manage > Fleet > Devices.

  2. Click a printer name.

  3. Click Policy > Create Policy.

  4. Configure the policy for the appropriate service, maintenance, and supply events.

  5. Click Ok.

Editing a policy

  1. From the Fleet Tracker web portal, click Manage > Fleet > Policies.

  2. If necessary, select a client or group. For more information, see Selecting a client or group.

    Note: The policy events are organized according to their types in the Service, Maintenance, or Supplies tabs.
  3. Click the policy name, and then configure the settings.

  4. Click Ok.

Managing the ticket life cycle

Tickets are generated automatically when a policy event is created. The open tickets are closed automatically when a policy event is cleared.

Notes:

Creating a ticket manually

Note: You can create tickets manually for only one printer at a time.
  1. From the Fleet Tracker web portal, click Manage > Fleet > Devices.

  2. Click a printer name.

  3. Click Ticket > Create Ticket, and then enter the appropriate information.

  4. Click Submit.

Editing a ticket

  1. From the Fleet Tracker web portal, click Manage > Fleet > Tickets.

  2. If necessary, select a client or group. For more information, see Selecting a client or group.

  3. If necessary, click a printer name.

  4. Click a ticket.

  5. Configure the settings.

  6. Click Submit.

Configuring the ticket life cycle

For Service and Supplies policy events, and for manually created tickets, you can send an e-mail notification when the ticket is created or closed.

Configuring the life cycle of tickets in Policies
  1. From the Fleet Tracker web portal, click Manage > Fleet > Policies.

  2. Select a group, and then click a policy.

  3. Click a Service or Supplies event.

  4. From the Ticket tab, select Manage Tickets for [x] events, and then configure the settings.

  5. Select Send E-mail on ticket creation or Send E-mail on ticket closure.

  6. From the Notification tab, select the users and when to notify them.

  7. Click Ok.

Configuring the life cycle of manually created tickets
  1. From the Fleet Tracker web portal, click Manage > Fleet > Devices.

  2. Select a group, and then click a printer name.

  3. From the Ticket tab, click a ticket, and then configure the settings.

  4. From the Technician Visits section, configure the settings.

  5. Click Submit.

  6. Note: For more information on manually creating tickets, see Creating a ticket manually.

No e-mail notifications are sent in the following cases: