Managing the Lexmark Distributed Intelligent Capture system
To perform system tasks, such as creating reports on the overall performance of the system, setting servers offline, changing the administrative user name and password, or viewing the overall job schedule, use the System tab in Lexmark Management Console.
Viewing and changing server status
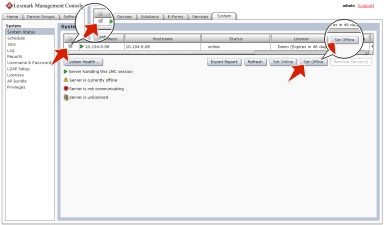
To view server status, click the System tab, and then select System Status from the System list.
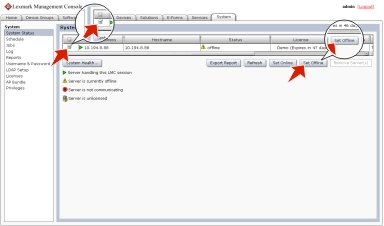
A table is displayed with information about each server in the system. The Status column indicates whether the server is online, offline, or has a communication problem. A yellow exclamation mark icon appears beside the status when the server is offline, and a red X icon appears to indicate a communication problem.
| Note: Multiple non-communicating servers may impact system performance. If you do not expect a non-communicating server to quickly reestablish communication, you should remove it. |
The server on which the current LMC session is running is indicated by a green arrow beside the Server Address.
You can perform the following tasks:
To change the online status of a server, select the check box of a server from the table, and then click Set Online or Set Offline.
To export all system status information and component version information, click Export Report.
To remove a server that is not communicating, select the check box beside it in the table, and then click Remove Server(s). If the server later reestablishes communication, it automatically reappears in the server list.
Viewing and managing scheduled tasks
To access a list of all scheduled discovery, policy update, and script tasks for all device groups and software client groups, select Schedule from the System list on the System tab.
From this list, you can perform the following actions:
Add a new task—Click Add.
Edit an existing task—Select the existing scheduled task you want to edit, and then click Edit.
| Note: You cannot change the task type for an existing task. |
Delete an existing task—Select the existing scheduled task you want to delete, and then click Delete.
Do the following when adding or editing a task:
If you are adding a new task, then select a task to schedule.
Edit the description of the task, and then click Next.
Configure the task:
If you are adding or editing a discovery or policy update task, then select the device groups for which the task is performed, and then click Next.
If you are adding or editing a script task, then do the following:
Select whether to associate the scheduled script with a device group or software client group to access the local solution settings of that group:
To associate the script with a device group, click DeviceGroup, and then click Next.
To associate the script with a software client group, click SftClientGroup, and then click Next.
To schedule the script without associating it with a device group or software client group, click None, and then click Next.
Select the device group or software client group for which the task is performed, and then click Next.
| Note: You can select only one device group or software client group for a script task. |
Select the solution that contains the script you want to run.
Select the script to run, and then click Next.
If you are adding or editing a discovery or policy update task, then select the device groups for which the task is performed, and then click Next.
If you are adding or editing a report task, then select and configure the report to run, and then click Next.
If you are adding or editing a backup and restore task, then type the backup share path and the credentials required to access the specified share, and then click Next.
If you are adding or editing a directory watcher task, then do the following:
Type the directory path and the credentials required to access the specified share.
| Note: You cannot configure another directory watcher task to an existing task with the same directory path and regular expression. |
Type the regular expression and the batch size.
A regular expression is a set of characters that specify a pattern. This helps you specify the type of files the system will process each time the task is run. A batch size is the number of files the system will process each time the task is run.
Click Test Settings to check the directory settings.
Select the solution that contains the script you want to run.
| Note: Make sure that at least one solution is configured in the scheduled script task. |
Select the script to run, and then click Next.
Configure the date, time, and frequency information for the task.
Click Finish.
Configuring the confirmation page
When a job is completed, a confirmation is automatically delivered through a printout or e-mail message unless it is disabled within a particular solution. These settings determine the type of confirmation, how it appears, and, if it is an e-mail message, to whom it is sent.
Click the Services tab.
Select Confirm from the Services list.
Select Parameters from the Tasks list.
Select the lowest level of messages to include in confirmations:
debug—This includes detailed messages used to diagnose problems, as well as other lower message levels than this level.
info—This includes messages that indicate successful job activities, as well as other lower message levels than this level.
warn—This includes messages that indicate potential problems, as well as other lower message levels than this level.
error—This includes messages that indicate unsuccessful job activities, as well as other lower message levels than this level.
fatal—This includes only messages that indicate complete failure of jobs.
Select a task from the “Task used to deliver confirmation page” list:
confirm.printPS—This prints a confirmation page in PostScript format.
confirm.printPDF—This prints a confirmation page in PDF format.
confirm.emailAdmin—This sends a message to the administrator e-mail address with a PDF confirmation page attached.
confirm.emailAdminTextOnly—This sends a message containing the confirmation information to the administrator e-mail address with no attachments.
| Note: The e-mail service must be correctly configured to use confirm.emailAdmin or confirm.emailAdminTextOnly. |
If you are using e-mail confirmations, then type the address where e-mail confirmations are sent in the “Admin email address” field.
Type a page title to appear on the confirmation page or message.
Edit the remaining parameters to determine the font settings for the title and page text.
Click Apply.
Adding servers to the system after initial installation
New servers may be added to an existing system to increase capacity, or servers may be replaced without reinstalling other components. When a new server is installed on a system that already has solutions, the solutions and all associated settings are added to the new server. However, any third-party services used with existing solutions must be installed manually. If the new server is left without the same services as existing servers, any jobs that use the solution that is missing services on the new server will fail.
Add the computer where the server will be installed on the network, and make sure the time is synchronized using an NTP server.
Install the server. For more information, see Installing servers.
Install any third-party services required by existing solutions on the new server.
From the System tab in LMC, set the new server online. For more information, see Viewing and changing server status.
Changing the IP address on a configuration 1 system
If an incorrect IP address or fully qualified domain name is used when installing a configuration 1 system, or the IP address of the computer on which the components of a configuration 1 system are installed changes for any reason, then the IP address of the components can be changed without reinstallation.
From the command line on the computer where all components are installed, navigate to the Lexmark\Solutions\InstallHelper folder in the location where the components are installed. (The default is C:\Program Files\Lexmark\Solutions\InstallHelper.)
Type update-addr.bat -hostname to use the fully qualified domain name of the local computer, and then press Enter
or
Type update-addr.bat -ip to use the IP address of the local computer, and then press Enter.
The desktop shortcut must be changed to the new address manually:
On the desktop of the computer where the components are installed, right click the Lexmark Management Console (LMC) icon, and then click Properties.
Click Find Target.
In the folder that appears, right click the shortcut lmc, and then click Properties.
Change the IP address or host name part of the URL to the new IP address or host name of the local computer. The complete URL should be http://hostname:9780/lmc/, where hostname is the host name or IP address of the computer where the components are installed.
Rebooting the Lexmark Distributed Intelligent Capture system
Click the System tab.
Set all servers offline. For more information, see Viewing and changing server status.
Shut down all server computers, load balancer computers, and database computers.
Boot the database computers, load balancer computers, and server computers.
| Note: You can boot the server components in any order. |
From the System tab in LMC, set all servers online. For more information, see Viewing and changing server status.
| Note: It may take several minutes to start all services when the Lexmark Distributed Intelligent Capture system is first booted. If LMC cannot be accessed immediately after booting the system, then wait a few minutes, and then try again. |
Restarting the Lexmark Solutions Application Server
If you install a workflow solution that includes a component, then you may need to restart the Lexmark Solutions Application Server for the solution to fully function.
Before restarting the Lexmark Solutions Application Server, set the server offline on the System tab in LMC. Make sure the server is offline before proceeding. Click Refresh, and then make sure offline is reported in the Status column for the server.
You can restart the Lexmark Solutions Application Server from the Windows Services control panel.
| Note: When you restart the Lexmark Solutions Application Server service, any solution-related file in the \Lexmark\Solutions\apps\wf-ldss\ or \Lexmark\Solutions\apps\wf-ldss\solutions folders, such as a property file for a solution, is reverted to the version stored with the solution package as it was initially installed or upgraded, and any manual changes are lost. |
Uninstalling Lexmark Distributed Intelligent Capture components
Click the System tab.
Set all servers offline. For more information, see Viewing and changing server status.
Notes:
- Make sure all servers are offline before proceeding. Click Refresh, and then make sure offline is reported in the Status column for each server.
- Any jobs running or queued on a server must be completed before the server goes offline.
- If a server does not change from the status setting offline after all jobs have been completed, restart the server computer, and then make sure the status of the server is offline.
If the database or load balancer is installed on a failover cluster, then do the following:
On the primary node in each cluster, close all unnecessary applications, and make sure no applications are using the shared drive where Lexmark Distributed Intelligent Capture components are installed.
In the Cluster Administrator, move all cluster resources to the primary node where the system components are originally installed.
Stop the cluster service on standby nodes.
Wait for confirmation from the Cluster Administrator that the standby nodes are disabled before continuing the upgrade.
From the computer where the component(s) are installed, do the following:
Click Start.
Click Programs or All Programs.
Click Lexmark > Solutions Software Uninstall.
| Note: If a database or load balancer is installed on a failover cluster, then use the node where the component is originally installed. |
Select the components to uninstall, and then click Finish.
Allow the process to complete, and then click Done.
Updating the Advanced Prompting Bundle
The Advanced Prompting Bundle (AP Bundle) is an eSF application that LDIC installs on e-Task 2, e-Task 2+, e-Task 3, and e-Task 4 multifunction and single-function printers, and X642 printers. This application is required for LDIC support and provides prompting capabilities, held jobs support, and security support for printers with LDIC.
Click the System tab > AP Bundle.
Beside AP Bundle Application File, click Browse, and then locate the file ap-x.x.x.x.fls.
Beside AP Bundle Descriptor File, click Browse, and then locate the file ap-x.x.x.x_desc.xml.
Notes:
- The descriptor file is required in order to update the AP Bundle.
- You can change the default settings of the AP Bundle application on e-Task 2+ printers by editing the value attributes of the property elements in the descriptor file. Adding or removing settings in the descriptor file does not affect the application.
Click Upload.
During the next policy update, LDIC updates the AP Bundle application on printers where it has not been installed or when an older version is installed.
| Note: If a printer already has a newer version of the AP Bundle application installed, then the version specified for the update is not installed. |
Managing the e-mail watcher service
The e-mail watcher service lets you capture and process digital documents from the Lexmark Distributed Intelligent Capture profile. This service checks an e-mail account for any incoming e-mails, including attachments. You need to configure the e-mail watcher configuration files to set the parameters.
The following folders are located within the EmailWatcher folder where the Lexmark Distributed Intelligent Capture load balancer is installed:
lib—This contains JAR files, including third-party and Lexmark Distributed Intelligent Capture e-mail watcher JAR files.
| Note: Make sure not to make any changes in this folder. |
conf—This folder contains two files: config_EmailWatcher.properties and l4j_EmailWatcher.xml.
logs—All logs related to the e-mail watcher are saved in this folder.
Configuring e-mail watcher
Notes:
- Only one e-mail address at a time can be configured to be read by the e-mail watcher service.
- Make sure there are no spaces between the parameter values.
From the conf folder, open config_EmailWatcher.properties in a text editor, and then modify the following:
ldd.server—This is the IP address of the load balancer where the solution is deployed. This IP address can have a port or domain name.
ldd.profile —This is the name of the profile which will be invoked when an e-mail is received.
mail.type—This is the e-mail protocol used to read the mailbox. Supported values are POP3 and IMAP.
| Note: E-mail servers which support POP3 or IMAP, and are within the same firewall can be configured in the e-mail watcher service. |
mail.server—This is the e-mail server address.
mail.user—This is the user ID used to log in to the mail server.
mail.pw—This is the password used to log in to the mail server.
mail.port—This is the port used to read the mail from the mail server. If no port is provided, then the default and standard port is used based on the e-mail protocol and SSL usage.
mail.ssl—If the mail server requires SSL authentication, then set the value to 1. Otherwise, set it 0. The default value is 0.
mail.folder —This is the name of the mailbox folder from which all e-mails received will be read. The default folder name is INBOX.
mail.allowIdle—If you want the mail server to support IMAP IDLE, then set this value to 1. Otherwise, leave it blank.
From the conf folder, open l4j_EmailWatcher.xml in a text editor, and then do the following:
Type the file location of the log folder. This is the log folder in the EmailWatcher folder.
Type the log priority. The default and suggested value is fatal.
Save your changes.
| Note: If there are new changes made to the config_EmailWatcher.properties and l4j_EmailWatcher.xml, then you need to restart the Lexmark E-mail Watcher service from the Windows Services control panel. |
Make sure to add the IP address of the load balancer in LMC. From the Software Client Groups tab in LMC, select a software client group, then click Client Profiles, and then add the IP address.