Installing an enterprise system
An enterprise system is used for Document Producer installations.
Configuration types for enterprise systems
When installing an enterprise system, Lexmark Distributed Intelligent Capture can be installed using the following hardware configurations:
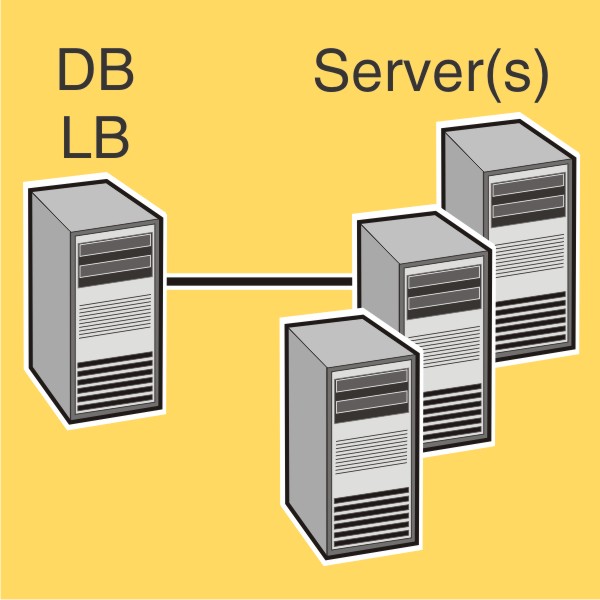
1-N | Database (DB) and load balancer (LB) on one computer, server on one or more additional computers (most common setup when failover is not used) | Improved performance | Increased hardware needs, no failover for database or load balancer |
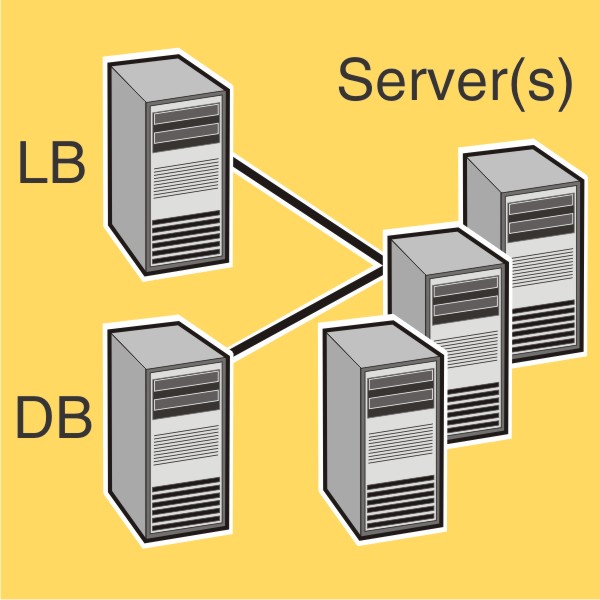
1-1-N | Database (DB) and load balancer (LB) on separate computers, server on one or more additional computers Note: An external Oracle database may be installed in place of the standard database, resulting in an E-1-N configuration. The external database (E) and load balancer (LB) are on separate computers, and the server is on one or more additional computers. | Further improved performance | Further increased hardware needs, no failover for database or load balancer |
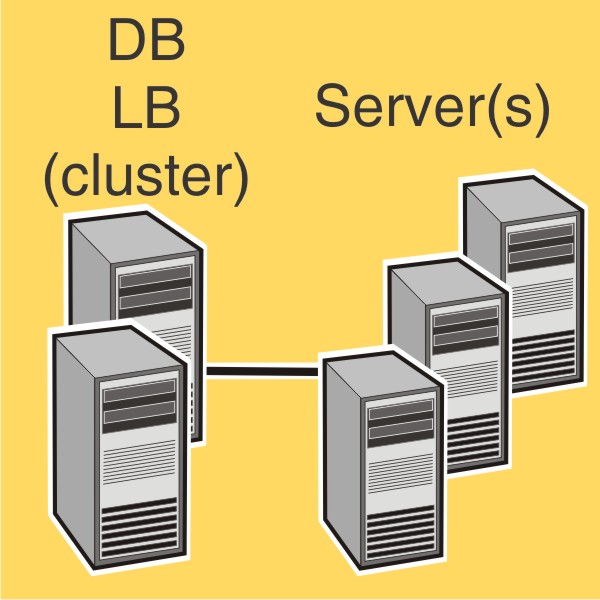
X-N | Database (DB) and load balancer (LB) together on X computers in a Microsoft Cluster Server for failover, server on one or more additional computers (most common setup when using failover) | High availability, improved performance | Increased hardware needs, cluster licensing |
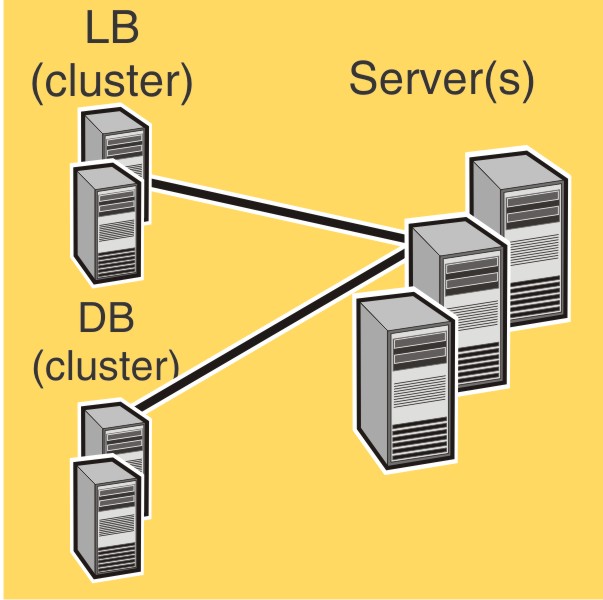
X-Y-N | Database (DB) on X computers in a Microsoft Cluster Server for failover, load balancer (LB) on Y other computers in a Microsoft Cluster Server for failover, server on one or more additional computers Note: An external Oracle database may be installed in place of the standard database, resulting in an E-Y-N configuration. The external database (E) on X computers and the load balancer (LB) on Y other computers are in a Microsoft Cluster Server for failover. The server is on one or more additional computers. | High availability, further improved performance | Further increased hardware needs, cluster licensing |
Using multiple systems for high availability
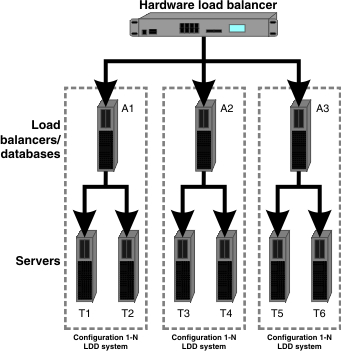
When configuring multiple Lexmark Distributed Intelligent Capture systems, you can connect them to a hardware load balancer or Global Site Selector (GSS) to provide high availability, without using clustering, as well as increased capacity.
Each system group contains two identical Lexmark Distributed Intelligent Capture systems. Jobs are balanced between these systems in each group by the hardware load balancer or GSS. If a failure occurs in one system in a group, then the other system in the group receives all incoming jobs until the failed system can be restored.
With this type of setup, you need additional computers, as well as a hardware load balancer or GSS. You also need to manually configure these systems to be identical.
| Note: Printers that do not support eSF applications cannot be used with a Lexmark Distributed Intelligent Capture system that uses a hardware load balancer or GSS. |
When a hardware load balancer is used with multiple Lexmark Distributed Intelligent Capture systems, the hardware load balancer must be configured as follows:
The X-Forwarded-For HTTP header must be inserted into incoming packets.
The packets going into the Lexmark Distributed Intelligent Capture systems from the HW LB should not appear to be from the hardware load balancer of the packet headers so that device or clients groups and their settings will work properly.
Cookie-based session persistence must be disabled.
This is needed in case one of the Lexmark Distributed Intelligent Capture systems is down. If this is enabled, then LMC may not work properly when one of the Lexmark Distributed Intelligent Capture systems is down.
The load balancing algorithm should be set to Round Robin.
Based on tests made on hardware balancing algorithms, Lexmark Distributed Intelligent Capture systems work better with round robin than the other algorithms.
Installation overview for an enterprise system
Select a system configuration, and then configure the appropriate hardware on the network.
Make sure the time on all computers used in the Lexmark Distributed Intelligent Capture system is synchronized using a Network Time Protocol (NTP) server.
Install the system components.
| Note: If you are installing Lexmark Distributed Intelligent Capture using the default database (Firebird), then the system components can be installed in any order. However, if you are using Oracle database, then see Using Oracle database with Lexmark Distributed Intelligent Capture before installing Lexmark Distributed Intelligent Capture. |
Install the database.
Activate and download licenses on the computer where the load balancer will be installed.
Install the load balancer.
If you are using one or more Microsoft Cluster Servers, then extend the database and load balancer to standby nodes.
Install servers.
| Note: Multiple servers should not be installed at the same time. Let each server installation complete before beginning another server installation. |
Change the administrator password. You can also change the administrator user name.
Temporarily set servers online to test function.
Notes:
- The database requires the most system resources and disk I/O, and therefore should be installed on the fastest hardware with the fastest disk I/O infrastructure available. Second in resource usage are the servers.
- Lexmark Distributed Intelligent Capture components can be installed on virtual servers using VMware ESX 3.0.1 or later. However, the best performance can be achieved only by using separate physical servers.
System sizing guidelines
There are two main factors for determining the number of servers required to process jobs efficiently:
Peak demand—This is usually the deciding factor when the average execution time for a solution is under 30 seconds.
Concurrency—This is usually the deciding factor when the average execution time for a solution is over 30 seconds.
Additionally, the database, when installed on the recommended hardware and connected using Gigabit Ethernet, can process 200,000 logged messages per hour, which is approximately 40,000 jobs per hour when using a typical solution (five logged messages per job). If this limit is reached, then it may be necessary to use multiple systems.
Peak demand
Use the following formulas to determine the number of servers necessary to handle peak loads for a particular solution:
(System-wide hourly job rate) = (system printer capacity) x (jobs per printer per day) / (length of business day)
(Peak demand) = 2 x (system-wide hourly job rate)
(Minimum number of servers) = (peak demand) / (single-server throughput for current solution)
Consider the following example:
Each server in your system can process 3000 jobs per hour using the solution.
There is capacity for 300 printers in your system.
Each printer in your system averages 100 jobs per day.
Perform the following calculations:
Determine the system-wide hourly job rate:
(300 printers) x (100 daily jobs/printer) / (8 hours/day) = 3750 jobs/hour
Determine the peak demand:
2 x (3750 jobs/hour) = 7500 jobs/hour
Determine the minimum number of servers:
(7500 jobs/hour) / (3000 jobs/hour) = 2.5
Rounding up, the system should include three servers to reliably handle the peak load for a solution with average execution time below 30 seconds.
The single-server throughput for a solution must be determined by the solution developer, though the following typical throughputs on a server with the recommended hardware may help determine a rough estimate:
Typical | Some image processing Printing
| 6000–8000 jobs per hour |
Heavy | | 2000–3000 jobs per hour |
Very heavy (OCR) | | 100–200 jobs per hour |
| Note: Using less than the recommended RAM significantly reduces throughput. For example, a dual-processor server with only 2GB of RAM can process only 600–800 jobs/hour when using a “heavy” solution. |
For more information, see the Lexmark Document Distributor SDK Guide.
Concurrency
Each server that meets recommended requirements can process 30 concurrent jobs from clients. The following formula determines the number of servers necessary to meet concurrency requirements:
(minimum number of servers) = (number of printers expected to submit jobs near the same time) / 30
For example, assume that 1/3 of the 300 printers in the last example might be active at the same time:
100 / 30 = 3.33
Rounding up, the system should include four servers to allow for 100 active printers for a solution with average execution time below 30 seconds.
Using Oracle database with Lexmark Distributed Intelligent Capture
If you are using Oracle as the back-end database, then make sure:
The Oracle database 10g or later is completely installed before proceeding with the Lexmark Distributed Intelligent Capture installation.
Lexmark Distributed Intelligent Capture system components are not installed on the server running Oracle.
The internal Lexmark Distributed Intelligent Capture database is not installed.
For Lexmark Distributed Intelligent Capture to work with Oracle, six databases should be created before the load balancer and server are installed. To help the database administrator create these databases, Lexmark Distributed Intelligent Capture includes the following in the installation package:
Database templates—These are Database Configuration Assistant (DBCA) templates used to create databases. Your database administrator can launch these templates through DBCA, and then configure parameter settings as needed.
Scripts—These are user configuration scripts for adding users. Users are added to access and manage Lexmark Distributed Intelligent Capture databases.
Pfiles—These files contain information about the database configuration parameters. The values of database configuration parameters may vary, except the parameter value for nls_timestamp_format and nls_timestamp_tz_format of the MONITOR database.
These parameters should have the following values:
nls_timestamp_format string YYYY-MM-DD HH24:MI:SS:FF3
nls_timestamp_tz_format string YYYY-MM-DD HH24:MI:SS:FF3
| Note: Make sure to follow the correct time-stamp format when configuring time-stamp parameters. |
Installing the database and load balancer without clustering (configurations 1, 1-N, and 1-1-N)
Installing the database
| Note: If you are installing an Oracle database, then do not install the default database. |
Do the following on the computer that will run the database:
From the installation package, run Setup.exe.
From the Lexmark Solutions installation window, click Install Enterprise System > Install Database.
Click Agree to accept the license agreement.
If necessary, specify a location for the installation, and then click Next.
| Note: The installation path cannot contain double-byte characters. |
Select the IP address of the computer that will run the database.
If you want to use only IP addresses for a system without reliable DNS, then select IP address only install, and then click Next.
If you are installing a system to recover a backup, then do the following:
Select Restore Install (RI).
Type the path of the folder containing the .ri file from the backup, or click the folder icon, and then locate the .ri file.
Click Finish.
Allow the installation to complete, and then click Done.
Installing the load balancer
Do the following on the computer that will run the load balancer:
If the Lexmark Solutions installation window is not open, then run Setup.exe from the installation package.
From the Lexmark Solutions installation window, click Install Enterprise System > Install Load Balancer.
Click Agree to accept the license agreement.
If necessary, specify a location for the installation, and then click Next.
| Note: The installation path cannot contain double-byte characters. |
Select the IP address of the computer that will run the load balancer.
If you want to use only IP addresses for a system without reliable DNS, then select IP address only install, and then click Next.
Type the fully qualified domain name or IP address of the computer where the database is installed.
Notes:
- If you are installing the load balancer on the same computer as the database, then you must still use the fully qualified domain name or IP address of the computer on the network. Do not use localhost or the loopback IP address (127.0.0.1) for the location of the database.
- When installing any configuration other than configuration 1, the location of the database can be set most conveniently during installation. If the database is moved, or the IP address of the database changes for any other reason, then you must uninstall, and then reinstall the load balancer. For more information about changing the IP address of a Configuration 1 system, see Changing the IP address on a configuration 1 system.
Select the type of database, and then click Next.
| Note: If you are using an Oracle database, then make sure the database is already installed before proceeding with the installation. |
Specify the folder that contains your license files, and then click Next.
Notes:
- If the license files are located on a network share that requires authentication, then you must supply authentication before specifying the license location. To authenticate with the remote server, click Start > Run, type the Uniform Naming Convention (UNC) path to the share (for example, \\myserver\myshare\), and then type the user name and password when prompted.
- During installation, the license files are copied to the program folder. You can safely move the license files from the temporary location where you saved them.
If you are installing a system to recover a backup, then do the following:
Select Restore Install (RI).
Type the path of the folder containing the .ri file from the backup, or click the folder icon and then locate the .ri file.
Click Finish.
Allow the installation to complete, and then click Done.
Installing the database and load balancer with clustering (configurations X-N, and X-Y-N)
Notes:
- Before installing Lexmark Distributed Intelligent Capture, set up the failover clusters using Microsoft Windows Server Clustering Services.
- Make sure to set up all firewall exceptions on all physical and logical nodes in the cluster before installing Lexmark Distributed Intelligent Capture.
Setting up firewall exceptions on a Windows Server 2008 cluster node
Create a temporary directory.
From the install\Cluster_Config_Script of the Lexmark Distributed Intelligent Capture installation package, copy all the batch files (2008-cluster-*.bat) to the temporary directory.
Open a command prompt window as an administrator.
Click Start > All Programs > Accessories.
Right-click Command prompt, and then click Run as administrator.
If the User Account Control dialog appears, then confirm that you want to start the command prompt as an administrator, and then click Continue.
From the command prompt window, change the current directory to the temporary directory you created.
Run the batch files (2008-cluster-*.bat) by typing the batch file name and then pressing Enter.
| Note: If you are using an Oracle database for Lexmark Distributed Intelligent Capture, then do not run the Lexmark Distributed Intelligent Capture DB firewall batch file (2008-cluster-firewall-config-DB.bat). |
Installing the database
If you are installing the Lexmark Distributed Intelligent Capture database on a Microsoft server cluster, then install the Microsoft C++ 2005 Redistributable package on all physical nodes or servers in the cluster. If these files are not installed, then the Lexmark Distributed Intelligent Capture database cluster resource will not initiate failover to the cluster node where Lexmark Distributed Intelligent Capture is not installed.
Depending on the operating system installed on the cluster node (x86 or x64), run the Microsoft C++ 2005 Redistributable package, found in the packages folder of the Lexmark Distributed Intelligent Capture installation package (vcredist_x86*.exe or vcredist_x64*.exe).
| Note: If you are using an Oracle database, then do not install the Lexmark Distributed Intelligent Capture database. |
Do the following on the primary node of the failover cluster that will run the database:
From the Lexmark Distributed Intelligent Capture installation package, run Setup.exe.
From the Lexmark Solutions installation window, click Install Enterprise System > Install Database.
Click Agree to accept the license agreement.
Specify a location on a shared cluster disk for the installation, and then click Next.
| Note: The installation path cannot contain double-byte characters. |
Select the IP address or host name of the logical host of the cluster.
If you want to use only IP addresses for a system without reliable DNS, then select IP address only install, and then click Next.
If you are installing a system to recover a backup, then do the following:
Select Restore Install (RI).
Type the path of the folder containing the .ri file from the backup, or click the folder icon and then locate the .ri file.
Click Finish.
Allow the installation to complete, and then click Done.
Installing the load balancer
Do the following on the primary node of the failover cluster that will run the load balancer:
If the Lexmark Solutions installation window is not open, then run Setup.exe from the Lexmark Distributed Intelligent Capture installation package.
From the Lexmark Solutions installation window, click Install Enterprise System > Install Load Balancer.
Click Agree to accept the license agreement.
If necessary, specify a location on a shared cluster disk for the installation, and then click Next.
| Note: The installation path cannot contain double-byte characters. |
Select the IP address or host name of the logical host of the cluster.
If you want to use only IP addresses for a system without reliable DNS, then select IP address only install, and then click Next.
Type the fully qualified domain name or IP address of the logical host where the database is installed.
Notes:
- If you are installing the load balancer on the same computer as the database, then you must still use the fully qualified domain name or IP address of the logical host on the network. Do not use localhost or the loopback IP address (127.0.0.1) for the location of the database.
- For installation on a cluster, the location of the database can be set most conveniently during installation. If the database is moved, then you must uninstall, and then reinstall the load balancer, or contact Lexmark Professional Services to assist in modifying your current installation.
Select the type of database, and then click Next.
| Note: If you are using an Oracle database, then make sure that the database is already installed before proceeding with the installation. |
Specify the folder that contains your Lexmark Distributed Intelligent Capture license files, and then click Next.
Notes:
- If the license files are located on a network share that requires authentication, then you must supply authentication before specifying the license location. To authenticate with the remote server, click Start > Run, type the UNC path to the share (for example, \\myserver\myshare\), and then type the user name and password when prompted.
- For cluster installation, the folder must contain the license files for all of the cluster nodes with their appropriate network card MAC addresses.
- During installation, the license files are copied to the program folder. You can safely move the license files from the temporary location where you saved them.
If you are installing a system to recover a backup, then do the following:
Select Restore Install (RI).
Type the path of the folder containing the .ri file from the backup, or click the folder icon and then locate the .ri file.
Click Finish.
Allow the installation to complete, and then click Done.
Extending the database and load balancer to standby nodes
Do the following on the primary node of each failover cluster:
Run the Lexmark Solutions Cluster Configuration script:
In Windows Server 2003
From the install\Cluster_Config_Script folder of the Lexmark Distributed Intelligent Capture installation package, run the LexmarkSolutionsClusterConfigScript.vbs script.
In Windows Server 2008
Create a temporary directory.
From the install\Cluster_Config_Script of the Lexmark Distributed Intelligent Capture installation package, copy LexmarkSolutionsClusterConfigScript.vbs to the temporary directory.
Open a command prompt window as an administrator.
Click Start > All Programs > Accessories.
Right-click Command prompt, and then click Run as administrator.
If the User Account Control dialog appears, then confirm that you want to start the command prompt as an administrator, and then click Continue.
From the command prompt window, change the current directory to the temporary directory you created.
Run the VBScript file by typing cscript LexmarkSolutionsClusterConfigScript.vbs and then pressing Enter.
Click Yes to begin the installation.
Enter a number to select a resource group as shown in the dialog, and then click OK.
Enter a number to select an IP address for the logical host as shown in the dialog, and then click OK.
Allow the installation to complete, and then click OK.
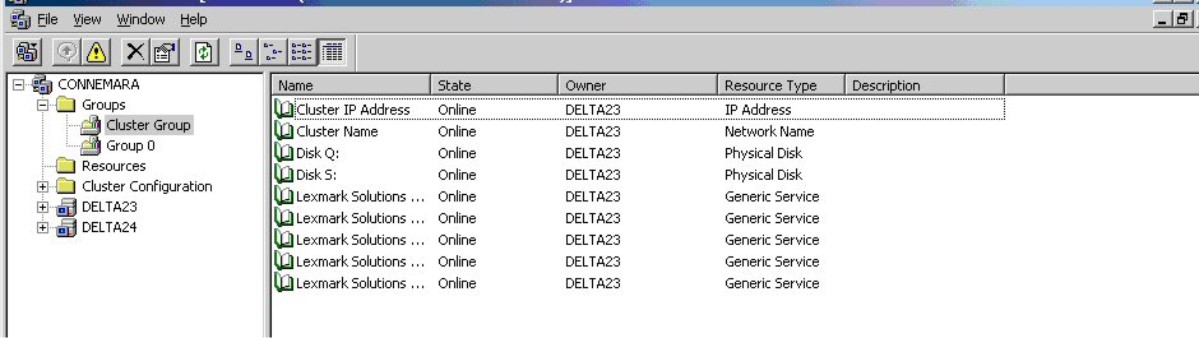
The configured cluster contains the necessary Lexmark services.
Installing servers
| Note: Multiple servers should not be installed at the same time. Complete each server installation before beginning another one. |
Do the following on each computer that will run a server:
If the Lexmark Solutions installation window is not open, then run Setup.exe from the installation package.
From the Lexmark Solutions installation window, click Install Enterprise System > Install Server.
Click Agree to accept the license agreement.
If necessary, specify a location for the installation, and then click Next.
If the computer contains multiple network adapters, then select the IP address to bind to the installed server.
If you want to use only IP addresses for a system without reliable DNS, then select IP address only install, and then click Next.
Type the fully qualified domain name or IP address of the computer or cluster logical host where the database is installed.
Notes:
- If you are installing the server on the same computer as the database and/or the load balancer, then you must still use the fully qualified domain name or IP address of the computer on the network. Do not use localhost or the loopback IP address (127.0.0.1) for the location of the database or load balancer.
- If you are using DNS aliases for connection to a backup system during a recovery, then use the DNS aliases of the database and load balancer.
Select the type of database, and then click Next.
| Note: If you are using an Oracle database, then make sure that the database is already installed before proceeding with the installation. |
Select the Same as Database check box if the load balancer is installed on the same computer as the database, or type the fully qualified domain name or IP address of the computer or cluster logical host where the load balancer is installed.
Notes:
- If you want to type the fully qualified domain name or IP address of the computer or cluster logical host, then clear the Same as Database check box.
- When installing any configuration other than configuration 1, the location of the database and load balancer can be set most conveniently during installation. If the database or load balancer is moved, or the IP address of the database or load balancer changes for any other reason, then you must uninstall and then reinstall the load balancer. For more information about changing the IP address of a Configuration 1 system, see Changing the IP address on a configuration 1 system.
If you want to set the Globe Site Selector (GSS) IP address, then do the following:
Click Advanced.
Type the GSS IP address, and then click OK.
| Note: You can type a GSS IP address only if all the printers in the system are e -Task 2 or later. GSS is not supported in e -Task and earlier printers. |
Click Finish.
Allow the installation to complete, and then click Done.
After all servers are installed, log on to LMC, then change the administrator password, and then set the servers online.