Managing the Lexmark Distributed Intelligent Capture system
To perform system tasks, such as creating reports on the overall performance of the system, setting servers offline, changing the administrative user name and password, or viewing the overall job schedule, use the System tab in Lexmark Management Console.
Viewing and changing server status
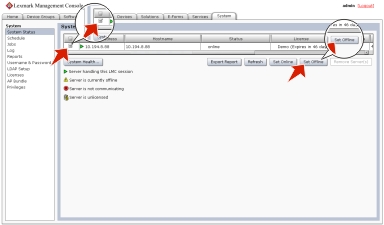
To view server status, click the System tab, and then select System Status from the System list.
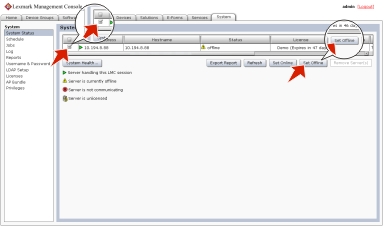
A table is displayed with information about each server in the system. The Status column indicates whether the server is online, offline, or has a communication problem. A yellow exclamation mark icon appears beside the status when the server is offline, and a red X icon appears to indicate a communication problem.
| Note: Multiple non-communicating servers may impact system performance. If you do not expect a non-communicating server to quickly reestablish communication, then you should remove it. |
The server where the current LMC session is running is indicated by a green arrow beside the Server Address.
You can perform the following tasks:
To change the online status of a server, select the check box of a server from the table, and then click Set Online or Set Offline.
To export all system status information and component version information, click Export Report.
To remove a server that is not communicating, select the check box beside it in the table, and then click Remove Server(s). If the server later reestablishes communication, then it automatically reappears in the server list.
Adding servers to the system after initial installation
New servers may be added to an existing system to increase capacity, or servers may be replaced without reinstalling other components. When a new server is installed on a system that already has solutions, the solutions and all associated settings are added to the new server. However, any third-party services used with existing solutions must be installed manually. If the new server is left without the same services as existing servers, any jobs that use the solution that is missing services on the new server will fail.
Add the computer where the server will be installed on the network, and make sure the time is synchronized using an NTP server.
Install the server. For more information, see Installing servers.
Install any third-party services required by existing solutions on the new server.
From the System tab in LMC, set the new server online. For more information, see Viewing and changing server status.
Changing the IP address on a configuration 1 system
If an incorrect IP address or fully qualified domain name is used when installing a configuration 1 system, or the IP address of the computer on which the components of a configuration 1 system are installed changes for any reason, then the IP address of the components can be changed without reinstallation.
From the command line on the computer where all components are installed, navigate to the Lexmark\Solutions\InstallHelper folder in the location where the components are installed. (The default is C:\Program Files\Lexmark\Solutions\InstallHelper.)
Type update-addr.bat -hostname to use the fully qualified domain name of the local computer, and then press Enter
or
Type update-addr.bat -ip to use the IP address of the local computer, and then press Enter.
The desktop shortcut must be changed to the new address manually:
On the desktop of the computer where the components are installed, right click the Lexmark Management Console (LMC) icon, and then click Properties.
Click Find Target.
In the folder that appears, right click the shortcut lmc, and then click Properties.
Change the IP address or host name part of the URL to the new IP address or host name of the local computer. The complete URL should be http://hostname:9780/lmc/, where hostname is the host name or IP address of the computer where the components are installed.
Rebooting the Lexmark Distributed Intelligent Capture system
Click the System tab.
Set all servers offline. For more information, see Viewing and changing server status.
Shut down all server computers, load balancer computers, and database computers.
Boot the database computers, load balancer computers, and server computers.
| Note: You can boot the server components in any order. |
From the System tab in LMC, set all servers online. For more information, see Viewing and changing server status.
| Note: It may take several minutes to start all services when the Lexmark Distributed Intelligent Capture system is first booted. If LMC cannot be accessed immediately after booting the system, then wait a few minutes, and then try again. |
Restarting the Lexmark Solutions Application Server
If you install a workflow solution that includes a component, then you may need to restart the Lexmark Solutions Application Server for the solution to fully function.
Before restarting the Lexmark Solutions Application Server, set the server offline on the System tab in LMC. Make sure the server is offline before proceeding. Click Refresh, and then make sure offline is reported in the Status column for the server.
You can restart the Lexmark Solutions Application Server from the Windows Services control panel.
| Note: When you restart the Lexmark Solutions Application Server service, any solution-related file in the \Lexmark\Solutions\apps\wf-ldss\ or \Lexmark\Solutions\apps\wf-ldss\solutions folders, such as a property file for a solution, is reverted to the version stored with the solution package as it was initially installed or upgraded, and any manual changes are lost. |
Uninstalling Lexmark Distributed Intelligent Capture components
Click the System tab.
Set all servers offline. For more information, see Viewing and changing server status.
Notes:
- Make sure all servers are offline before proceeding. Click Refresh, and then make sure offline is reported in the Status column for each server.
- Any jobs running or queued on a server must be completed before the server goes offline.
- If a server does not change from the status setting offline after all jobs have been completed, restart the server computer, and then make sure the status of the server is offline.
If the database or load balancer is installed on a failover cluster, then do the following:
On the primary node in each cluster, close all unnecessary applications, and make sure no applications are using the shared drive where Lexmark Distributed Intelligent Capture components are installed.
In the Cluster Administrator, move all cluster resources to the primary node where the system components are originally installed.
Stop the cluster service on standby nodes.
Wait for confirmation from the Cluster Administrator that the standby nodes are disabled before continuing the upgrade.
From the computer where the component(s) are installed, do the following:
Click Start.
Click Programs or All Programs.
Click Lexmark > Solutions Software Uninstall.
| Note: If a database or load balancer is installed on a failover cluster, then use the node where the component is originally installed. |
Select the components to uninstall, and then click Finish.
Allow the process to complete, and then click Done.
Configuring connection to an SMTP server
Click the Services tab.
Select Email from the Services list.
Select Parameters from the Tasks list.
Type the password and user ID used to log on to your SMTP server.
Type the e-mail server connection timeout in seconds. The default is 60.
Type the e-mail server host name or IP address.
Enter the e-mail server I/O timeout in seconds.
Click Apply.