 Using a PictBridge-enabled camera to control printing
Using the control panel when printing from a camera
Using a PictBridge-enabled camera to control printing
You can connect a PictBridge-enabled digital camera to the All-In-One and use the buttons on the camera to select and print your photos. Refer to the instructions included with your camera for PictBridge use information. You can also use the control panel on your All-In-One to select the default values for the paper size, photo size, and quality that are used when the camera does not make or permit selection.
Note: Make sure the PictBridge-enabled digital camera is set to the correct USB mode. Refer to the camera documentation for USB instructions.
Connecting your PictBridge Camera to the All-In-One
- Be sure to press the POWER button on the control panel so the All-In-One is on.
- Load paper if necessary. For more information, see Loading paper into the paper support.
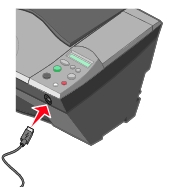
- Insert one end of the PictBridge cable into the camera.
Note: Use only the USB cable that came with your camera.
- Insert the other end of the cable into the PictBridge port on the front of the All-In-One.
After inserting the cable, you will see a message that your camera is enabled. When a PictBridge camera is connected and the camera connected message is displayed, printing of photos is controlled by the camera until the camera is unplugged or turned off.
Note: Follow the instructions that came with your camera to understand your options for printing from the camera.
Using the control panel when printing from a camera
You should observe the control panel for information when printing without a computer. To find more information about the general control panel button functions, see Learning about the control panel. However, remember that the PictBridge menus differ from the standard menus.
PictBridge messages on the All-In-One control panel
The following messages may appear on the control panel when you are using a PictBridge-enabled camera:
- If your camera is not supported, an error message appears on the All-In-One control panel.
- If your camera is recognized, the message PictBridge camera detected. Press -> to change settings. appears on the All-In-One control panel. There will also be an alignment message.
This message is the starting point for printing with the camera.
- If the camera is disconnected, the message Ready to Copy will appear on the All-In-One control panel, indicating that the All-In-One has returned to normal mode.
- If your camera is recognized and an invalid button is pressed on the control panel, the message Button Not Available appears on the All-In-One control panel.
- If you press any of the following buttons, when using a PictBridge camera:


the message Unplug camera to use other features appears on the All-In-One control panel, and then the message PictBridge camera detected. Camera control enabled. You cannot perform scan or copy functions with the PictBridge camera attached.


- You use this button to browse the menus on the control panel and to accept a choice from the menu options:
- This button also acts as a paper feed.
- This button will also launch the PictBridge camera detected. Camera control enabled. Use -> to change default settings. message.
Note: You can also do this from your camera.
- If you press any key while the message: PictBridge Camera Connected. Press -> to change default settings. is displayed, the control panel will enter the PictBridge settings menu.
For more information, see PictBridge menus and options for printing from the control panel
PictBridge menus and options for printing from the control panel
You may want to change some of your print settings but your camera does not have that functionality. You can do so by using the options on the All-In-One control panel.

- You use this button to browse the menus on the control panel and to accept a choice from the menu options:

|
Option
|
Name and Dimensions
|
|
Paper Size
|
Paper Size defines the size of the sheet of paper the All-In-One uses to print the photos.
- 4 x 6 inches or 10 cm x 15 cm
- 5 x 7 inches or 13 cm x 18 cm
- Letter 8.5 x 11 inches or 22 cm x 28 cm
- A4 8.25 x 11.7 inches or 21 cm x 30 cm
- L 9 cm x 13 cm
- 2L 13 cm x 18 cm
- Hagaki 10 cm x 15 cm
- Additional paper sizes are available for normal printing without a PictBridge camera. The photo print will be borderless if the paper size is same as photo size.
Note: The default is saved from the first alignment, either Letter or A4.
|
|
Photo Size
|
Photo Size defines the size of the photo the All-In-One prints.
- 4 x 6 inches or 10 cm x 15 cm
- 5 x 7 inches or 13 cm x 18 cm
- 8 x 10 inches or 20 cm x 25 cm
- Letter 8.5 x 11 inches or 22 cm x 28 cm
- A4 8.25 x 11.7 inches or 21 cm x 30 cm
- L 9 cm x 13 cm
- 2L 13 cm x 18 cm
- Hagaki 10 cm x 15 cm
Note: Default is 4x6 inches or 10 cm x 15 cm.
|
|
Quality
|
Quality controls the amount of detail rendered in your printing task, and therefore the amount of time it will take to print.
- Automatic
- Draft
- Normal
- Photo
Note: Default is Automatic quality.
|
Using PictBridge to change your default printer settings
Note: When your camera is removed, the settings for Paper Size, and Photo size you chose are saved for the next PictBridge session.
The first time you connect a PictBridge-enabled camera to the All-In-One, you can set the default values.
- Press the POWER button on the control panel to turn the All-In-One on.
- Load paper if necessary. For more information, see Loading paper into the paper support.
- Insert one end of the PictBridge cable into the camera.
- Insert the other end of the cable into the PictBridge port on the front of the All-In-One.
- Press to access the menus.
- Use the
 buttons to navigate to the option you want to change.
- Press to confirm your selection.
- Go to the next option you want to change.