 Understanding the All-In-One parts
 Understanding the All-In-One parts
To set up your All-In-One, follow the instructions on the Lexmark 4200 Series Setup sheet to install the hardware and software. For additional setup instructions, see Setting up the All-In-One. For troubleshooting help, see Setup troubleshooting.
These items are in the box with your All-In-One.
The Lexmark 4200 Series All-In-One is a color scanner, color printer, color copier, and color fax machine. This guide shows you how to use the All-In-One features.
Note: You do not have to attach your All-In-One to your computer to make copies or send faxes.
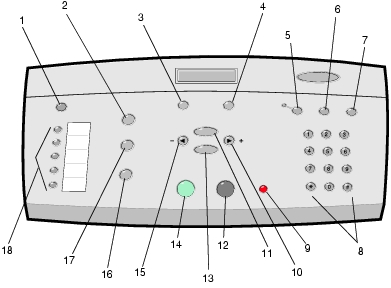
The Lexmark 4200 Series is available in two models. One model has a handset, and the other does not. The following table describes each part.
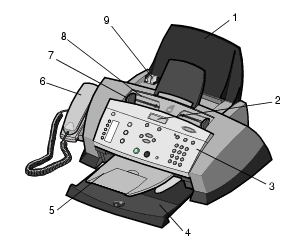
A Lexmark 4200 Series with a handset:
|
|
Use the: |
When you want to: |
|---|---|---|
|
1 |
Paper support |
Load paper in the All-In-One. |
|
2 |
Display |
Check the status of the All-In-One or view settings. |
|
3 |
Control panel |
Operate your All-In-One (attached to a computer or unattached). For more information, see Using the control panel. |
|
4 |
Paper exit tray |
Stack paper as it exits the All-In-One. |
|
5 |
ADF exit tray |
Pick up your original document after it has gone through the ADF. |
|
6 |
Handset (available on some models) |
Answer an incoming telephone call and talk to someone on the phone. |
|
7 |
Paper guide |
Make sure the paper feeds correctly into the All-In-One. |
|
8 |
Automatic Document Feeder (ADF) |
Scan, copy, or fax one or more pages. |
|
9 |
Paper guide |
Make sure your original document feeds correctly into the All-In-One. |
|
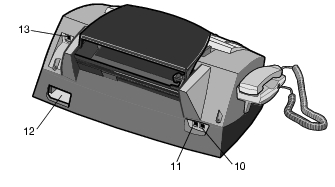
10 |
Telephone/answering machine connector |
Connect an answering machine or telephone to your All-In-One. |
|
11 |
Wall jack connector |
Connect the telephone line. |
|
12 |
Power supply connector |
Supply power to the All-In-One. |
|
13 |
USB cable connector |
Connect your All-In-One to a computer. |
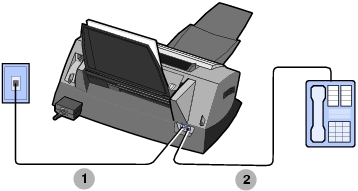
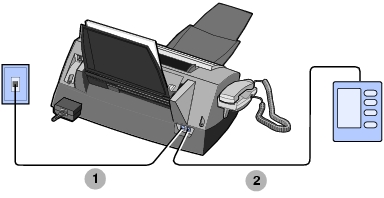
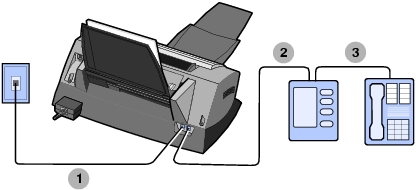
The setup sheet that came with your All-In-One provides basic setup instructions. You can also connect your All-In-One with equipment, such as a telephone, an answering machine, or a computer modem.
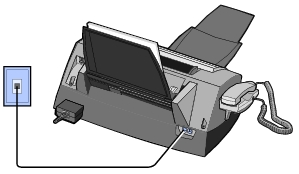
Connect a telephone line from the wall jack connector on the All-In-One to the telephone wall jack.
If your All-In-One does not have a handset, you can connect a telephone to your All-In-One to use the fax line as a normal telephone line.
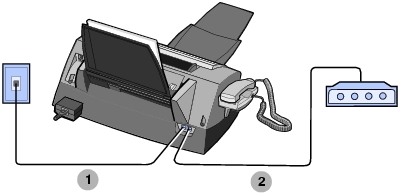
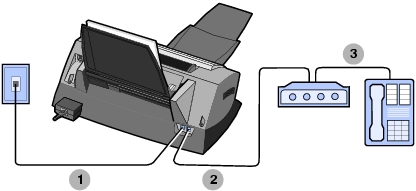
The fax modem in your All-In-One is an analog device and cannot be used on an ISDN, DSL, or PBX digital phone service. However, you can connect certain devices to your All-In-One that let you use the fax function in addition to these digital phone services.
The control panel buttons help you scan, copy, fax, and customize documents. When Power is lit, the All-In-One is on. You can scan, copy, fax, and select or change settings using several of the buttons.
The display features:
The following table describes each button function.
|
|
Press: |
To: |
|---|---|---|
|
1 |
Power |
Turn your All-In-One on or off. Note: To enter the state of lowest power consumption, press and hold the Power button for at least five seconds. |
|
2 |
Fax |
Enter fax mode. The All-In-One can receive a fax while in any mode. Note: This button is lit when the All-In-One is in fax mode. |
|
3 |
Quality |
|
|
4 |
Lighter/Darker |
Lighten or darken a copy or fax. |
|
5 |
Auto Answer |
Select how a fax is received.
(default)
Make sure the Auto Answer light is on. When you press *9* on the external phone connected to the All-In-One. The Auto Answer light is off. When an answering machine is connected to the external phone jack on the All-In-One. The Auto Answer light is on. For more information, see Receiving a fax. |
|
6 |
Speed Dial |
Use the speed dial feature while the All-In-One is in fax mode. Note: If you press Speed Dial when your All-In-One is in copy or scan mode, the All-In-One automatically switches to fax mode.
|
|
7 |
Redial/Pause |
Enter a pause only when you have already begun entering the number. Note: If you press Redial/Pause when your All-In-One is in copy or scan mode, the All-In-One automatically switches to fax mode.
|
|
8 |
A keypad number or symbol |
Enter fax numbers. Get through an automated answering system. Select letters when creating a speed dial list. Type numbers to enter or edit the date and time shown on the All-In-One display. Select the number of copies you want to make. |
|
9 |
Stop/Clear |
|
|
10 |
Right arrow
|
|
|
11 |
Options |
Scroll through the list of menu headings. |
|
12 |
Black |
Start a black and white copy, fax, or scan job. Make sure the mode you want is lit. |
|
13 |
Select |
Choose the option that appears on the display. |
|
14 |
Color |
Start a color copy, fax, or scan job. Make sure the mode you want is lit. |
|
15 |
Left arrow
|
|
|
16 |
Scan |
Enter scan mode (possible when the All-In-One is attached to a computer). This button is lit when the All-In-One is in scan mode. |
|
17 |
Copy |
Enter copy mode. This button is lit when the All-In-One is in copy mode. |
|
18 |
Quick dial buttons |
Program up to five speed dial numbers. |
There are various times when you need to enter text on the display, such as when you create a speed dial list.
To enter text:
Note: To enter a space between words, press the right arrow button twice.
To set the current date and time:
To change the date:
Note: If you make an error entering the date, you can use the left arrow button to navigate to the number you entered incorrectly, and then enter your correction.
To change the time:
Note: If you make an error entering the time, you can use the left arrow button to navigate to the number you entered incorrectly, and then enter your correction.
Note: If the time is entered incorrectly, the time shown will be the default.
The following sections provide information on using the All-In-One software.
Use this utility to adjust the fax send and receive settings. When you save these settings, they apply to every fax you send or receive. You can also use this utility to create and edit your speed dial list.
 Programs Lexmark 4200 Series Fax Setup Utility.

The following table describes the Fax Setup Utility tabs:
To access the Lexmark All-In-One Center, the software driver for your Lexmark 4200 Series:
Programs Lexmark 4200 Series Lexmark All-In-One Center.You can use the Lexmark All-In-One Center to:
The All-In-One Main Page displays when you open the All-In-One Center. It consists of four main sections: Scan, Copy, Productivity Tools, and Preview.
The following table describes the All-In-One Main Page tabs.
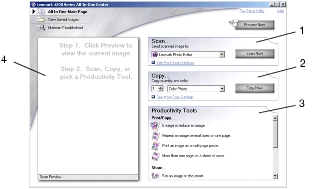
Note: For more information about the All-In-One Main Page, click the Help link near the top of the screen.
Print Properties is the software that controls the All-In-One printing function. You can change the settings in Print Properties based on the type of project you want to create. You can open Print Properties from almost any program:
Print.
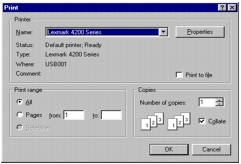
Note: Some programs open Print Properties differently.
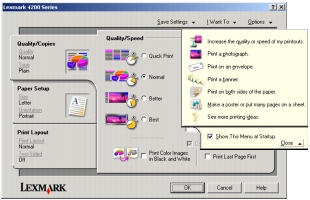
The I Want To menu displays when you open Print Properties. It contains a variety of task wizards to help you select the correct print settings for your project. Close the menu for a full view of the Print Properties dialog box.
All of the print settings are on the three main tabs of the Print Properties software: Quality/Copies, Paper Setup, and Print Layout.
The Photo Editor lets you adjust photo attributes (brightness, contrast, red eye reduction, and orientation) of scanned images. You can also crop an image or erase part of it.
To access the Lexmark 4200 Series Photo Editor, click Start Programs Lexmark 4200 Series Lexmark Photo Editor.
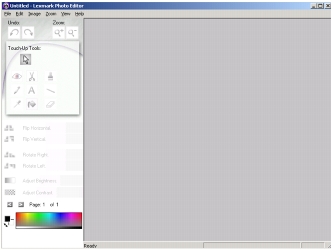
Use the touch-up tools to edit your photo or image.
Note: Move your mouse pointer over the tool for a description.
The Lexmark Solution Center (LSC) provides All-In-One Help and information about printer status and ink levels. There are two ways to open the LSC:
Programs Lexmark 4200 Series Lexmark Solution Center.

The following table describes the LSC tabs:
|
From this area or tab: |
You can: |
|---|---|
|
Printer Status |
|
|
How To 
|
|
|
Troubleshooting 
|
|
|
Maintenance 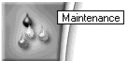
|
|
|
Contact Information 
|
|
|
Advanced 
|