Use the | To | |
|---|---|---|
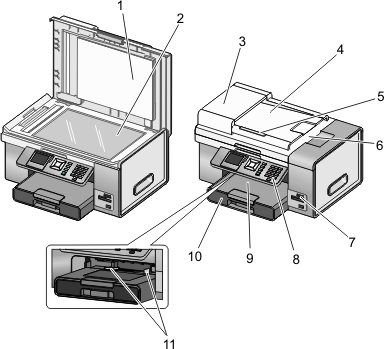
1 | Top cover | Access the scanner glass. |
2 | Scanner glass | Copy, scan, fax, or remove an item. |
3 | Automatic Document Feeder (ADF) | Copy, scan, or fax multiple-page letter-, legal-, and A4-size documents. |
4 | Automatic Document Feeder (ADF) tray | Load original documents in the ADF for copying, scanning, or faxing multiple-page documents quickly. Note: Do not load postcards, photos, small items, or thin media (such as magazine clippings) into the ADF. Place these items on the scanner glass. |
5 | Automatic Document Feeder (ADF) paper guide | Keep paper straight when feeding into the ADF. |
6 | Automatic Document Feeder (ADF) output tray | Hold documents as they exit from the ADF. |
7 | Memory card slots and PictBridge port | Insert a memory card and connect a PictBridge-enabled digital camera or a flash drive to the printer. |
8 | Control panel | Operate the printer. For more information, see Using the control panel. |
9 | Paper exit tray | Hold paper as it exits. |
10 | Paper tray (Tray 1) | Load paper. Printed paper exits on top of Tray 1. |
11 | Small media feeder | Load envelopes, 10 x 15 cm (4 x 6 in.) photo paper, and other small card sizes. |

Slots | |
|---|---|
1 |
|
2 |
|
3 | PictBridge port for connecting a PictBridge-enabled digital camera, a flash drive, or a Bluetooth adapter to the printer |
If you purchased and installed the optional Tray 2, your fully assembled printer appears as follows with the parts identified.

1 | Tray 2 base |
2 | Optional Tray 2 |
Use the | To | |
|---|---|---|
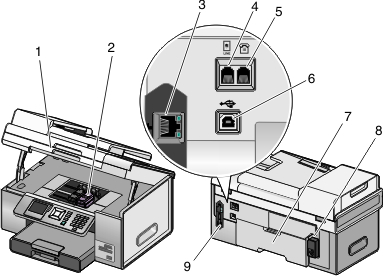
1 | Access the print cartridges. | |
2 | Print cartridge carrier | Install, replace, or remove a print cartridge. |
3 | Ethernet port | Connect your computer to another computer, a local network, an external DSL, or cable modem. |
4 | LINE port  | Connect the printer to an active telephone line to send and receive faxes. The printer must be connected to a telephone line to receive incoming fax calls. Note: Do not connect additional devices to the LINE port, and do not connect a DSL (digital subscriber line), ISDN (integrated services digital network), or cable modem to the printer. |
5 | EXT port | Connect additional devices, such as a data/fax modem, telephone, or answering machine, to the printer. This connection method may not be available in all countries or regions. Note: Remove the plug to access the port. |
6 | USB port | Connect the printer to a computer using a USB cable. Warning—Potential Damage: Do not touch the USB port except when plugging in or removing a USB cable or installation cable. |
7 | Duplex unit |
|
8 | Power supply with port | Connect the printer to a power source. Plug the power cord into the power supply at the back of the printer and then into the wall outlet. |
9 | Internal wireless print server | Communicate with other devices on a wireless network. |
Tell me more