Interpreting the printer control panel lights

Understanding the printer control panel light sequences

Understanding the primary light sequences

Printer control panel

Lights and buttons

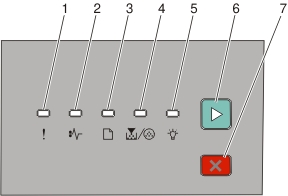
control panel labeled
  1. Error

  2. Jam

  3. Load paper

  4. Toner

  5. Ready

  6. Continue

  7. Stop


The printer control panel features six lights and two buttons. The lights can be on, off, blinking, or blinking slowly.

Light sequence

What to do

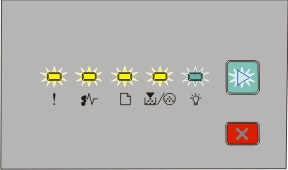
all lights blinking

Service Error

error light - Blinking

jam light - Blinking

load light - Blinking

toner light - Blinking

ready light - Blinking

continue button light - Blinking

Turn the printer off, and then on. If the lights are still blinking, then visit the Lexmark support Web site at http://support.lexmark.com.

continue on error toner blinking

Replace PC Kit

error light - Blinking

toner light - Blinking

continue button light - On

Replace the photoconductor kit.

ready light on

Ready

ready light - On (green)

Send a print job.

ready light on yellow

Power Saver

ready light - On (yellow)

Send a print job.

ready light blinking slowly

Hex Trace Ready

ready light - Slowly Blinking

Use Hex Trace to troubleshoot printing problems. Turn the printer off, and then on to return to the Ready state.

ready light blinking

Busy

ready light - Blinking

Wait or press the stop button.

error and ready lights blinking

Flushing Buffer

error light - Blinking

ready light - Blinking

Wait until the printer returns to the Ready state.

ready and continue on

Waiting

ready light - On

continue button light - On

Wait for the light sequence to clear.

all lights on

Canceling job

error light - On

jam light - On

load light - On

toner light - On

ready light - On

continue button light - On

Wait for the light sequence to clear.

error ready lights on

Invalid Engine Code or Invalid Network Code

error light - On

ready light - On

Press the continue button twice to get the secondary message.

Use valid code when programming the printer.

continue on

Not ready

continue button light - On

Press and release either the continue button or the stop button to return to the Ready state.

error toner on

Cartridge error

error light - On

toner light - On

Replace the toner cartridge with one suitable for your region.

Note: This LED pattern also indicates other problems with the cartridge. Press the continue button twice quickly to see the secondary message. For more information, see Understanding the secondary error light sequences.

error on

Front door is open

error light - On

Close the front door.

load continue on

No paper in Tray 1 or Tray 2

load light - On

continue button light - On

Load paper in Tray 1 or Tray 2, and then press the continue button or the stop button.

load on

No paper in the manual feeder

load light - On

Load paper in the manual feeder.

load blinking

Remove paper from the standard exit bin

load light - Blinking

Remove printed pages from the standard exit bin, and then press and release the continue button to clear the light sequence and continue printing.

toner continue on

Cartridge is low

toner light - On

Ready button light on - On

  • Press and release the continue button to clear the light sequence and continue processing the print job.

  • With the printer turned off, remove the toner cartridge and shake it to extend its life.

  • Replace the toner cartridge, and then turn the printer on.

continue on toner blinking

PC Kit life warning

toner light - On

  • Press and release the continue button to clear the light sequence and continue processing the print job.

  • Replace the photoconductor kit.


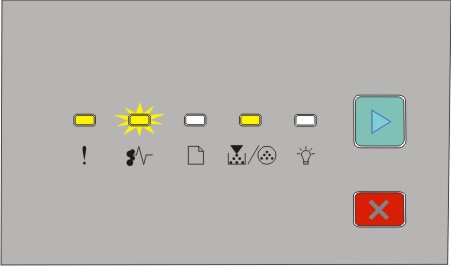
The following light sequences show that there is a secondary error code or secondary jam code to read:

Light sequence

What to do

error continue on

Printer error

error light - On

continue button light - On

Press the continue button twice quickly to see the secondary error code.

jam continue on

Paper jam

jam light - On

continue button light - On

Press the continue button twice quickly to see the secondary paper jam code.


Understanding the secondary error light sequences

When the continue button and error lights are on simultaneously, press the continue button twice quickly to see the secondary error code.

Printer control panel

Lights and buttons

control panel labeled
  1. Error

  2. Jam

  3. Load paper

  4. Toner

  5. Ready

  6. Continue

  7. Stop


Light sequences

What you can do

error ready continue on

Complex page, some data may not have printed

error light - On

ready light - On

continue button light - On

Press either the continue button or the cancel button to clear the light sequence.

error toner continue on

Insufficient memory to collate job

error light - On

toner light - On

continue button light - On

Press the continue button to print the remaining pages of the job.

error continue on ready blinking

Insufficient memory to support Resource Save feature

error light - On

ready light - Blinking

continue button light - On

  • Install additional printer memory.

  • Press either the continue button or the cancel button to clear the light sequence. Job will be printed without Resource Save.

error continue on jam load blinking

Host interface disabled

error light - On

jam light - Blinking

load light - Blinking

continue button light - On

Press the continue button to clear the code. The printer discards any print jobs previously sent.

error load ready continue on

Paper size is small

error light - On

load light - On

ready light - On

continue button light - On

  • Ensure that the paper you loaded is large enough.

  • Clear any paper jam.

  • Press the continue button to clear the code and continue the print job.

error toner on load blinking

Cartridge region mismatch

error light - On

load light - Blinking

toner light - On

Replace the toner cartridge with one that is suitable for your region. For more information, see Replacing the toner cartridge.

error jam toner on

Replace missing or defective cartridge

error light - On

jam light - Blinking

toner light - On

Replace the toner cartridge. For more information, see Replacing the toner cartridge.

error load toner on

Cartridge part number not supported by device

error light - On

load light - On

toner light - On

Remove the toner cartridge and replace it with a supported toner cartridge. For more information, see Replacing the toner cartridge.