 Scanning an original document
Customizing a scan job
Use your All-In-One to perform basic or custom scan jobs.
Scanning an original document
You can scan documents using the control panel or the All-In-One software.
Scanning using the control panel and the ADF
- Make sure your computer and All-In-One are on.
- Load up to 30 sheets of the original document into the ADF face down.
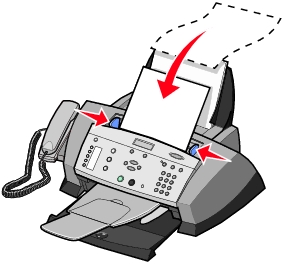
Note: When you load small paper sizes, place your original in the center of the tray and adjust the paper guides to the edges of the paper.
- On the control panel, press Scan.
- Select a Scan To: destination, and then press Select.
- Press Black or Color.
Your scan is sent to the destination you selected.
Scanning using the All-In-One software and the ADF
Note: Some programs do not support multiple page scanning.
- Make sure your computer and All-In-One are on.
- Load up to 30 sheets of the original document into the ADF face down.
Note: When you load small paper sizes, place your original in the center of the tray and adjust the paper guides to the edges of the paper.
- Double-click the Lexmark 4200 Series All-In-One Center desktop icon.
The All-In-One Main Page appears.
- From the Send scanned image to: drop-down box, select a program to send the scanned image to.
Note: If you want to further customize your scan, click Display Advanced Scan Settings for more customizing options.
- Click Scan Now.
Customizing a scan job
You can use the control panel or the software to customize your scan jobs. For a complete list of the control panel Scan menu options, see Using the control panel.
E-mailing a scanned image or document
You can send photographs to people through e-mail:
- Place the photograph you want to scan face down in the ADF.
- Click Start
 Programs Lexmark 4200 Series Lexmark All-In-One Center.
The All-In-One Main Page appears.
- Click Preview Now.
- From the Productivity Tools area, click E-mail an image or document.
- From the What is being scanned? menu, select Photo.
- Follow the instructions on the screen to prepare the photograph for e-mail.
- Click Attach Now.
- Write a note to accompany the attached photo, and then send it.
Saving an image on your computer
- From your desktop, double-click the Lexmark 4200 Series All-In-One Center icon.
The All-In-One Main Page appears.
- From the Productivity Tools area, click Save an image on my computer.
- Follow the directions to save an image on your computer.
Editing scanned text using Optical Character Recognition
- From your desktop, double-click the Lexmark 4200 Series All-In-One Center icon.
The All-In-One Main Page appears.
- From the Productivity Tools list, click Edit text found in a scanned document (OCR).
- Follow the steps on your screen.
Using the control panel
You can use the control panel to customize your scan jobs. Press Scan to enter Scan mode, and then press Options repeatedly to see each sub menu.
|
From this sub menu:
|
You can:
|
|
Scan To:
|
Select a Scan-To destination.
|
|
ORIGINAL SIZE
|
Specify the size of the document in the ADF:
- Letter (default)
- A4
- Legal
- A5
- 3x5
- 4x6
- 5x7
- 8x10
|
|
KEY PRESS TONE
|
Turn on or off the sound that is made when you press a control panel button. The options are:
|
|
MAINTENANCE
|
- Check ink levels.
- Change cartridges.
- Align cartridges.
- Clean cartridges.
- Print a test page.
|
|
CLEAR SETTINGS
|
Select when you want your All-In-One to return to the default settings:
- After 2 min (default)
- Never
|
|
SET DEFAULTS
|
Set your default settings to:
|
|
LANGUAGE
|
Select a language for all display text.
|
Note: The option currently selected is noted with an asterisk (*) on the display.