 Loading paper
Placing documents on the scanner glass
Printing
Printing photos
Scanning
Copying using the control panel
Faxing
The following sections give you everything you need to know for basic printing, scanning, copying, and faxing.
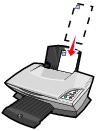
Loading paper
You can load up to 100 sheets of plain paper at a time, depending on the thickness of the paper (up to 10 mm).
- Place the paper against the right side of the paper support with the print side facing you.
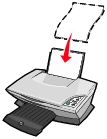
Note: Do not force the paper into the All-In-One.
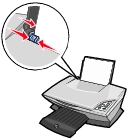
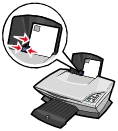
- Squeeze the release tab and slide the paper guide to the right until it rests against the edge of the paper.
Loading specialty paper
Follow these guidelines when loading specialty paper:
Note: If you are using letter size paper, adjusting the paper guide may not be necessary.
Note: Make sure you select the correct paper size and paper type in Print Properties. For help, see Using Print Properties.
|
Load up to
|
Make sure
|
|
100 sheets of inkjet paper (depending on the thickness)
|
- The print side is facing you.
- The paper is against the right side of the paper support.
|
|
25 iron-on transfers
|
- The print side (blank side) is facing you.
- The paper guide rests against the edge of the iron-on transfers.
- You follow the loading instructions on the iron-on transfer packaging.
|
|
25 sheets of photo/glossy paper
|
- The glossy or coated side is facing you.
- If your paper includes instructions, read them carefully.
- You load the photo paper vertically against the right side of the paper support.
- The paper guide rests against the edge of the photo paper.
- You use photo paper that is made for inkjet printers.
Note: To prevent smudging, remove each photo as it exits the printer, and then let it dry before stacking.
|
|
50 transparencies
|
- The rough sides of the transparencies are facing you.
- The paper guide rests against the edge of the transparencies.
Note: Since transparencies and photos require more drying time, we recommend that you remove each transparency or photo as it exits and allow to dry to avoid ink smearing.
|
|
10 sheets of greeting card stock, postcards, or photo cards
|
- The print side is facing you.
- The cards are loaded vertically against the right side of the paper support.
- The paper guide rests against the edge of the cards.
- If your cards include instructions, read them carefully.
Note: You do not force the cards into the printer.
|
|
20 sheets of banner paper
|
- You remove any paper from the paper support before inserting banner paper.
- You place a stack of banner paper with only the number of sheets you need to print your banner behind the printer.
Note: Loading excess banner paper may cause a paper jam. For help, see Jams and misfeeds troubleshooting.
- You load the leading edge of the banner paper into the printer against the right side of the paper support.
- You squeeze and slide the paper guide to the left edge of the banner paper.
|
|
25 coated paper
|
- If your paper includes instructions, read them carefully.
- You load the premium paper vertically against the right side of the paper support.
- If there is a special mark on the paper, make sure the mark is facing away from you.
- You do not force the paper into the printer.
- You squeeze and slide the paper guide to the left side of the paper.
|
|
10 envelopes
|
- The print side is facing you.
- The envelopes are loaded vertically against the right side of the paper support.
- The stamp location is in the upper left corner.
- The paper guide rests against the edge of the envelopes.
Note: Do not load envelopes with:
- Holes, perforations, cutouts, or deep embossing.
- Metal clasps, string ties, or metal folding bars.
- Exposed flap adhesive.
|
Placing documents on the scanner glass
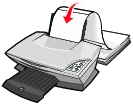
- Open the scanner lid of the All-In-One.
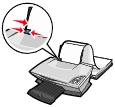
- Place the item you want to scan face down on the glass. Make sure the upper left corner of the front of the item aligns with the arrow.
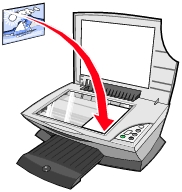
- Close the scanner lid.
Printing
- Load paper. For help, see Loading paper.
- With your document open, click File
 Print.
- Change any print settings. For help, see Changing print settings, or click the I Want To menu to select a print wizard for a project, such as printing a banner or an envelope.
- Click OK.
Changing print settings
- With your document open, click File Print.
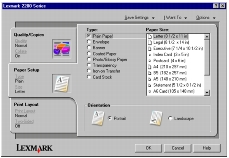
- Click Properties, Preferences, Options, or Setup (depending on the program or operating system) to customize print settings. The Print Properties dialog box displays.
- Click the tabs to change your print settings, or click a project such as printing a banner or an envelope from the I Want to menu.
- From the Quality/Copies tab, select the Quality/Speed of your document, the number of copies, black and white or color printing for your document, and how you want to handle multiple copies of your document.
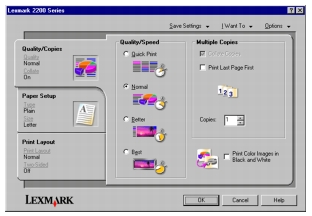
- From the Paper Setup tab, select the paper type, paper size, and orientation.
Note: To see details about a setting, right-click a setting on the screen, and then select the What's This? item.
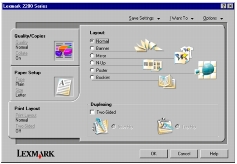
- From the Print Layout tab, select the layout and duplexing settings for the type of document you are printing.
Note: To see details about a setting, right-click a setting on the screen, and then select the What's This? item.
- Once you have applied all the settings you want in Print Properties, click OK at the bottom of the screen to return to the Print dialog box.
- Click OK or Print to complete your task.
Printing photos
- Load photo paper. For help, see Loading specialty paper.
- With your document open, click File Print.
- Click Properties, Preferences, Options, or Setup (depending on the program or operating system) to customize print settings. The Print Properties dialog box displays.
- From the Quality/Copies tab, select Better or Best.
- From the Paper Setup tab, select the paper size, paper type, and orientation of your photo.
Note: Photo/Glossy or Coated paper is recommended for printing photos.
- From the Print Layout tab, select the layout of your photo.
- When you are finished customizing your photo, click OK.
- Click OK or Print to complete your task.
Other printing projects
The I Want To menu provides wizards for creating projects: You may want to print a photo, print on an envelope, print a banner, make a poster, create a booklet, print a greeting card, or do some of the other projects available.
- With your document open, click File Print.
- Click Properties, Preferences, Options, or Setup (depending on the program or operating system) to customize print settings. The Print Properties dialog box displays along with the I Want To menu.
- Select one of the available projects or click See more printing ideas.
- Follow the instructions on the computer screen to complete your project.
Scanning
The following steps show you how to scan and save images.
- Open the scanner lid of the All-In-One.
- Place the item you want to scan face down on the glass. Make sure the upper left corner of the front of the item aligns with the arrow.
- Close the scanner lid.
- Press Scan. The All-In-One Main page displays.
- From the Send scanned image to: drop-down menu, select a program to send the scanned image to.
- Customize your scan settings. For help, see Changing scan settings.
- Click Scan Now to complete your scan.
Changing scan settings
- From the Scan Section, click See More Scan Settings.
- Choose what is being scanned.
- Choose how the scan will be used.
- Click Advanced to change advanced options.
- Click the tabs to make any changes.
|
Click this tab
|
To
|
|
Scan
|
- Choose the color depth and scan resolution.
- Choose whether to auto-crop more or less of the scanned image.
- Select the area to be scanned.
- Choose to convert your scanned item to text for editing.
- Choose to scan multiple images before output.
- Update the list of applications to send scans to.
- Update the default fax driver.
|
|
Image Enhancements
|
- Choose whether to sharpen your blurry images more or less.
- Adjust the brightness of your image.
- Adjust the color correction curve (gamma) of your image.
|
|
Image Patterns
|
- Smooth the conversion of a gray image to a black and white dot pattern (dither).
- Remove image patterns from magazine/newspaper (descreen).
- Select whether to print with Best quality or Best speed.
- Choose what was scanned.
- Reduce more or less of the background noise on your color document.
|
- When you are finished customizing your scan settings, click Scan Now.
Scanning photos
- Place your photo on the scanner glass. For help, see Placing documents on the scanner glass.
- Open the Lexmark All-In-One Center. For help, see Using the Lexmark All-In-One Center.
- Click Preview Now.
- Adjust the dotted lines to fit around the portion of the image you want to print.
- Select your scan destination from the drop-down box.
- Change any scan settings. For help, see Changing scan settings.
- When you are finished customizing your image, click Scan Now.
- When your document has finished processing, it will open the program you chose to send the image to.
Copying using the control panel
Note: You can make a quick color or black and white copy. Press Color Copy or Black Copy on the control panel.
To make black and white, gray, or color copies:
- Open the scanner lid of the All-In-One.
- Place the item you want to copy face down on the glass. Make sure the upper left corner of the front of the item aligns with the arrow.
- Close the scanner lid.
- Change any copy settings. For help, see Changing copy settings using the control panel or Changing copy settings using the software.
- Press Black Copy or Color Copy.
Note: To copy using the best quality, press and hold Black Copy or Color Copy for at least two seconds.
Changing copy settings using the control panel
You can change the quantity and quality of your copy using the control panel.
To change the copy quantity using the control panel
Press Copy Quantity repeatedly until the number of copies (1-9) you want to make appears on the display.
To change the copy quality using the control panel:
Press and hold Black Copy or Color Copy for at least two seconds.
Changing copy settings using the software
- Open the Lexmark All-In-One Center. For help, see Using the Lexmark All-In-One Center.
- Select a copy quantity and color.
- Click See More Copy Settings to:
- Choose a copy quality.
- Select the original document size.
- Collate copies.
- Print last page first (reverse order printing).
- Lighten or darken your document.
- Click Display Advanced Copy Settings to change advanced options, such as paper size, and paper type, and so on.
- Click the tabs to make any changes.
|
Click this tab
|
To
|
|
Print
|
- Select the paper size and type in your printer.
- Select the print quality.
|
|
Scan
|
- Choose the color depth and scan resolution.
- Choose whether to auto-crop more or less of the scanned image.
|
|
Image Enhancements
|
- Choose whether to sharpen your blurry images more or less.
- Adjust the brightness of your image.
- Adjust the color correction curve (gamma) of your image.
|
|
Image Patterns
|
- Smooth the conversion of a gray image to a black and white dot pattern (dither).
- Remove image patterns from magazine/newspaper (descreen).
- Select whether to print with Best quality or Best speed.
- Choose what was scanned.
- Reduce more or less of the background noise on your color document.
|
- When you are finished customizing your copy settings, click Copy Now.
Copying photos
- Place your photo on the scanner glass. For help, see Placing documents on the scanner glass.
- Make sure your computer and printer are on.
- Load photo paper. For help, see Loading specialty paper.
- Open the Lexmark All-In-One Center. For help, see Using the Lexmark All-In-One Center.
- Click Preview Now.
- Adjust the dotted lines to fit around the part of the image you want to print.
- From the Copy Section, select Photo.
- Select a copy quantity and color.
- To further customize your photo, click See More Copy Settings.
- Click Copy Now when you are finished customizing your settings.
Copying photos without a computer
- Load paper. For help, see Loading paper.
- Press and hold Color Copy for two seconds. Your photo prints with Best quality.
Faxing
Sending a fax
The following steps lead you through sending a fax using the computer modem.
- Open the scanner lid.
- Place the item you want to fax face down on the glass. Make sure the upper left corner of the front of the item aligns with the arrow.
- Close the scanner lid.
- Open the Lexmark All-In-One Center (see Using the Lexmark All-In-One Center).
- From the Creative Tasks section of the All-In-One Main page, click Fax using PC modem.
- Follow the instructions on the computer screen.
Receiving a fax
- Click Start Settings Control Panel.
- Click Fax.
- Click the Status Monitor tab, and then select the Enable manual answer for the first device check box.
- When an incoming call comes through, the Answer call? prompt appears.Click No for voice calls, click Yes if a fax tone is heard.