 |
 |
|
 |
|
|
|
|
|
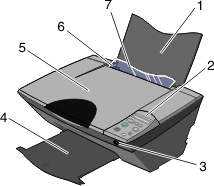
1 | Paper support | Load paper. For more information, see Loading paper. |
2 | Operate the All-In-One. | |
3 | PictBridge port | Connect a PictBridge-enabled camera to the All-In-One. |
4 | Stack paper as it exits. | |
5 | Scanner lid | Open the scanner unit and place an item on or remove an item from the scanner glass. For more information, see Opening the scanner unit. |
6 | Paper guide | Make sure paper feeds correctly. |
7 | Paper feed guard | Prevent small objects from falling inside the All-In-One. |
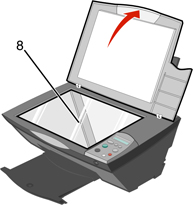
8 | Scanner glass | Load an item for scanning. For more information, see Loading originals on the scanner glass. |
|
|
 |
 |
 |
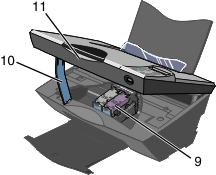
9 | Cartridge carriers | Access the Print cartridges. |
10 | Scanner unit support | Hold the scanner unit open when checking cartridges. |
11 | Scanner unit | Open the All-In-One and access the print cartridges. See Opening the scanner unit and Closing the scanner unit. |
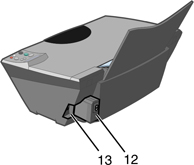
12 | Power supply | Connect the All-In-One to a power source. |
13 | USB connector | Connect the All-In-One to the computer using a USB cable. |