 Lexmark 4300 Series Center icon. Applications Lexmark 4300 Series Center icon.
There are two ways to open the Lexmark 4300 Series Center from the Finder desktop:
Lexmark 4300 Series Center icon. Applications Lexmark 4300 Series Center icon.The Lexmark 4300 Series Center dialog appears. It has two main sections: the Scan tab and the Copy tab. If you have more than one Lexmark All-In-One installed on the computer, the "Device" pop-up menu appears on top of the dialog. Choose Lexmark 4300 Series from this menu.
If the Lexmark 4300 Series folder is missing from the desktop or was accidentally deleted, do the following:
Printers Lexmark 2005 Lexmark 4300 Series Lexmark 4300 Series Center icon.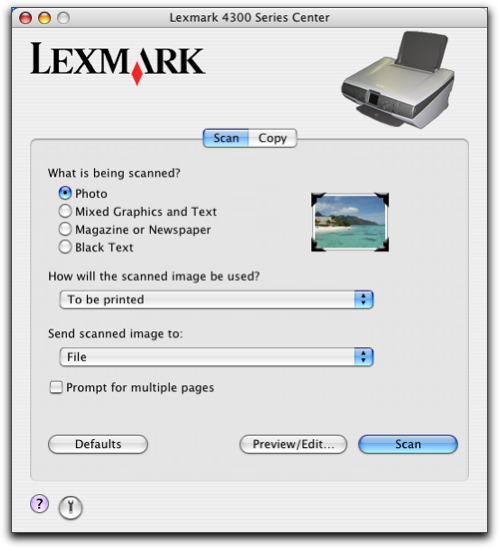
Scan tab What is being scanned? Select the option closest to the type of image you are scanning. Settings are optimized based on your selection: How will the scanned image be used? Choose the way the scan will be used. Resolution and other settings are optimized based on your selection: Send scanned image to: Choose where to send scanned images, such as to File, to the Clipboard, or to an application. To add, remove, or modify an application in the list of software applications, see Editing the Customize list. For more information, see Choosing where to send scanned images. Prompt for multiple pages Scan multiple pages using the current scan settings. You are prompted to place the next item on the scanner glass after a page is scanned. If you still have more pages to scan, click Scan. When the multiple-page scan is complete, click Done. Clear Prompt for multiple pages if you are scanning only a single item. Defaults Revert to factory default settings. Preview/Edit Open the Scan dialog to view the image, and fine-tune the scan settings. Scan Start scanning. Copy tab Quantity & Copy Type Choose the quantity and color for copies. Copy Quality Select a quality setting for copies. Output Paper Type Choose the type of the paper type you will use for printing. Output Paper Size Choose the paper size of the paper you will use for printing. Resize Enlarge or reduce copies by a percent, or choose a preset size from the pop-up menu. Original Image Size Choose a paper size for the original document. If you do not know the original size, choose Auto. The All-In-One software detects the size and adjusts the copying function accordingly. Portrait orientation is the default for all other paper types in the "Original Image Size" pop-up menu. Prompt for multiple pages Scan multiple pages using the current scan settings. You are prompted to place the next item on the scanner glass after a page is scanned. If you still have more pages to scan, click Scan. When the multiple-page scan is complete, click Done. Clear Prompt for multiple pages if you are scanning only a single item. Defaults Revert to factory default settings. Preview/Edit Open the Copy dialog to view the image, and fine-tune copy settings. Copy Start copying.
Note:
The software scales to fit the selected size as closely as possible without cropping or distorting the image.
Note:
Auto-crop sensitivity on the Copy dialog is turned on when Auto is selected from the "Original Image Size" pop-up menu on the Copy tab.
Click ![]() to go to the Help Center for more information. Click
to go to the Help Center for more information. Click ![]() to open the Lexmark 4300 Series Utility.
to open the Lexmark 4300 Series Utility.