 Understanding the All-In-One parts
Using the control panel
Using the All-In-One software
Understanding the All-In-One parts
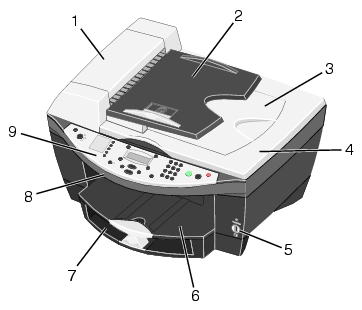
The Lexmark 7100 Series All-In-One is a color scanner, color copier, color printer, and color fax machine.
Note: You do not have to attach your All-In-One to your computer to make copies or send and receive faxes.
The tables following each graphic describe the parts of the All-In-One.
|
|
Use the
|
To
|
|
1
|
Automatic Document Feeder (ADF)
|
Scan, copy, or fax multiple page letter, legal, and A4 size documents.
|
|
2
|
ADF input tray
|
Load original documents in the All-In-One. Recommended for scanning, copying, or faxing multiple page documents.
|
|
3
|
ADF exit tray
|
Pick up your original document after it has gone through the ADF.
|
|
4
|
Top cover
|
Access the scanner glass. Lift top cover to place or remove items on the scanner glass.
Note: Scanner glass recommended for card stock, photos, delicate, or unusually sized originals that cannot be fed through the ADF.
|
|
5
|
PictBridge port
|
Connect your PictBridge compatible digital camera to the All-In-One.
|
|
6
|
Paper exit tray
|
- Stack paper as it exits the All-In-One.
- Load a single envelope or card.
|
|
7
|
Paper tray
|
Load paper into the All-In-One.
|
|
8
|
Scanner unit
|
Access the print cartridges.
|
|
9
|
Control panel
|
Operate your All-In-One (attached or unattached to a computer). For more information, see Using the control panel.
|
Note: The phone cord must be connected to the correct port.
|
|
Use the
|
To
|
|
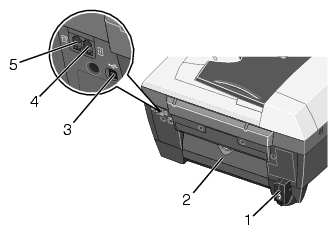
1
|
Power cord connector
|
Supply power to the All-In-One.
|
|
2
|
Rear access door
|
Remove paper jams.
|
|
3
|
USB port
|
Connect your All-In-One to a computer.
|
|
4
|
LINE port
|
Connect your All-In-One to an active telephone line to send and receive faxes. Your All-In-One must be connected to this telephone line to receive incoming fax calls.
Note: Do not connect additional devices to the wall jack connector and do not connect a DSL (digital subscriber line), ISDN (integrated services digital network), or cable modem to the All-In-One without a proper third party device, such as a DSL filter.
|
|
5
|
EXT port
|
Remove the plug to connect additional devices, such as a computer, telephone, or answering machine to your All-In-One.
|
Using the control panel
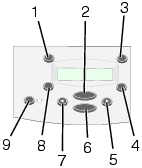
The control panel buttons help you scan, copy, fax, and customize documents. When Power is lit, the All-In-One is on. You can select a mode from the Mode area, select or change settings using several of the buttons, and initiate a scan, copy, or fax from the Start buttons on the far right.
The display features:
- All-In-One status
- Messages
- Menus
The table following the graphic describes each button function.

|
|
Press
|
To
|
|
1
|
Power
|
Turn your All-In-One on or off.
|
|
2
|
Quick Dial buttons (01-04)
|
Access any of the four programmed Speed Dial numbers.
|
|
3
|
Speed Dial
|
Access any of the programmed Speed Dial numbers (5-99).
|
|
4
|
Mode
|
Select a mode for your All-In-One.
Note: The selected mode is lit.
|
|
|
Press
|
To
|
|
1
|
Number of Copies
|
Specify a number (1-99) of copies.
|
|
2
|
Options
|
Scroll through the list of menu headings.
|
|
3
|
Reduce/Enlarge
|
Customize the size of your original document by a percentage, Fit to Page, or to poster size.
Note: Fit to Page is not available when using the ADF.
|
|
4
|
Lighter/Darker
|
Lighten or darken a copy or fax.
|
|
5
|
Right arrow
|
|
|
6
|
Select
|
Choose the option that appears on the display.
|
|
7
|
Left arrow
|
- Decrease a number on the display.
- Scroll through a list on the display.
|
|
8
|
Quality
|
- Select from the following copy qualities: Quick, Normal, or Best.
- Select a fax resolution: Standard, Fine, Superfine, or Ultrafine.
- Select a scan resolution when the All-In-One is attached to a computer.
|
|
9
|
Auto Answer
|
Answer all incoming calls when lit.
The number of rings before the machine will answer incoming phone calls should be set in the "ANSWER FAX WHEN options menu. For more information, see ANSWER FAX WHEN.
|
|
|
Press
|
To
|
|
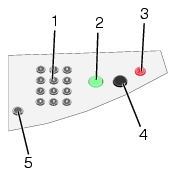
1
|
A keypad number or symbol
|
- Enter fax numbers.
- Select letters when creating a speed dial list.
- Type numbers to enter or edit the date and time shown on the All-In-One display.
Select the number of copies you want to make.
|
|
2
|
Color
|
Start a color scan, copy, or fax job.
Note: Make sure the correct mode you want to perform is lit.
|
|
3
|
Stop/Clear
|
- Cancel a scan, copy, or print job in progress.
- Clear a fax number or end a fax transmission and return the display to the fax default.
- Exit a menu.
- Clear current settings or error messages, and return to default settings.
|
|
4
|
Black
|
Start a black and white scan, copy, or fax job.
Note: Make sure the correct mode you want to perform is lit.
|
|
5
|
Redial/Pause
|
- Recall the last number entered.
- Insert a three-second pause in the number to be dialed to wait for an outside line or get through an automated answering system.
Enter a pause only when you have already begun entering the number.
|
Using the control panel menus
See this section for help accessing the Copy, Fax, and Scan mode menu items.
Selecting Copy mode menu items
- On the control panel, press Mode repeatedly until Copy is selected.
- Press Options repeatedly until the menu heading you want appears on the display.
- Press + or - to scroll through the available menu items.
- Press Select when the menu item you want appears on the display to save the setting.
Note: The option currently selected is noted with an asterisk (*) on the display.
|
From this menu
|
You can
|
|
BLANK PAPER SIZE
|
Specify the size of the paper loaded in the paper tray:
- Letter
- Legal
- B5
- A4
- A5
- A6
- 3x5
- 4x6
- L
- 2L
Note: For other specialty sizes, see the All-In-One Center.
|
|
BLANK PAPER TYPE
|
Specify the type of paper loaded in the paper tray:
- Auto Detect (default)
- Plain
- Coated
- Photo
- Transparency
Auto Detect optimizes the setting according to the type of paper loaded.
Note: For other specialty types, see the All-In-One Center.
|
|
REPEAT IMAGE
|
Specify how many copies of one image you want on one page:
- 1x per page (default)
- 4x per page
- 9x per page
- 16x per page
|
|
COLOR
|
Press + or - to adjust the color intensity of the copy.
|
|
ORIGINAL SIZE
|
Specify the size of the document on the scanner glass. Auto Detect is the default.
Note: Specify an original size other than Auto Detect to confine the scan area to the size of the original selected.
|
|
CONTENT TYPE
|
Specify the type of document on the scanner glass.
- Text&Graphics (default)
- Photo
- Text Only
- Line Drawing
|
|
COLLATE
|
Scan multiple pages to memory and print them out in reverse order.
|
|
KEY PRESS TONE
|
Turn on or off the sound that is made when you press a control panel button. The options are:
|
|
MAINTENANCE
|
- Check Ink levels.
- Align cartridges.
- Clean cartridges.
- Print a Test page.
|
|
POWER SAVE
|
Select a time to begin reducing power:
- After 10 min
- After 30 min
- After 60 min
- After 6 hours (default)
- Never
|
|
CLEAR SETTINGS
|
Select when you want your All-In-One to return to the default settings:
- After 2 min (default)
- Never
|
|
SET DEFAULTS
|
Set your default settings to:
- Use Factory (default)
- Use Current
|
|
LANGUAGE
|
Select a language for all display text.
|
Note: The option currently selected is noted with an asterisk (*) on the display.
Selecting Fax mode menu items
Use the control panel to customize your fax jobs.
- On the control panel, press Mode repeatedly until Fax is selected.
- Press Options repeatedly until the menu heading you want appears on the display.
- Press + or - to scroll through the available menu items.
- Press Select when the menu item you want appears on the display to save the setting.
In order for faxing to function properly:
- The All-In-One must be connected to an active phone line.
- If you are using the All-In-One software to fax, the All-In-One must be connected to a computer with a USB cable.
Note: You cannot fax with a DSL (digital subscriber line), ISDN (integrated signature digital network), or cable modem unless you purchase a third party device.
Note: You can also use the Fax Software Utility to adjust most of the All-In-One fax settings. For more information, see Using the Lexmark Fax Solutions.
Note: The option currently selected is noted with an asterisk (*) on the display.
|
From this menu
|
You can
|
|
PENDING FAXES
|
Cancel any faxes that have not been sent.
|
|
PRINT REPORTS
|
Print:
- An Activity Report (the last 40 sent and received faxes)
- A Send log
- A Receive log
- A Settings list (lists settings such as ringer volume, fax quality, and redial attempts)
|
|
ANSWER FAX WHEN
|
Select how a fax is received.
- After 1 ring
- After 2 rings
- After 3 rings (default)
- After 5 rings
Note: For more information, see Answering machine.
|
|
DELAY UNTIL
|
Enter a specific time to send a fax. For help, see To delay sending a broadcast fax.
Note: Make sure the date and time are entered correctly before you set a specific time to send a fax.
|
|
ON HOOK DIAL
|
Press Select to use On Hook Dial and dial the number when you hear a dial tone.
For more information, see Manually dialing a fax while listening to a telephone line (On Hook Dial).
|
|
RINGER TONE
|
Choose a tone for incoming rings:
|
|
KEY PRESS TONE
|
Turn on or off the sound that is made when you press a control panel button. The options are:
|
|
SPEAKER VOLUME
|
Turn the All-In-One speaker volume (affects All-In-One fax sounds) to:
|
|
EDIT SPEED DIAL
|
Do these things to your speed dial list:
- Add to it
- Remove a number from it
- Modify it
- Print it
Note: For more information, see Adding Speed Dial numbers to your list.
|
|
EDIT DATE/TIME
|
Edit the date and time.
Note: Make sure you enter a number into each of the available spaces. For example, 01:00 for 1:00. Once you have entered the time, press 1 for AM, 2 for PM or 3 for 24-hour mode.
|
|
PERSONALIZE FAX
|
Enter your name or the name of your business and your number. This information appears as a heading to identify you and your fax machine to the fax recipient.
Note: Not available for double-byte languages.
|
|
BLANK PAPER SIZE
|
Specify the size of the paper loaded in the paper tray.
Note: If no asterisk (*) is present, a paper size that is not supported by fax has been selected through the copy menu.
|
|
BLANK PAPER TYPE
|
Specify the type of paper loaded in the paper tray:
- Auto Detect (default)
- Plain
- Coated
- Photo
- Transparency
Auto Detect optimizes the setting according to the type of paper loaded.
Note: For other specialty types, see Loading specialty paper into the paper tray.
|
|
FAX FORWARD
|
- Turn this feature Off (default).
- Enter a number to Forward the fax to.
- Print&Forward the fax.
|
|
ADVANCED FAX
|
Press Select to see a menu of advanced fax options (see From this Advanced Fax option).
|
|
MAINTENANCE
|
- Check Ink Levels.
- Align cartridges.
- Clean cartridges.
- Print a Test page.
|
|
CLEAR SETTINGS
|
Select when you want your All-In-One to return to the default settings:
- After 2 min (default)
- Never
|
|
SET DEFAULTS
|
Set your default settings to:
- Use Factory (default)
- Use Current
|
Selecting Advanced Fax menu items
- On the control panel, press Mode repeatedly until Fax is selected.
- Press Options repeatedly until ADVANCED FAX appears on the display.
- Press Select.
- Press Options to scroll through the Advanced Fax options.
- Press + or - to scroll through the available items.
- Press Select when the menu item you want appears on the display to save the setting.
Note: The option currently selected is noted with an asterisk (*) on the display.
|
From this Advanced Fax option
|
You can select
|
|
REDIAL ATTEMPTS
|
The number of times you want the machine to try again if your fax does not go through:
- 0 times
- 1 time
- 2 times (default)
- 3 times
- 4 times
- 5 times
|
|
REDIAL INTERVAL
|
The time the machine waits before attempting a fax call again:
- 1 minute
- 2 minutes
- 3 minutes (default)
- 4 minutes
- 5 minutes
- 6 minutes
- 7 minutes
- 8 minutes
|
|
FAX CONFIRMATION
|
- Off (no status page is printed)
- Print for all (prints a status report after each fax you send, including jobs that have errors)
- Print for errors (prints a status report only after jobs that did not send) (default)
|
|
ACTIVITY REPORT GENERATION
|
- On request (you can ask for the report to print) (default)
- After 40 faxes (report is automatically generated after 40 faxes print)
|
|
FIT FAX TO PAGE
|
How the received fax will be printed.
- Try to fit (default)
- Two pages
|
|
FAX FOOTER
|
- On (if you want the machine to insert the time, date, and page number at the bottom of each incoming fax) (default)
- Off
|
|
DIALING METHOD
|
|
|
RING PATTERN
|
- Any (default)
- Single
- Double
- Triple
Note: You can choose distinctive rings if they are available from your local telephone service. If they are not available, select Any. See Assigning a ring pattern for your fax line for setup instructions.
|
|
DIAL PREFIX
|
- None (default)
- Create —You can create an up to 8-character prefix to be added to the beginning of each number dialed.
|
|
SCAN BEFORE DIAL
|
|
|
BLOCK JUNK FAXES
|
Note: You may enter up to 50 numbers to block faxes from.
|
|
BLOCK "NO ID" CALLS
|
|
|
EDIT JUNK FAX LIST
|
|
|
BLOCK HOST FAX SETTINGS
|
Avoid unwanted changes from users on the network.
|
|
AUTO FAX QUALITY DOWNGRADE
|
To convert color faxes to mono or convert to a lower quality setting for faxes.
|
|
MAX SEND SPEED
|
A bps speed:
- 33,600 (default)
- 31,200
- 28,800
- 26,400
- 24,000
- 21,600
- 19,200
- 16,800
- 14,400
- 12,000
- 9,600
- 7,200
- 4,800
- 2,400
|
|
ERROR CORRECTION
|
Note: Turn error correction off if you have trouble sending a fax to an older fax machine.
|
|
LANGUAGE
|
Select a language for all display text.
|
|
COUNTRY CODE
|
- Algeria
- Argentina
- Australia
- Austria
- Belgium
- Bolivia
- Brazil
- Bulgaria
- Canada
- Caribbean Islands
- Chile
- China
- Columbia
- Croatia
- Czech Republic
|
|
COUNTRY CODE
(continued)
|
- Denmark
- Ecuador
- Egypt
- Emirates (UAE)
- Estonia
- Finland
- France
- Germany
- Greece
- Guam
- Hong Kong
- Hungary
- India
- Indonesia
- Ireland
- Israel
- Italy
- Japan
- Jordan
- Korea
- Kuwait
- Latvia
- Lebanon
- Lithuania
- Luxembourg
- Malaysia
- Mexico
- Morocco
- Netherlands
- New Zealand
- Nigeria
- Norway
- Oman
- Paraguay
- Peru
|
|
COUNTRY CODE (continued)
|
- Philippines
- Poland
- Portugal
- Puerto Rico
- Qatar
- Romania
- Russia
- Saudi Arabia
- Serbia
- Singapore
- Slovakia
- Slovenia
- South Africa
- Spain
- Sri Lanka
- Sweden
- Switzerland
- Taiwan
- Thailand
- Tunisia
- Turkey
- UK
- USA
- Uruguay
- US Virgin Islands
- Venezuela
- Vietnam
- Yemen
|
|
CALL DIAGNOSTICS
|
Note: This feature is intended for advanced troubleshooting only.
|
Selecting Scan mode menu items
- On the control panel, press Mode repeatedly until Scan is selected.
- Press Options repeatedly until the menu heading you want appears on the display.
- Press + or - to scroll through the available menu items.
- Press Select when the menu item you want appears on the display to save the setting.
Note: The option currently selected is noted with an asterisk (*) on the display.
|
From this menu
|
You can
|
|
ORIGINAL SIZE
|
Specify the size of the document on the scanner glass.
Note: Leave this on Auto Detect (default) unless the size of the document you printed is not satisfactory.
|
|
POWER SAVE
|
Select a time to begin reducing power:
- After 10 min
- After 30 min
- After 60 min
- After 6 hours (default)
- Never
|
|
CLEAR SETTINGS
|
Select when you want your All-In-One to return to the default settings:
- After 2 min (default)
- Never
|
|
SET DEFAULTS
|
Set your default settings to:
- Use Factory (default)
- Use Current
|
|
LANGUAGE
|
Select a language for all display text.
|
Using the All-In-One software
The All-In-One software consists of several components.
- Lexmark Productivity Suite (opens the component necessary for you to complete your task quickly and easily)
- The Lexmark 7100 Series All-In-One Center (scanning, copying, and faxing)
- Print Properties (printing)
- The Lexmark 7100 Series Solution Center (troubleshooting, maintenance, and cartridge ordering information)
- The Lexmark Photo Editor (editing graphics)
- The Lexmark Fax Solutions (faxing)
Using the Lexmark Productivity Suite
The Lexmark Productivity Suite enables you to complete tasks quickly and easily by opening the correct component for the task you want to complete.
Use one of these methods to open the Lexmark Productivity Suite software:
- Double-click the shortcut icon on your desktop.
- Click Start
 Programs Lexmark 7100 Series Lexmark Productivity Suite.
 - Right-click the system tray icon, and then select Productivity Suite.
The Lexmark Productivity Suite appears on your desktop.
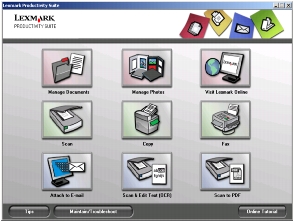
The Lexmark Productivity Suite buttons
|
Click
|
To
|
Details
|
|

|
Manage Documents
|
Organize, search for, or print documents. Send documents to other people or open them with various programs.
|
|

|
Manage Photos
|
Organize or print photos in various layouts. Send photos to other people or open them with various programs.
|
|

|
Visit Lexmark Online
|
Visit Lexmark on the Web
|
|

|
Scan
|
Scan a photo or document.
|
|

|
Copy
|
Copy a photo or document with options to enlarge, reduce, or change other features.
|
|

|
Fax
|
Send a fax or change fax settings.
|
|

|
Attach to E-mail
|
E-mail documents or photos which are scanned or saved on your computer.
|
|

|
Scan & Edit Text (OCR)
|
Scan a document to a word processor to edit its text (OCR).
|
|

|
Scan to PDF
|
Scan a document and save it on your computer in PDF format.
|
|

|
Learn more about what I can do with this software.
|
|

|
Use tools to keep your All-In-One working optimally.
|
|

|
View a Web based tutorial
|
Using the Lexmark All-In-One Center
Use the Lexmark All-In-One Center software to scan, copy, and fax documents. To open the All-In-One Center:
- Double-click the Productivity Suite icon, and select a task that requires the All-In-One Center.
- Click Start Programs Lexmark 7100 Series All-In-One Center.
- Right-click the system tray icon, and then select Lexmark 7100 Series All-In-One Center.
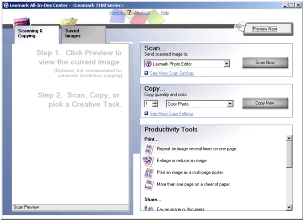
The Scanning & Copying page
The Scanning & Copying page consists of four main sections: Scan, Copy, Productivity Tools, and Preview.
|
From this section
|
You can
|
|
Scan
|
- Select a program to send the scanned image to.
- Choose what type of image is being scanned.
- Choose how the scan will be used.
Note: Click See More Scan Settings to view all settings.
|
|
Copy
|
- Select the quantity and color of your copies.
- Select a quality setting for your copies.
- Adjust the size of the scanned area.
- Lighten or darken your copies.
- Enlarge or reduce your copies.
Note: Click See More Copy Settings to view all settings.
|
|
Productivity Tools
|
Choose from a variety of creative ideas.
- Repeat an image several times on one page.
- Enlarge or reduce an image.
- Print an image as a multi-page poster.
- More than one page on a sheet of paper.
- Fax an image or document.
- E-mail an image or document.
- Save an image on my computer.
- Save multiple photos.
- Edit text found in a scanned document (OCR).
- Modify an image with a photo editor.
|
|
Preview
|
- Select a region of the preview image to scan.
- View an image of what will be printed or copied.
|
Note: For more information about the Scanning & Copying page, click Help in the top center of the screen.
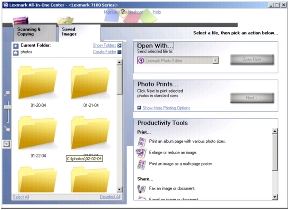
Saved Images page
Use the Saved Images page to perform tasks with images that are saved on the computer. The View Saved Images page has three sections.
|
From this section
|
You can
|
|
Open with
|
Select a program to send the saved image to.
|
|
Photo Prints
|
- Choose the quantity and color of your copies.
- Select a quality setting for your copies.
- Lighten or darken your copies.
- Enlarge or reduce your copies.
Note: Click Next to select and print photos in standard sizes, or click See More Print Settings to view additional settings.
|
|
Productivity Tools
|
- Print an album page with various photo sizes.
- Enlarge or reduce an image.
- Print an image as a multi-page poster.
- Fax an image or document.
- E-mail an image or document.
- Edit text found in a scanned document (OCR).
- Modify an image with a photo editor.
|
Note: For more information about this page, click Help in the top center of the screen.
Maintain/Troubleshoot page
The Maintain/Troubleshoot page provides you with direct links to the Lexmark Solution Center and the Fax Setup Utility.
To access the Maintain/Troubleshoot page, click the Maintain/Troubleshoot link located in the top center of the All-In-One Center. For help, see Using the Lexmark All-In-One Center.
Choose from these topics:
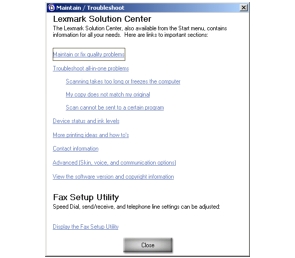
- Maintain or fix quality problems
- Troubleshoot All-In-One problems
- Device status and ink levels
- More printing ideas and how to's
- Contact information
- Advanced (Skin, voice, and communication options)
- View the software version and copyright information
- Display the Fax Setup Utility
For more information about the Lexmark Solution Center, see Using the Lexmark Solution Center.
Using Print Properties
Print Properties is the software that controls the All-In-One printing function. You can change the settings in Print Properties based on the type of project you want to create. You can open Print Properties from almost any program:
- With your document open, click File Print.
- In the Print dialog box, click the Properties, Preferences, Options, or Setup button (depending on the program).
The Print Properties screen displays.
Save Settings menu
From the Save Settings menu, you can name and save the current Print Properties settings for future use. You can save up to five custom settings.
The I Want To menu
The I Want To menu contains a variety of task wizards (such as print a photo, print on an envelope, print a banner, print a poster, or print on both sides of the paper) to help you select the correct print settings for your project. Click Close for a full view of the Print Properties dialog box.
Options menu
Use the Options menu to make changes to the Quality Options, Layout Options, and Printing Status Options settings. For more information on these settings, open the tab dialog box from the menu, and then click the Help button on the dialog box.
The Options menu also provides you with direct links to different parts of the Lexmark Solution Center (see Using the Lexmark Solution Center), as well as software version information.
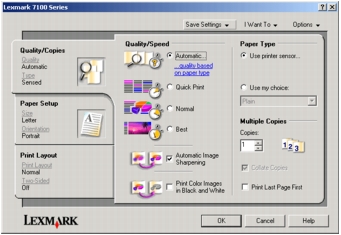
Print Properties tabs
All of the print settings are on the three main tabs of the Print Properties software: Quality/Copies, Paper Setup, and Print Layout.
|
From this tab
|
You can
|
|
Quality/Copies
|
- Select a Quality/Speed setting.
- Select a Paper Type.
- Customize how the All-In-One prints several copies of a single print job: collated or normal.
- Choose Automatic Image Sharpening.
- Choose to print color images in black and white.
- Choose to have the last page printed first.
|
|
Paper Setup
|
- Select the size of the paper you are using.
- Select how you want the document oriented on the printed page: portrait or landscape.
|
|
Print Layout
|
- Select the layout you want to print.
- Choose to print on both sides of the paper and select your duplexing preference.
|
Note: For additional information about these settings, right-click a setting on the screen, and then select the What's This? item.
Using the Lexmark Solution Center
The Lexmark Solution Center is a valuable information resource. The Solution Center provides All-In-One help and information about All-In-One status, paper type detected, and ink levels.
There are four ways to open the Lexmark Solution Center.
- Double-click the Lexmark Productivity Suite icon, and then click the Maintain/Troubleshoot button.
- Click Start Programs Lexmark 7100 Series Lexmark Solution Center.
- From the All-In-One Center, click the Maintain/Troubleshoot link located in the top center of the Scanning and Copying page, and then click a topic.
- Right-click the system tray icon, and then select Lexmark 7100 Series Solution Center.
The Printer Status tab displays.
The Lexmark Solution Center consists of six tabs: Printer Status, How To, Troubleshooting, Maintenance, Contact Information, and Advanced.
|
From this tab
|
You can
|
|
Printer Status (Main dialog box)
|
- View the status of the All-In-One. For example, while printing, the status is Busy Printing.
- View the type of paper detected in the All-In-One.
- View the ink levels of the print cartridges.
|
|
How To

|
Learn how to:
- Scan, copy, fax, and print.
- Find and change settings.
- Use basic features.
- Print projects such as banners and iron-on transfers.
|
|
Troubleshooting

|
- Learn tips about the current status.
- Solve All-In-One problems.
|
|
Maintenance

|
Note: Wait until scanning is complete before installing new cartridges.
- View shopping options for new cartridges.
- Print a test page.
- Clean to fix horizontal streaks.
- Align to fix blurry edges.
- Troubleshoot other ink problems.
- Remove Japanese postcard residue.
|
|
Contact Information

|
- Learn how to contact Lexmark by phone, e-mail, or on the World Wide Web.
|
|
Advanced

|
- Change the appearance of the Printing Status window and turn printing voice notification on or off.
- Change network printing settings.
- Share information with Lexmark regarding how you use your All-In-One.
- Obtain software version information.
|
Note: For more information, click Help in the lower right corner of the screen.
Using the Lexmark Photo Editor
Use the Lexmark Photo Editor software to edit graphics or photos before you print them.
To access the Lexmark Photo Editor:
- Click Start Programs Lexmark 7100 Series Lexmark Photo Editor or double-click an image.
- Double-click an image file.
- From the All-In-One Center Scanning and Copying page, select Photo Editor in the Send scanned imaged to: drop-down dialog box before scanning your image or document.
The Lexmark Photo Editor displays.
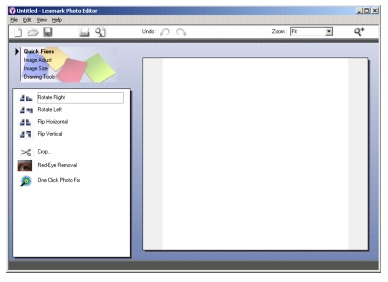
Use the available tools to edit your graphic.
Note: Move your mouse pointer over the tool for a description.
Using the Lexmark Fax Solutions
Use this utility to adjust the fax send and receive settings. When you save the settings, they apply to every fax you send or receive. You can also use this utility to create and edit your speed dial list.
Click Start Programs (or All Programs) Lexmark 7100 Series Lexmark Fax Solutions.
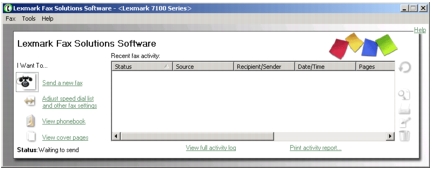
To customize fax setting using the software, click Adjust speed dial list and other fax settings. For a list of options available, see Customizing your settings using the Lexmark Fax Solutions.