 Receiving a fax
Sending a fax
Sending a fax from your computer
Adding Speed Dial numbers to your list
Using Speed Dial
Using the Quick Dial buttons
Avoiding unwanted changes to fax settings
Sending a multi-page fax to a group
Assigning a ring pattern for your fax line
Forwarding faxes
Using Caller ID
Adding fax numbers to block junk faxes
Customizing your settings using the Lexmark Fax Solutions
Adding your logo to fax cover page
Changing information that appears on your fax cover page
You can use your All-In-One to send color or black and white faxes. You can send and receive A4, legal, and letter size documents.
Receiving a fax
You can choose to receive a fax automatically, manually, or through an answering machine.
Note: For your All-In-One to receive a color fax, the machine from which you are receiving must also support color faxes.
Automatically
Recommended for a dedicated fax line
Your All-In-One automatically accepts incoming faxes using the automatic answering mode. When the Auto Answer light is on, the All-In-One receives a fax after the specified number of rings set in the Options menu.
To set a number of rings for the automatic answering mode:
- On the control panel, press Mode repeatedly until Fax is selected.
- Press Options until ANSWER FAX WHEN appears.
- Press + to choose After 1 ring, After 2 rings, After 3 rings (default), or After 5 rings.
- Press Select.
- Make sure the Auto Answer light on the All-In-One is on.
When the number of rings that you set is detected, the All-In-One automatically receives your fax.
Manually
Recommended for a shared fax and telephone line
You can choose which incoming faxes to accept by setting your All-In-One to manual answering mode.
- Make sure the All-In-One Auto Answer light is off.
- Press *9* on the telephone after you answer the telephone and hear fax tones.
- Hang up the telephone.
The All-In-One receives your fax.
Answering machine
Recommended for a shared fax and telephone line
To receive a fax with an answering machine connected to your All-In-One, set the answering machine to answer incoming calls before the All-In-One does. For example, if you set the answering machine to answer calls after 3 rings, set the All-In-One to answer calls after 5 rings.
- On the control panel, press Mode repeatedly until Fax is selected.
- Press Options until ANSWER FAX WHEN appears.
- Press + until After 5 rings appears.
- Press Select.
- Make sure the Auto Answer light on the All-In-One is on.
When a ring is detected, the answering machine picks up the call.
- If a fax is detected, the All-In-One receives the fax and disconnects the answering machine.
- If not, the answering machine completes the call.
Note: You must set up the equipment as shown in Connecting to an answering machine for this to work properly.
Sending a fax
Using the ADF
|
Using the software
|
Using the control panel
|
- Make sure your All-In-One is attached to a computer.
- Load up to 50 sheets of your original document face up in the ADF.
- Place your document with the top of the page pointing to the arrow.
- From your desktop, double-click the Lexmark Productivity Suite icon.
- Click Fax.
- Click Fax an image or document.
The Scanning and Copying page opens.
- Follow the instructions on your computer screen to complete your task.
|
- Make sure your All-In-One is on.
- Load up to 50 sheets of your original document face up in the ADF.
Note: To use the control panel and scanner glass, see Using the control panel and scanner glass.
- On the control panel, press Mode repeatedly until Fax is selected.
- Use the keypad to either:
- Enter the fax number, and then press Black or Color.
- Press Quick Dial 1, 2, 3, or 4.
- Press Speed Dial, and then:
- Use the arrow keys to scroll through the list to find the number you want, and then press Black or Color.
- Use the keypad to enter a two-digit number (viewable in the upper left of the display), and then press Black or Color.
Note: If you do not have a Speed Dial list but want to create one, see Adding Speed Dial numbers to your list.
The All-In-One scans your document and sends your fax to the number you entered.
|
Using the control panel and scanner glass
- Make sure your All-In-One is on.
- Open the top cover.
- Put the first page of your document face down on the scanner glass, as shown.
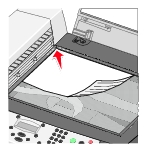
- Close the top cover.
- On the control panel, press Mode repeatedly until Fax is selected.
- Enter a fax number, press Quick Dial 1, 2, 3, or 4, or press Speed Dial to select numbers from your speed dial list.
- Press Black or Color.
- Do you have another page?
- If not, press 2 to answer No.
- If yes, press 1, then follow these steps:
- When your machine prompts you for another page, place the second page of your document face down in the upper left corner on the scanner glass.
- Press Select.
- Repeat these steps until you have scanned the last page of your document, and then press 2 to answer No.
Sending a fax from your computer
You can create a soft copy document on your computer and send a black and white fax of it to someone else.
Note: You cannot receive soft copy faxes, only send them. All incoming faxes will print from your All-In-One.
To send a fax from your computer program using the fax modem in your All-In-One:
- With your document open, click File
 Print.
- In the All-In-One list, select the Fax Lexmark 7100 Series.
- Click OK.
- To send a soft copy fax, follow the instructions in the program that launches.
Note: All faxes sent using the soft copy fax feature appear in Fine resolution.
Adding Speed Dial numbers to your list
|
Using the computer (recommended)
|
Using the control panel
|
- Click Start Programs Lexmark 7100 Series Lexmark Fax Solutions.
- Click Adjust speed dial list and other fax settings.
- Click the Speed Dial tab.
- Follow the instructions on the Speed Dial tab to add a new number to your speed dial list.
- Press Save Settings after you finish your updates. Nothing is saved until you press this button.
Note: If you are using an computer with Chinese, Japanese, or Korean languages, you are unable to enter a name.
|
- On the control panel, press Mode repeatedly until Fax is selected.
- Press Options until you see EDIT SPEED DIAL.
- If the current option is Add, press Select. Press + to scroll, if necessary.
- Enter a two-digit speed dial number, and then press Select.
- Enter the fax number, and then press Select.
- Enter the name using the keypad.
- Find the number button that corresponds to the letter you want to enter and press it repeatedly until the correct letter appears.
- Press + to move to the next character.
Note: To enter a space between words, press + twice.
- Repeat the previous steps until you are finished entering text.
- Press Select when you are finished.
Saved appears on the display.
Note: If you are using an All-In-One with Chinese, Japanese, or Korean languages, you are unable to enter a name.
|
Using Speed Dial
To make sending faxes easier, you can enter up to 99 speed dial numbers. You can enter 79 individual fax numbers and 20 groups that can hold up to 5 phone numbers each. The first four numbers assigned will be assigned to Quick Dial 1, 2, 3, and 4.
- Make sure the All-In-One is on.
- Load your original document. For help, see Loading an original document face up into the ADF, or Loading an original document face down on the scanner glass.
- Press Speed Dial.
- Press + to scroll through the list, or use the keypad to enter the two-digit speed dial number.
- Press Color or Black to send your fax.
Using the Quick Dial buttons
You can access speed-dial numbers 01-04 with the quick dial buttons. These buttons are automatically programmed when you program the first four speed dial numbers. To send a fax using one of the quick dial buttons:
- Make sure the All-In-One is on.
- Load your original document. For help, see Loading an original document face up into the ADF, or Loading an original document face down on the scanner glass.
- Press Quick Dial 1, 2, 3, or 4.
The number assigned to that button appears.
- Press Color or Black to send your fax.
Avoiding unwanted changes to fax settings
- On the control panel, press Mode repeatedly until Fax is selected.
- Press Options repeatedly until ADVANCED FAX appears on the display.
- Press Select.
- Press Options repeatedly until BLOCK HOST FAX SETTINGS appears.
- Press + repeatedly until On appears.
- Press Select.
Sending a multi-page fax to a group
You can send a multi-page fax to as many as 5 people at once.
To send a broadcast fax immediately
- Load your original document. For help, see Loading an original document face up into the ADF.
- On the control panel, press Mode repeatedly until Fax is selected.
- Enter a fax number, press Quick Dial 1, 2, 3, or 4, or press Speed Dial to select numbers from your speed dial list.
- Press Select to enter another fax number.
- Continue this procedure until all of the fax numbers (up to 5 numbers) have been entered.
- Press Black or Color to send the fax to the numbers you entered.
To delay sending a broadcast fax
- On the control panel, press Mode repeatedly until Fax is selected.
- When the default screen appears, press Options until DELAY UNTIL appears.
- Press + until Time appears.
- Press Select.
- Enter the time you want your fax to send.
- Press Select.
- Press 1 for AM, 2 for PM, or 3 for 24-hour mode.
- Enter a fax number, press Quick Dial 1, 2, 3, or 4, or press Speed Dial to select numbers from your speed dial list.
- Press Black or Color to send your fax to this number, or press Select to enter another fax number (you can do this up to 5 times and the delayed fax will be sent to as many numbers as you entered).
Note: At the designated time, the fax numbers are dialed and the fax transmitted to all of the designated fax numbers. If the fax transmission is unsuccessful to any of the numbers on the broadcast list, the unsuccessful numbers will be tried again.
Sending a delayed fax using speed dial
- On the control panel, press Mode repeatedly until Fax is selected.
- When the default screen appears, press Options until DELAY UNTIL appears.
- Press + until Time appears.
- Press Select.
- Enter the time you want your fax to send.
- Press Select.
- Press 1 for AM, 2 for PM, or 3 for 24-hour mode.
- Press Speed Dial and then:
Or
- Press the keypad buttons to enter a two-digit number (viewable in the upper left corner of the display).
- Press Black or Color.
Manually dialing a fax while listening to a telephone line (On Hook Dial)
The manual dialing feature lets you dial a telephone number while listening to the call through a speaker on the All-In-One. It is useful when you must use an automated answering system before sending your fax.
- On the control panel, press Mode repeatedly until Fax is selected.
- Press Options repeatedly until ON HOOK DIAL appears.
- Press Select. You can now hear the dial tone of the phone line.
- Enter the number to which you want to send a fax.
Note: Press the keypad numbers to use an automated answering system, if necessary.
- Press Black or Color when you hear fax tones to send your fax.
Dialing behind a PBX
If the All-In-One is connected to a PBX phone system, you may need to set the Dialing method to Behind a PBX. Ordinarily, when dialing a fax number, the All-In-One waits to recognize the dial tone and then dials the fax number. However, this method of dialing may not work if the PBX phone system has a dial tone that is not recognizable to most fax machines. Dialing behind a PBX enables the All-In-One to dial the fax number without waiting to recognize the dial tone.
To set the All-In-One to Behind a PBX:
- On the control panel, press Mode repeatedly until Fax is selected.
- Press Options repeatedly until ADVANCED FAX appears on the display, and then press Select.
- Press Options repeatedly until DIALING METHOD appears on the display.
- Press + repeatedly until Behind a PBX appears.
- Press Select.
When you send a fax, the All-In-One dials behind the PBX phone system.
Assigning a ring pattern for your fax line
Distinctive ring is a service provided by some telephone companies that assigns multiple phone numbers to a single telephone line. If you subscribe to this service, you can program your All-In-One to have a distinctive ring pattern and phone number for incoming faxes.
To use distinctive ring for faxing:
- Order the distinctive ring service from your telephone company.
- On the control panel, press Mode repeatedly until Fax is selected.
- Press Options repeatedly until ADVANCED FAX appears.
- Press Select.
- Press Options repeatedly until RING PATTERN appears.
- Press + to scroll through the available options:
- Any (default)
- Single ring
- Double ring
- Triple ring
- Press Select when the ring you want appears.
Auto Answer
When using the Auto Answer feature, set the number of rings before the fax is received. The default is set to After 3 rings. To change this setting:
- On the control panel, press Mode repeatedly until Fax is selected.
- Press Options until ANSWER FAX WHEN appears on the display.
- Press + to choose After 1 ring, After 2 rings, After 3 rings (default), or After 5 rings.
- Press Select.
When the number of rings you set is detected, the All-In-One automatically receives your fax.
If you want to receive faxes manually, see Manually.
Forwarding faxes
There are three fax forwarding settings:
- Off (default)
- Forward—When your All-In-One receives a fax, it holds it in memory and then sends it to the fax number that you designated.
- Print and forward—The All-In-One forwards the fax to the designated fax number and prints the fax.
- On the control panel, press Mode repeatedly until Fax is selected.
- Press Options until FAX FORWARD appears on the display.
- Press + repeatedly until the option you prefer (Forward or Print&Forward) appears, and then press Select.
Fwd now appears on the bottom left corner of the display.
- Enter the fax number to forward the fax number to, and then press Select.
Using Caller ID
Caller ID is a service provided by some telephone companies that identifies the phone number (and possibly the name) of the person who is calling. If you subscribe to this service, it works with your All-In-One. When you receive a fax, the phone number of the person who is sending you the fax appears on the display.
Note: Caller ID is available only in some countries and regions.
Adding fax numbers to block junk faxes
Junk Fax Blocking helps you regulate who you receive faxes from.
Create a junk fax list
- On the control panel, press Mode repeatedly until Fax is selected.
- Press Options until ADVANCED FAX appears on the display, and then press Select.
- Press Options until EDIT JUNK FAX LIST appears on the display.
- Press + until Add appears on the display, and then press Select.
- Enter a two-digit number or a telephone number, and then press Select.
- Enter a name, and then press Select.
- If you want to add another phone number to the list, press 1. If you do not want to add another phone number, press 2.
- Press Options until BLOCK JUNK FAXES appears on the display.
- Press + until On appears on the display, and then press Select.
Your All-In-One will no longer accept faxes from the fax numbers you entered.
Customizing your settings using the Lexmark Fax Solutions
You can adjust the fax settings in the Lexmark Fax Solutions. These settings apply to the faxes you send or receive.
- Click Start Programs Lexmark 7100 Series Lexmark Fax Solutions.
- Click Adjust speed dial list and other fax settings.
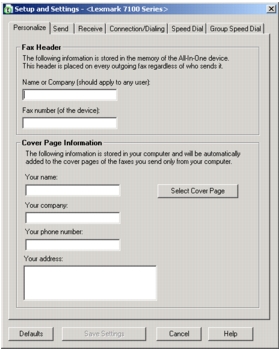
- Click each tab and change the settings as desired.
- Press Save Settings after you finish your updates. Nothing is saved until you press this button.
- Click Close.
The following table contains the Setup and Settings tabs for the Lexmark Fax Solutions.
|
On this tab
|
You can
|
|
Personalize
|
- Enter your company name and fax number.
- Enter your name, company name, phone number and address as you want them to appear your cover page.
- Select a cover page for your fax.
|
|
Send
|
- Choose to use error correction.
- Choose to use fax header.
- Select a maximum send speed and a print quality for outgoing faxes.
- Choose whether to scan the entire document before dialing the number.
- Select when to print a fax usage report.
- Select when to print a fax activity report.
|
|
Receive
|
- Choose to print a footer (the date, time, and page number) to appear on each page you receive.
- Automatically reduce an incoming fax to fit to the paper size loaded or print it on two sheets of paper.
- Select whether you want to forward a fax or print it, and then forward it.
- Manage junk faxes.
|
|
Connection
|
- Select the number of times you want the machine to redial and the time between those attempts if the fax cannot be sent on the first try.
- Select the phone line format you want to use (Pulse, Touch-tone, Behind a PBX).
- Enter a dialing prefix.
- Choose how (manually, if fax tones are detected, or after a certain amount of rings) you want to answer incoming calls.
- Choose a distinctive ring.
|
|
Speed Dial
|
Add to, create, edit, or delete entries from the speed dial list.
|
|
Group Speed Dial
|
Create a group number and name, and add phone numbers to the group.
|
Adding your logo to fax cover page
- Click Start Programs Lexmark 7100 Series Lexmark Fax Solutions.
- Click View Cover Pages.
- Click Change....
- Click Browse... to locate your logo graphic.
- Customize any other settings available.
- Click OK.
Changing information that appears on your fax cover page
- Click Start Programs Lexmark 7100 Series Lexmark Fax Solutions.
- Click View Cover Pages.
- Click Change your personal information that appears on this page.
- Make any changes.
- Click OK.