 Replacing the print cartridges
Aligning the cartridges
Improving print quality
Changing the language on the printer display
Replacing the print cartridges
Your printer uses the following cartridges:
|
Left cartridge carrier:
Black or Photo cartridge
|
Right cartridge carrier:
Color cartridge
|
|
|
|
Checking your printer's ink levels
- Press the Menu button on the front of the printer.
- Use the down arrow button until Ink Levels is highlighted, then press Select to see the ink levels. To return to the Photo Menu, press Select again.
Ordering supplies
To order printer supplies or to locate a dealer near you, visit the Lexmark Web site at www.lexmark.com.
Note: When ordering a USB cable, use part number 43H5856.
Recycling Lexmark products
To return your Lexmark products to Lexmark for recycling:
- Visit our Web site: www.lexmark.com/recycle
- Follow the instructions on your screen.
Removing a used cartridge
Note: Make sure the printer is on.
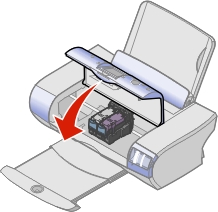
- Raise the access cover.
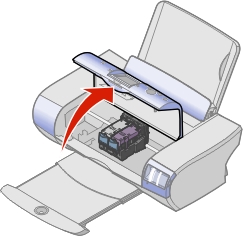
The print cartridge carrier moves and stops at the loading position unless the printer is busy.
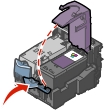
- Press down on the cartridge lever to raise the cartridge lid.
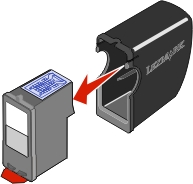
- Remove the old cartridge. Store it in an airtight container or dispose of it.
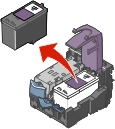
Note: If you are removing both cartridges, repeat steps 2 and 3 for the second cartridge.
Installing the print cartridges
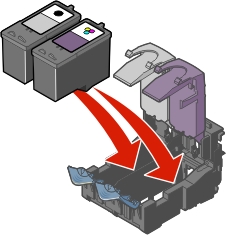
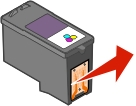
- If you are installing new cartridges, remove the sticker and transparent tape from the back and bottom of the cartridges.
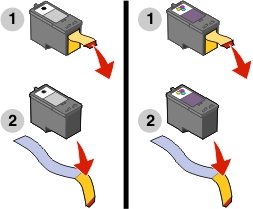
Warning: Do not touch the copper contact area on the back or the metal nozzles on the bottom of the cartridges.
- Unless they are already open, press down on the cartridge levers to raise the cartridge lids.
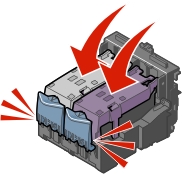
- Insert the black cartridge or the photo cartridge in the left carrier. Insert the color cartridge in the right carrier.
- Snap the lids closed.
- Close the access cover.
Note: The access cover must be closed to start a print job.
Aligning the cartridges
Your printer aligns the print cartridges when they are installed or replaced.
- Load plain paper. See Loading paper.
- Install the print cartridges and close the access cover. See Installing the print cartridges.
- Follow the alignment page directions on your computer screen.
Note: You can also align the cartridges by following the instructions on the printer display.
- Your printer prints an alignment page.
Your print cartridges are now aligned for optimal print quality.
However, you may need to align cartridges when:
- Characters are not properly formed or are not aligned at the left margin.
- Lines that should be vertical and straight print as wavy.
To align the cartridges:
- Load plain paper. See Loading paper.
- Open the Lexmark Imaging Studio. See Working with the Lexmark Imaging Studio.
- Click the Maintain/Troubleshoot button.
- From the Maintenance tab, click Align to fix blurry edges.
- Click Print. The cartridges are aligned after the page prints.
Improving print quality
If you are not satisfied with the print quality of your document, make sure you:
- Use the appropriate paper for the document. For example, use photo paper if you are using a photo cartridge.
- Use paper that is a heavier weight, is bright white, or is coated.
- Select a higher print quality:
- From your program, click File
 Print. The Print dialog box appears.
- From the Print dialog box, click Properties, Preferences, or Options.
- From Quality/Speed, select a higher quality setting.
- Print your document again.
If your document still does not have the print quality you want, follow these steps:
- Remove the print cartridges. See Removing a used cartridge.
- Insert the print cartridges. See Installing the print cartridges.
- Print your document again.
If print quality has not improved, continue with Cleaning the print cartridge nozzles.
Cleaning the print cartridge nozzles
|
Using your computer's software
|
Using your printer's control panel
|
- Load paper. See Loading paper.
- Click Start Programs Lexmark P910 Series Lexmark Solution Center.
- Click the Maintenance tab.
- From the Maintenance tab, click Clean to fix horizontal streaks.
- Click Print.
- A page prints, forcing ink through the clogged nozzles to clean them.
|
- Load paper. See Loading paper.
Press the Menu button until Photo Menu is displayed.
- Use the down arrow button to scroll to Clean Cartridges.
- Press Select.
A page prints, forcing ink through the clogged nozzles to clean them.
|
|
|
If you are not satisfied with the print quality, continue with Wiping the print cartridge nozzles and contacts, and then print your document again.
Wiping the print cartridge nozzles and contacts
- Remove the print cartridges. See Removing a used cartridge.
- Dampen a clean, lint-free cloth with water.
- Gently hold the cloth against the nozzles for about three seconds, and then wipe in the direction shown.
- Using another clean section of the cloth, gently hold the cloth against the contacts for about three seconds, and then wipe in the direction shown.
- With another clean section of the cloth, repeat steps 3 through 4.
- Let the nozzles and contacts dry completely.
- Reinsert the print cartridges, then print your document again.
If the print quality does not improve, repeat Wiping the print cartridge nozzles and contacts up to two more times.
If print quality is still not satisfactory, replace the print cartridges. See Replacing the print cartridges.
Preserving the print cartridges
To ensure the longest life from your print cartridges and optimum performance from your printer:
- Keep a new print cartridge in its packaging until you are ready to install it.
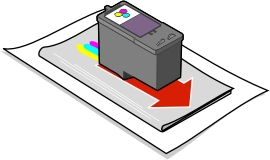
- Do not remove a print cartridge from the printer except to replace, clean, or store it in an airtight container. When it is not in use, keep your photo print cartridge in the print cartridge storage unit.
Refilling cartridges
Lexmark's printer warranty does not cover repair of failures or damage caused by a refilled cartridge. Lexmark does not recommend use of refilled cartridges. Refilling cartridges can affect print quality and cause damage to the printer. For best results, use Lexmark supplies.
Changing the language on the printer display
- Press the Menu button until Photo Menu is displayed.
- Scroll using the down arrow button until Language is highlighted.
- Press the left or right arrow button until the language you want is displayed, and then press Select.
Note: Press the Menu button to see the new language displayed.