 Scanning an item
Customizing a scan job
Scanning an item
- Open the top cover of the All-In-One.
- Place the item you want to scan on the scanner glass. For more information, see Placing documents on the scanner glass.
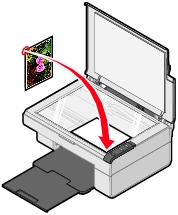
- Close the top cover.
- Press the
 button on the All-In-One control panel.
The All-In-One Center appears on the computer screen with a preview of the item on the scanner glass.
- From the "Send scanned image to:" drop-down menu, select a program.
- Adjust the dotted lines to fit around the portion of the image you want to scan.
- Customize the scan settings. For more information, see Customizing a scan job.
- Click Scan Now to complete the scan.
Customizing a scan job
- Open the All-In-One Center. For more information, see Using the Lexmark All-In-One Center.
- From the Scanning & Copying tab, click See More Scan Settings.
- From the What is being scanned? area, select an option.
- From the "Select Scan Quality" drop-down menu, select an option.
- Click Display Advanced Scan Settings to change advanced options.
- Click the tabs to make changes as needed. For a description of the tabs, see Advanced Scan Settings.
- When you are finished customizing the scan settings, click OK to save.
- To scan, click Scan Now.
Advanced Scan Settings
|
Click this tab
|
To
|
|
Scan
|
- Choose the color depth and scan resolution.
- Choose to scan using pure optical resolution.
- Choose whether to auto-crop more or less of the scanned image.
- Select the area to be scanned.
- Choose to convert the scanned item to text for editing.
- Choose to scan multiple images before output.
- Update the list of programs to send scans.
- Update the default fax driver.
|
|
Image Enhancements
|
- Straighten images after scan (deskew).
- Choose whether to sharpen or blur the images.
- Adjust the brightness of the image.
- Adjust the color correction curve (gamma) of the image.
|
|
Image Patterns
|
- Smooth the conversion of a gray image to a black and white dot pattern (dither).
- Remove image patterns from magazines or newspapers (descreen).
- Select whether to process with Best quality or Best speed.
- Reduce more or less of the background noise on the color document.
|
Note: For more information, click Help at the bottom of the screen.
Previewing items before scanning
|
From the computer
|
From the control panel
|
- Place the item on the scanner glass. For more information, see Placing documents on the scanner glass.
- Open the All-In-One Center. For more information, see Using the Lexmark All-In-One Center.
The All-In-One Center appears.
- Make sure the Scanning & Copying tab is selected.
- From the Scan section, click Preview Now.
- Adjust the dotted lines to fit around the portion of the image you want to scan.
|
- Place the item on the scanner glass. For more information, see Placing documents on the scanner glass.
- Press the button.
On the computer screen, the All-In-One Center appears with a preview of the item.
- Adjust the dotted lines to fit around the portion of the image you want to scan.
|
Finishing the scan
- Select the scan destination from the drop-down menu.
Note: If the program you want to use is not listed, select Search for more... in the drop-down box. On the screen that follows, click Add to locate and add the program to the list.
- Change any settings as needed. For more information, see Customizing a scan job.
- When you are finished customizing the image, click Scan Now.
When the document has finished processing, it will open the program to which you chose to send the image.
E-mailing a scanned image or document
- Open the Lexmark Imaging Studio. For more information, see Using the Lexmark Imaging Studio.
- Click the Share Photos button.
- Select Scan and e-mail a photo.
- Follow the instructions on the computer screen to prepare the item for e-mailing.
- Click Next.
- Write a note to accompany the attached item, and then send it.
E-mailing a saved image or document
- Open the Lexmark Imaging Studio. For more information, see Using the Lexmark Imaging Studio.
- Click the Share Photos button.
- Select Find and e-mail a saved photo.
- Click Show Folders to browse to the folder where the saved images are stored.
- Click Hide Folders to close the folder window.
- Select the photo(s) you want to send.
- Follow the instructions on the computer screen to prepare the item for e-mailing.
- Click Attach Now.
- Write a note to accompany the attached item, and then send it.
Editing scanned text using Optical Character Recognition (OCR)
- Place the image face down on the scanner glass. For more information, see Placing documents on the scanner glass.
- Open the Lexmark Imaging Studio. For more information, see Using the Lexmark Imaging Studio.
- Click the Scan and Edit Text (OCR) button.
The Edit text in a document feature appears. You can preview the image if you want.
- From the "Select your text editor" drop-down menu, select a word-processing or text-editing program.
- If you have more than one page, click Yes, prompt me for each page.
- Click Send Now.
The text-editing program appears, and the scanned text appears on the computer screen.