Installing the print cartridges
- If you are installing new cartridges, remove the sticker and transparent tape from the back and bottom of the cartridges.
|
Warning: |
Do not touch or remove the gold contact area on the back and bottom of each print cartridge. |
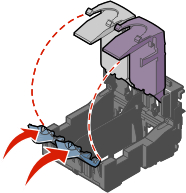
- Open the scanner unit.
- Open the cartridge carrier lids by pressing down firmly on the carrier levers.
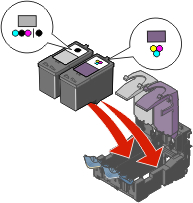
- Insert the black or photo cartridge in the left carrier. Insert the color cartridge in the right carrier.
You can print with a color cartridge and a black cartridge, with a color cartridge and a photo cartridge, or with a single cartridge.
|
Note: |
Depending on the part numbers you use, the color of the cartridge tops may vary. |
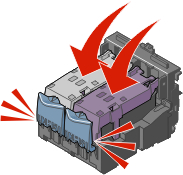
- Snap the cartridge carrier lids into place.
- Close the scanner unit. The scanner unit must be closed to start a print job.
- Align the print cartridges and specify cartridge settings.
Related topics
Aligning the print cartridges
Closing the scanner unit
Opening the scanner unit
Preserving the print cartridges
Print cartridges
Removing the print cartridges
Specifying cartridge settings