 Copying photos without a computer
Changing copy settings
Copying photos
Copying photos without a computer
To make a copy by pressing Color Copy or Black Copy on the control panel:
- Load photo paper. For more information, see Loading specialty media into the paper support.
- Select the copy quality you want. See Control panel menus.
- Open the top cover of the All-In-One.
- Place the item you want to copy face down on the scanner glass. Make sure the upper left corner of the front of the item aligns with the arrow on the right of the All-In-One.
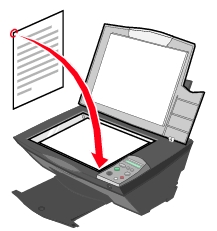
- Close the top cover.
- Change copy settings as needed. For more information, see Control panel menus.
Note: If you are using the Lexmark software on a computer instead of the All-In-One's control panel buttons, see Changing copy settings.
- Press Black Copy or Color Copy.
Changing copy settings
- Right-click the Lexmark Imaging Studio icon in the system tray.
- Select Lexmark Imaging Studio.
- Click the Copy button.
- Select a copy quantity and color.
- Click See More Copy Settings to:
- Select a copy quality.
- Select the Blank Paper size.
- Select the original document size.
- Lighten or darken the document.
- Reduce or enlarge the document.
- Click Display Advanced Copy Settings to change options such as paper size or print quality.
Advanced Copy Settings
|
Click this tab
|
To
|
|
Print
|
- Select the paper size.
- Select the paper type.
- Select borderless printing options.
- Select the print quality.
|
|
Scan
|
- Select the color depth.
- Select the scan resolution.
- Select whether to auto-crop the scanned image.
- Select an exact size to be scanned.
|
|
Image Enhancements
|
- Select whether to deskew the image.
- Select whether to sharpen blurry images.
- Adjust the brightness of the image.
- Adjust the color correction curve (gamma) of the image.
|
|
Image Patterns
|
- Select whether to process for best quality or best speed.
- Select whether you are scanning a newspaper, magazine, or lithograph.
- Control the darkness of the edges of the text.
- Remove wavy patterns from magazines or newspapers (descreen).
- Reduce more or less of the background noise (scratches) on color documents.
|
- Click the tabs and select options to make changes as needed.
- When you are finished customizing the copy settings, click OK, and then click Copy Now on the main page.
Note: For more information, see Changing advanced copy settings.
Copying photos
- Place the photo face down on the scanner glass. For more information, see Copying photos.
- Make sure the computer and All-In-One are on.
- Load photo paper with the print side facing you. For more information, see Loading specialty media into the paper support.
- Right-click the Lexmark Imaging Studio icon in the system tray.
- Select Lexmark 3300 All-In-One Center.
- If you want to see a preview of the image, click Preview Now.
- Adjust the dotted lines to fit around the part of the image you want to print.
- From the Copy section, select a copy quantity.
- Select Color Photo or Black & White Photo from the color drop-down.
- To adjust the photo, click See More Copy Settings.
- Click Copy Now when you are finished with the settings.