 Understanding the box contents
 Understanding the box contents
Setting up the All-In-One with a computer
Setting up the All-In-One without a computer
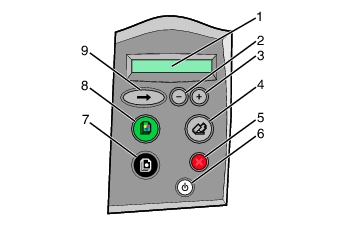
Learning about the control panel
To set up the All-In-One, follow the Lexmark 3300 Series setup documentation. If problems occur during the setup process, see Setup troubleshooting.
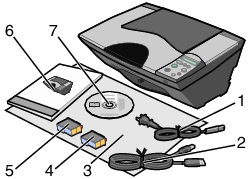
Note: A USB cable may or may not be included.
|
1 |
Power supply cord |
5 |
Black or photo print cartridge |
|
2 |
USB cable |
6 |
User's Guide and, or Setup Solutions booklet |
|
3 |
Setup sheet |
7 |
Driver and software CD |
|
4 |
Color print cartridge |
||
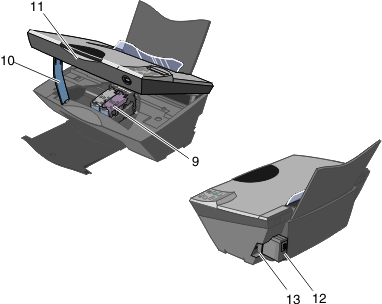
If you have not already done so, follow the steps on the setup sheet to complete the hardware and software installation. If problems occur during the setup process, see Setup troubleshooting.
If you are using the All-In-One without a computer, make sure you follow the steps on the setup sheet to complete hardware installation. Continue with the following steps to optimize print quality.
Note: When you first start the All-In-One, the control panel display reads: , then, .
During printing, a message on the control panel display reads .
After the page prints, the message reads .
This occurs when you start the All-In-One or when you change cartridges.

Press the ![]() button to scroll to the next menu item. Adjust the setting on the currently displayed menu by pressing the
button to scroll to the next menu item. Adjust the setting on the currently displayed menu by pressing the ![]() and
and ![]() buttons.
buttons.
When in idling mode, the display will read . If you press the Power button during a printing task, it will cancel the job, eject the page and turn off the All-In-One.
|
|
Use |
To |
|---|---|---|
|
1 |
Display screen |
|
|
2 |
Minus
|
|
|
3 |
Plus
|
|
|
4 |
Scan
|
|
|
5 |
Cancel
|
Note: Pressing Cancel during a task will stop the task, but leave the All-In-One on. |
|
6 |
Power
|
Turn the All-In-One on or off. Note: When the button is pressed, you will see the message as the All-In-One powers up. |
|
7 |
Black Copy
|
Make a black-and-white copy.
|
|
8 |
Color Copy
|
Make a color copy.
|
|
9 |
Arrow
|
Scroll through the available menus on the display. The Arrow key is used to scroll, select and feed paper to the All-In-One. When you press this button when selecting, the current selection is saved and you are advanced to the next menu or the starting position. If you press and hold the button for 10 seconds, a page will be advanced into the All-In-One. If you repeat this, the page will be ejected from the All-In-One. |
Note: If you run out of paper while printing, add paper and press ![]() to continue. This will feed paper into the All-In-One. For more information, see Error messages troubleshooting.
to continue. This will feed paper into the All-In-One. For more information, see Error messages troubleshooting.
Pressing the Arrow ![]() button presents menus on the display in this order:
button presents menus on the display in this order: