 Setup troubleshooting
 Jams and misfeeds troubleshooting
Memory card and PictBridge troubleshooting
Error messages troubleshooting
Should the All-In-One have a problem, this section helps you find the solution.
|
Symptom |
Diagnosis |
Solution |
|---|---|---|
|
Incorrect language appears on the display |
You may have selected the current language during the initial printer setup. |
Select the language of your choice: |
|
The Power light does not come on |
Is the power cord pushed all the way into the All-In-One? |
|
|
Is the All-In-One connected to a working electrical outlet? |
||
|
Software does not install |
Does the software launch automatically when you insert the CD? |
If the software does not launch automatically, follow these steps: In Windows XP, click Start to access the My Computer icon. |
|
Is your operating system compatible with the All-In-One? |
The All-In-One supports these operating systems: |
|
|
Are you using the correct CD to install the software? |
There are two installation CDs for this printer. |
|
|
Software does not install |
Is there anti-virus software installed on your computer? |
Disable all anti-virus software, and then try installing the software again. Follow these steps:
Note: After installation is complete, remember to re-enable your anti-virus software. |
|
Alignment page or test page does not print |
Is the All-In-One on? |
Press the Power button. If the Power light does not come on, see "The Power light does not come on" symptom at the beginning of this table. |
|
Do you see an error message? |
||
|
Did you remove the sticker and transparent tape from the bottom of each print cartridge? Are the print cartridges installed properly? |
Remove the print cartridges, check for the sticker and transparent tape, and then reinsert them. For help, see Replacing the print cartridges. |
|
|
Is the paper loaded correctly? |
See Loading paper. |
If the printer software is not functioning properly, or a communications error message appears when you try to use the printer, you may need to remove and then reinstall the printer software.
Note: Before reinstalling, shut down and restart the computer.
 Programs Lexmark 4300 Series Uninstall.
If the software installation screen does not appear:
In Windows XP, click Start to access the My Computer icon.
|
Symptom |
Diagnosis |
Solution |
|---|---|---|
|
Poor text and graphic quality
Including: |
Are you using the scan or copy features? |
|
|
Are you using the correct color setting? |
Try using a different color setting in your program. |
|
|
Did the ink completely dry on the print media before you removed it from the exit tray? |
Allow the ink some time to dry completely before handling the paper. |
|
|
Is the paper wrinkled? |
Use a new piece of paper that is straight and unwrinkled. |
|
|
Are the All-In-One settings adjusted to the correct paper type and size? |
Select the correct paper type and size in Preferences, Properties, the All-In-One software, or from the control panel. |
|
|
Are the All-In-One settings adjusted to the appropriate Quality for the paper type? |
Select the highest appropriate Quality for the paper type in Preferences, Properties, or from the All-In-One software. |
|
|
Are the print cartridges aligned properly? |
||
|
Have the print cartridges been properly maintained? |
||
|
Is the All-In-One out of ink? |
Replace the print cartridge with a new cartridge. For help, see Replacing the print cartridges. |
|
|
Poor quality at the edges of the page |
Are you printing beyond the minimum print margins for the All-In-One? |
Unless you are using the borderless feature, do not exceed minimum print margins. Left and right margins: Top margin: Bottom margin: |
|
Printer does not print or respond |
Do you see an error message? |
|
|
Is the All-In-One installed properly on the computer? |
If you are not sure, uninstall the All-In-One software, and reinstall it. For help, see Removing and reinstalling the software. |
|
|
Has the document been held or paused? |
||
|
Is the All-In-One set as the default printer? |
||
|
Slow print speed |
Are there other programs running on the computer? |
Close all programs not in use. |
|
Are you using the highest print quality resolution? |
Reduce the print quality resolution. Quick and Normal print more quickly than Photo. Photos or documents containing graphics may take longer to print than regular text. |
|
|
Does the computer meet the minimum memory requirements for the All-In-One? |
Consider purchasing more Random Access Memory (RAM) for the computer. |
Check the All-In-One status to make sure a document is not being held or paused and that the All-In-One is set as the default printer. To check the status:
Control Panel Printers and Other Hardware Printers and Faxes (Windows XP).
Click Start Settings Printers and Faxes or Printers (Windows 98, Me, 2000).
If you are not satisfied with the print quality of a document, make sure you:
If you still do not have the print quality you want, follow these steps:
If print quality has not improved, continue to step 2.
If print quality has not improved, repeat step 2 up to two more times before continuing to step 3.
If print quality has not improved, continue to step 4.
If print quality has not improved, repeat step 4 up to two more times.
Warning: Do not touch the copper contact area on the back or the metal nozzles on the bottom of the cartridges.
Note: Place two pieces of paper under the cloth to avoid getting ink on the work surface.

If print quality has not improved, try cleaning the print cartridge nozzles up to two more times.
|
Symptom |
Diagnosis |
Solution |
|---|---|---|
|
Scanner or copier is not responding |
Is the All-In-One on? |
Press the Power button. If the Power light does not come on, see The Power light does not come on. |
|
Do you see an error message? |
||
|
Is the All-In-One installed properly on the computer? |
If you are not sure, uninstall the All-In-One software and reinstall it. For help, see Removing and reinstalling the software. |
|
|
Poor quality at the edges of the page |
Are the All-In-One settings adjusted to the correct paper type and size? |
Select the correct paper type and size in Preferences, Properties, the All-In-One software, or from the control panel. |
|
Poor quality from scan or copy feature
Including: |
Has the Brightness setting on the All-In-One been changed? |
To adjust the brightness:
|
|
Is the original document or image placed properly on the scanner glass? |
The document must be placed face down on the scanner glass. See Loading a document on the scanner glass. |
|
|
Are the copy settings in the All-In-One Center set correctly? |
||
|
Are you copying or scanning a magazine or newspaper? |
||
|
Is the scanner glass dirty? |
Gently wipe the scanner glass with a damp, clean, lint-free cloth. |
|
|
Is the quality of the original document or image satisfactory? |
Try using another version of the document or image. |
|
|
Are the print cartridges aligned properly? |
||
|
Have the print cartridges been properly maintained? |
||
|
Is the All-In-One out of ink? |
Replace the print cartridge with a new cartridge. For help, see Replacing the print cartridges. |
The All-In-One Center appears.
The All-In-One Center appears.
The All-In-One Center appears.
Note: DSL (digital subscriber line), ISDN (integrated services digital network), and cable modems are not fax modems and are not supported.
Find the problem in the following table that best matches the problem you are having:
|
Symptom |
Diagnosis |
Solution |
|---|---|---|
|
Cannot send fax |
Is the All-In-One on? |
Press the Power button. The Power light comes on. |
|
Are the connections (power cord, telephone, handset, answering machine) loose? |
Make sure all the connections are secure. |
|
|
Is the original document loaded correctly? |
Load the original document face down on the front right corner of the scanner glass. See Loading a document on the scanner glass. |
|
|
Is there a paper jam? |
||
|
Cannot receive fax
|
Is the All-In-One on? |
Press the Power button. The Power light comes on. |
|
Are the connections (power cord, telephone, handset, answering machine) loose? |
Make sure all the connections are secure. |
|
|
Are both the black and color print cartridges installed? |
Install both print cartridges. The All-In-One only works if you have both print cartridges installed. For help installing the cartridges, see Installing the print cartridges. |
|
|
Is the paper loaded correctly? |
See Loading paper. |
|
|
Is there a paper jam? |
||
|
Received fax is blank |
Is the original document loaded correctly? |
Load the original document face down on the front right corner of the scanner glass. |
|
Is the receiving fax machine out of ink? |
Replace the print cartridge with a new cartridge. For more information, see Replacing the print cartridges. |
|
|
Are both the black and color print cartridges installed? |
Install both print cartridges. The All-In-One only works if you have both cartridges installed. For help installing the cartridges, see Installing the print cartridges. |
|
|
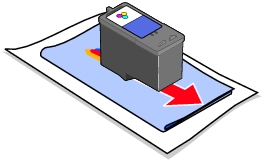
Are the sticker and tape removed from the print cartridges? |
Remove the stickers and transparent tape from the bottom of the print cartridges. For an illustration, see Installing the print cartridges. |
|
|
Received fax with poor print quality |
Does the original document have poor quality? |
Make sure the quality of the original document is satisfactory. |
|
Is the ink low on the receiving fax machine? |
Replace the print cartridge with a new cartridge. |
Find the problem in the following table that best matches the problem you are having:
|
Symptom |
Diagnosis |
Solution |
|---|---|---|
|
Paper jams |
Did the jam occur in the paper support? |
|
|
Did the jam occur in the All-In-One? |
To automatically eject the paper: |
|
|
Are you printing a banner? |
|
|
|
Paper misfeeds, skews, or multiple sheets feed |
Is the paper loaded correctly? |
See Loading paper. |
|
Are you using paper recommended for the All-In-One? |
See the list of paper recommendations in Loading paper. |
|
|
Are multiple sheets being fed through the All-In-One at one time? |
Try loading a smaller amount of paper into the All-In-One. For help, see Loading paper. |
|
|
Is the paper wrinkled? |
Use a new piece of paper that is straight and unwrinkled. |
|
|
Paper and specialty media stick together |
Are multiple sheets being fed through the All-In-One at one time? |
Try loading a smaller amount of paper into the printer. For help, see Loading paper. |
|
Are the pages sticking together on the paper exit tray? |
Remove each page as it exits the All-In-One, and let it dry completely before stacking. |
|
|
Are you using paper or specialty media recommended for the All-In-One? |
See the list of paper recommendations in Loading paper. |
|
Symptom |
Diagnosis |
Solution |
|---|---|---|
|
Memory card is not recognized by the All-In-One |
Is the memory card damaged? |
Verify that there is no damage to the memory card. |
|
Is the memory card inserted correctly? |
Insert the memory card correctly. For help, see Inserting memory cards. |
|
|
Is there more than one memory card inserted at the same time? |
Only one memory card may be used at one time. Remove the second memory card. |
|
|
Are you using a supported memory card type? |
For supported memory cards, see Memory cards supported. |
|
|
Do you have a PictBridge-enabled digital camera connected to the All-In-One? |
Disconnect the PictBridge-enabled digital camera from the All-In-One. |
|
|
Fast Pics does not open when a memory card is inserted, but it is recognized by the All-In-One |
Is the All-In-One connected properly to the computer? |
|
|
Is there more than one memory card inserted at the same time? |
Only one memory card may be used at one time. Remove the second memory card. |
|
|
Cannot print from the digital camera |
Is the digital camera PictBridge-compatible? |
Remove the device, and use a PictBridge-enabled digital camera in the PictBridge port. See your digital camera documentation to determine if it is PictBridge-compatible. |
|
Is the PictBridge-enabled digital camera set to the correct USB mode? |
See your digital camera documentation for help selecting the correct USB mode. |
|
|
Is there a memory card inserted in the All-In-One? |
Remove the memory card from the All-In-One. |
|
|
Are you using the USB cable that came with your digital camera? |
You must use the USB cable that came with your digital camera. See your digital camera documentation to determine which type of USB cable it supports. |
Find the error message that is on the computer screen or control panel display:
|
Error message |
What it indicates |
Solution |
|---|---|---|
|
|
The print cartridge is running out of ink. The Ink Low warning occurs when a cartridge is about 25% full, 15% full, and 5% full. |
Replace the print cartridge. For help, see Replacing the print cartridges. |
|
|
There is paper jammed in the printer. |
|
|
|
The print cartridge carrier is stuck. |
|
|
|
The printer is out of paper. |
Load more paper into the printer. For help, see Loading paper. |
|
|
The scanner unit was open when Start was pressed. |
Verify that the scanner unit is closed. Printing will continue immediately. |
|
|
The print cartridges are missing or not installed properly. |
Verify that the print cartridges are installed properly. For help, see Installing the print cartridges. |
|
|
The print cartridges are not installed in the correct positions. |
Verify that the the black or photo cartridge is in the left carrier and the color cartridge is in the right carrier. For help, see Installing the print cartridges. |
|
|
The print cartridges are not installed properly, or the tape was not removed. |
Verify that the print cartridges are installed properly, and the tape is removed. For help, see Installing the print cartridges. |
|
|
The memory card was inserted incorrectly or is damaged. |
|
|
A second memory card has been detected. |
Only one memory card may be used at one time. Remove the second memory card. |
|
|
The memory card has no supported images. |
Use a different memory card containing photos. |
|
|
|
The memory card formatting is not supported. |
Reformat the memory card in your digital camera. For help, see your digital camera documentation. |
|
|
The device attached to the PictBridge port is not supported. |
|
|
The PictBridge-enabled digital camera is not set to the correct USB mode. |
See your digital camera documentation for help selecting the correct USB mode. |
|
|
|
The blank paper size selected does not match the size of the photo paper in the paper support. |
Verify that the printer setting matches the blank paper size. For help, see Change the blank paper size. |
|
|
Black was pressed to start a print job when the Sepia Tone Print option was turned on. |
Sepia Tone Print is only available with color printing. Press Color to print your photos in sepia tones. Or, press Stop/Clear and then change the settings in the Photo menu. |
|
|
One or more files referenced in a DPOF print job could not be found. |
Press Select to complete the print job without the missing files. Or, press Stop/Clear to end the print job. |
|
The paper size requested by the DPOF is larger than the Blank Paper Size printer setting. |
Press Select and choose a new Blank Paper Size to match the largest photo size requested by the DPOF. |