Scan and copy troubleshooting
 Changing advanced copy settings
Adjusting the settings for a magazine or newspaper
Using the auto-cropping feature
Find the problem in the following table that best matches the problem you are having
|
Symptom: |
Question: |
Solution: |
|---|---|---|
|
Scanner or copier is not responding |
Is the All-In-One on? |
Press the Power button. If the Power light does not come on, see The Power light is not lit. |
|
Do you see an error message? |
||
|
Is the All-In-One installed properly on your computer? |
If you are not sure, uninstall the All-In-One software and reinstall it. See Removing and reinstalling the software. |
|
|
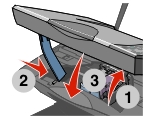
Scanner unit does not close |
Is the scanner support still holding up the scanner unit? |
Lift the scanner unit. Push and hold the scanner support up as you lower the scanner unit.
|
|
Poor quality at the edges of the page |
Are you printing beyond the minimum print margins for the All-In-One? |
Use these minimum settings:
- 6.35 mm (0.25 inches) for all paper sizes except A4
- 3.37 mm (0.133 inches) for A4 size paper
1.7 mm (0.067 inches)
16.51 mm (0.65 inches)
|
|
Poor quality from scan or copy feature.
Including: |
Has the Dark setting on the All-In-One been changed? |
On the control panel, press the Arrow button until "Dark" appears on the display. Adjust the setting with the + or - buttons. See Using the control panel. |
|
Is the original document or image placed properly on the scanner glass? |
The document must be placed face down on the scanner glass. |
|
|
Is the copy setting in the All-In-One Center set correctly? |
||
|
Are you copying or scanning a magazine or newspaper? |
||
|
Is the scanner glass dirty? |
Gently wipe the scanner glass with a damp, clean, lint-free cloth. |
|
|
Is the quality of the original document or image satisfactory? |
Try using another version of the document or image. |
|
|
Is auto-cropping on? |
||
|
Are the print cartridges aligned properly? |
||
|
Have the print cartridges been properly maintained? |
||
|
Is the All-In-One out of ink? |
Replace the print cartridge with a new cartridge. See Replacing the print cartridges. |
:
 Programs or All Programs Lexmark 5200 Series Lexmark All-In-One Center.
Programs or All Programs Lexmark 5200 Series Lexmark All-In-One Center.
Programs or All Programs Lexmark 5200 Series Lexmark All-In-One Center.
Programs or All Programs Lexmark 5200 Series Lexmark All-In-One Center.
Programs or All Programs Lexmark 5200 Series Lexmark All-In-One Center.
Programs or All Programs Lexmark 5200 Series Lexmark All-In-One Center.
Programs or All Programs Lexmark 5200 Series Lexmark All-In-One Center.