Enroll your printers
Fleet Management roles
The Fleet Management Administrator and File Service Administrator roles must be assigned to users who access the Fleet Management portal and enroll and manage printers
Note: You must have the User Administrator or Organization Administrator role to assign these roles to users.
Fleet Management roles for channel partners
Channel partners who manage printers in their customers’ organizations must be members of a Child Organization Access Group. The group must have the Fleet Management Administrator and File Service Administrator roles assigned to it.
Notes:
- You must have the User Administrator or Organization Administrator role to create and manage Child Organization Access Groups.
- Roles assigned through membership in a Child Organization Access Group apply across all customer organizations.
Creating Child Organization Access Groups
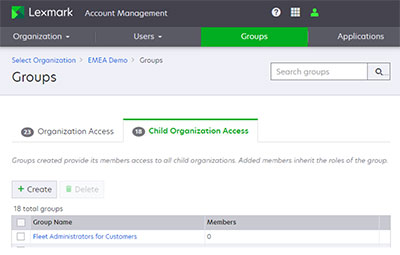
From the Account Management portal, click Groups tab.
Click the Child Organization Access tab.
Click Create.
In the Group name field, type the name of the group, and then click Create Group.
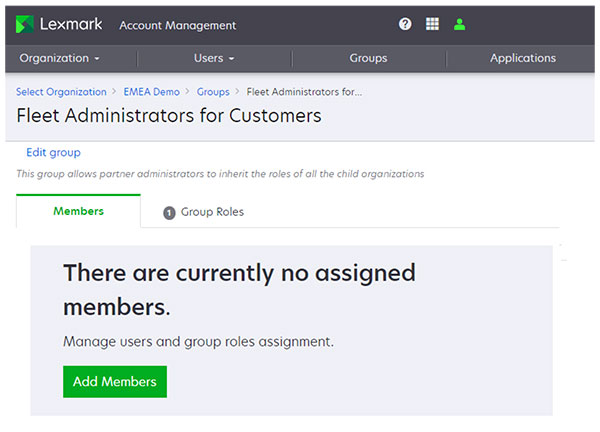
Click the name of the group.
Click Add or Add Members.
Select one or more members, and then click Add Members.
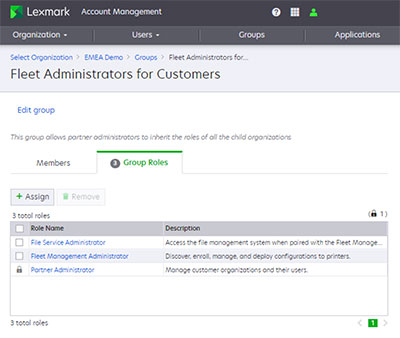
Click the Group Roles tab.
Click Assign.
Note: By default, the Partner Administrator role is assigned to all Child Organization Access Groups.
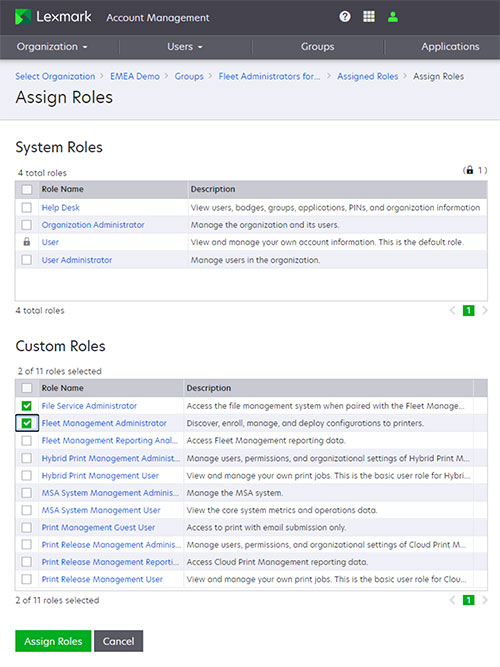
From the Custom Roles list, select Fleet Management Administrator and File Service Administrator roles, and then click Assign Roles.
Selecting an agent
The first step in enrolling printers is to decide which agent or agents to use. You may choose from the Native Agent, Fleet Agent, Printer Agent, or Local Agent.
Note: Collectively, the agents are referred to as Cloud Bridge.
Native Agent
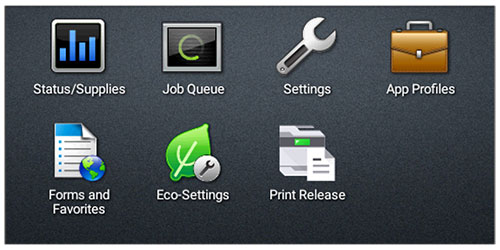
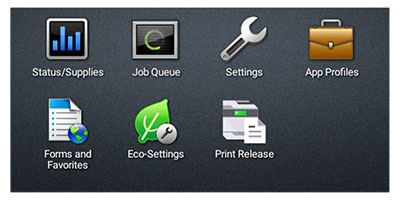
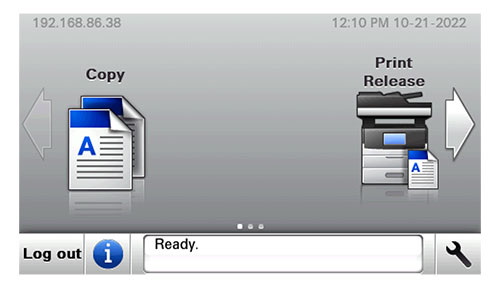
The Native Agent is built into the printer firmware. It is available on all current-generation Lexmark printers. The control panel on current-generation Lexmark printers has a dark background.
Sample of the control panel from a current-generation printer that supports the Native Agent.
Requires firmware 081.215 or later is required. For more information, see Viewing the printer firmware version.
Supports data collection and configuration on all current generation printers.
Supports the deployment of eSF applications on current generation, touch-screen printers. For more information, see Supported printer models.
Native Agent–capable printers can be enrolled using the following methods:
Requires the printers to have a constant Internet connection.
Uses Internet of Things (IoT) technology to reports printer data to the cloud.
Fleet Agent
The Fleet Agent is an application that is configured and installed on an on-site server or host computer. It enrolls Lexmark and third-party printers to the Lexmark Cloud Services.
Uses Internet of Things (IoT) technology to report printer data to the cloud.
Requires a stable, high-availability server or host computer with a constant Internet connection and with the following minimum specifications:
Operating system | x86, x64-bit or Linux 64-bit |
Processor | 1Ghz dual-core |
RAM | 2GB |
Storage | 32GB (Fleet Agent requires 12GB of storage) |
Supports printer configuration and data collection with Lexmark printers. For more information, see Supported printer models. Data collected and printer configuration capabilities may vary by model.
Data is collected over Simple Network Management Protocol (SNMP) from the public and private printer MIBs available on the enrolled printers.
Supports data collection for some third-party printers. Data collected varies by manufacturer and model.
Printer Agent
Printer Agent
The Printer Agent, also referred to as embedded agent, uses an embedded application, the Printer Configuration Agent (PCA), installed on each Lexmark printer. The Printer Configuration Agent collects and sends the printer information to Lexmark Cloud Services.
Requires running the Printer Enrollment Tool on a network connected computer to discover and enroll printers.
Supports data collection and configuration on Lexmark touch-screen printers with eSF version 3.0 or later. For more information, see Supported printer models.
Requires the printers to have a constant Internet connection.
Uses Internet of Things (IoT) technology to report asset inventory (meters, counters, and supplies) data. If the IoT hosts are blocked during enrollment, then this agent reverts to the https path.
Local Agent
Local Agent
The Local Agent is an application configured and installed on a Windows computer system that has USB-attached printers. It enrolls locally attached Lexmark printers into Lexmark Cloud Services. It uses an Internet of Things (IoT) connection to communicate with Lexmark Cloud Services.
Automatically discovers and enrolls USB-connected, Lexmark printers.
Uses Internet of Things (IoT) technology to report asset inventory (meters, counters, and supplies) data.
Supports Windows 64-bit and 32-bit operating systems.
Comparing agents
To make sure that you have an optimal experience in enrolling and managing your print fleet, select the correct agent for your specific needs.
If managing a current-generation Lexmark touch-screen printer with eSF version 5.0 or later, then use the Native Agent, Fleet Agent, or Printer Agent.
If managing Lexmark touch-screen printers with eSF version 3.0 or later, then use either the Printer Agent or the Fleet Agent.
If managing a group of touch-screen and non-touch-screen Lexmark printers, then use the Fleet Agent.
If managing a group of Lexmark and third-party printers, then use the Fleet Agent.
If managing USB-connected Lexmark printers, then use the Local Agent.
If eSF applications cannot be installed on the printers to be managed, then use the Fleet Agent.
If an on-site server or host computer cannot be used, then use either the Printer Agent or the Native Agent.
All agents may be used in the same organization at the same time.
A printer can only be managed by one agent.
Uses an agent native to printer firmware | ✔ | X | X | X |
Uses an application running on an Internet-connected, on-site server or host computer | X | ✔ | x | X |
Uses an embedded application running on enrolled printers | X | X | ✔ | X |
Supports USB-connected printers | X | X | X | ✔ |
Internet connection required for printers | ✔ | ✔ | ✔ | X |
Uses Internet of Things (IoT) technology | ✔1 | ✔3 | ✔2 | ✔2 |
Supports data collection and configuration in Lexmark printers with eSF version 5.0 or later (touch-screen models) | ✔4 | ✔4 | ✔4 | X |
Supports data collection and configuration in Lexmark printers with eSF version 3.0 (touch-screen models) | X | ✔4 | ✔4 | X |
Supports data collection and configuration for Lexmark printers with eSF version 2.0 | X | ✔4 | X | X |
Supports data collection for non-eSF Lexmark printers | ✔4 | ✔4 | X | ✔5 |
Supports data collection from third-party printers | X | ✔ | X | X |
Requires a user account on the printer with administrative access | X | X | ✔ | X |
Performs data collection over SNMP | X | ✔ | X | X |
Before enrolling
To make sure that the enrollment of printers is successful, do the following::
Make sure that the printer to be enrolled supports the agent to be used. For more information, see Supported printer models.
If a firewall or proxy is used, then add the proper host names to the Allow List.
If the printer was previously used at another customer site, then unenroll the printer from its current organization in the Cloud Fleet Management portal. If necessary, also erase the printer memory.
When erasing printer memory, note the following:
Unenrolling must be performed the first time a printer is enrolled with a customer.
Any configuration settings or customer data related to a prior installation is deleted. For more information, see Erasing printer memory..
Make sure that all printers are online and in the Ready state with no unresolved errors, such as paper jams or incorrect email configurations.
The printer firmware is updated to the latest recommended version.
Printer permissions are set correctly.
Printer login credentials for secure printers are available.
Printer SNMP configurations are available.
When using the Fleet Agent, SNMP v3 must be enabled on eTask version 5.0 and higher printers.
By default, SNMP v3 must be enabled on these models.
SNMP v3 does not have to be configured. It must be enabled.
Make sure that Firewall, DHCP, and DNS settings are correct.
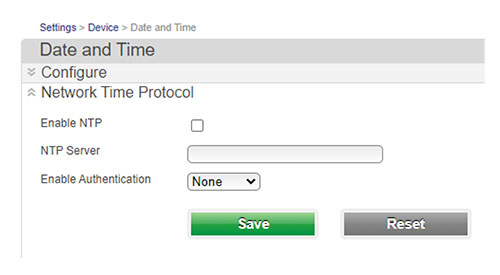
The date and time are configured correctly, preferably using a network time protocol server.
If possible, enroll printers during off hours when the printers are not being used.
Using the Native Agent
Enrolling printers with Native Agent
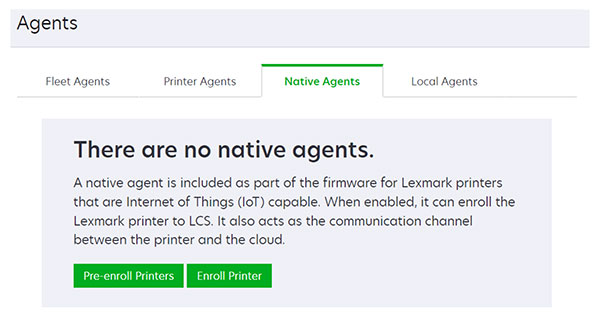
The Native Agent is available on all current-generation Lexmark printers that are Internet of Things (IoT)–capable. It is built into the firmware for any printer running firmware version 075.272 or later. The Native Agent can be used to enroll Lexmark printers in Lexmark Cloud Services. No applications are required to be installed on the printer or to run on an on-premises server or hosted computer. The printer must have a constant Internet connection. For more information on supported models, see Supported printer models.
You can enroll printers with the Native Agent using the Printer Enrollment Tool (PET), cloud-based pre-enrollment, or printer-based enrollment.
Printer Enrollment Tool—Can be used to enroll any current-generation IoT-capable Lexmark printers. If you are unable to enroll the printer using the Cloud-based pre-enrollment or printer-based enrollment methods, then PET must be used.
Cloud-based pre-enrollment—Lets you specify Lexmark printers that you want to enroll. In this process, you enter an enrollment code at the printer. The enrollment code is obtained from the Fleet Management portal for an organization and can be used to enroll all pre-enrolled printers for that organization. The list of pre-enrolled printers can be entered one at a time or imported from a CSV or TXT file before going on-site. This method is useful for large printer deployments because you can perform much of the needed work in advance.
Printer-based pre-enrollment—Lets you initiate the enrollment at the printer. You obtain an enrollment code from the printer and enter it in the Fleet Management portal. This method is useful if you are deploying only a few printers or do not know in advance the serial numbers of the printers to be deployed.
Enrolling printers using the Printer Enrollment Tool
The Printer Enrollment Tool (PET) can be used to enroll any current-generation IoT-capable Lexmark printers with the Native Agent. Use this method when enrolling older models of the current-generation printers or if you cannot enroll printers using the cloud-based pre-enrollment or printer-based enrollment methods.
Downloading the Printer Enrollment Tool
If you do not have a copy of the PET, download it from the Cloud Fleet Management portal.
From the Fleet Management web portal, do one of the following:
If some printers are already enrolled, then click Printers > Enroll Printer using > Printer Agent > Download PET.
If enrolling printers for the first time, then click Use Printer Agent > Download PET.
Accept and download the End User License Agreement (EULA).
Extract the compressed folder.
Using the Printer Enrollment Tool
Run the Printer Enrollment Tool launcher.
Log in using the same email address and password used to connect to the Cloud Fleet Management portal.
Note: If a newer version of the PET is available, then you will be prompted to download it.
If you manage multiple organizations, then select the organization, and then click Next.
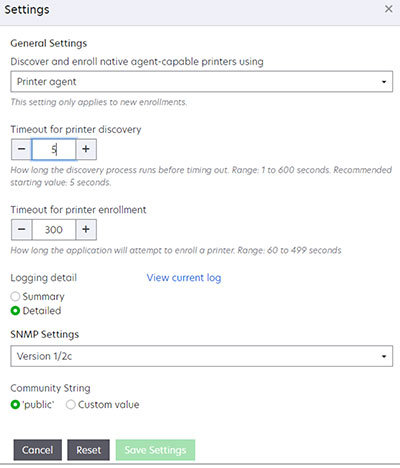
Click  on the upper-right corner of the page, and then configure the following:
Discover and enroll native agent-capable printers using—Determines whether Native Agent-capable printers are enrolled using the Native Agent or Printer Agent.
Time out for Printer Discovery—Determines how long the PET waits for a response to each network broadcast. The value can be increased to improve printer discovery in slow networks.
Time out for Printer Enrollment—Determines how long the PET waits for the Printer Agent to enroll the printer. The value can be increased to improve the printer enrollment process of older printers.
Logging detail levels—Set the logging level to Detailed.
SNMP settings—The SNMP settings in the PET must match those of the printers to be discovered.
Note: Printer discovery first occurs using mDNS, and then by Simple Network Management Protocol (SNMP). If SNMP discovery is desired, then mDNS must be disabled on the printers.
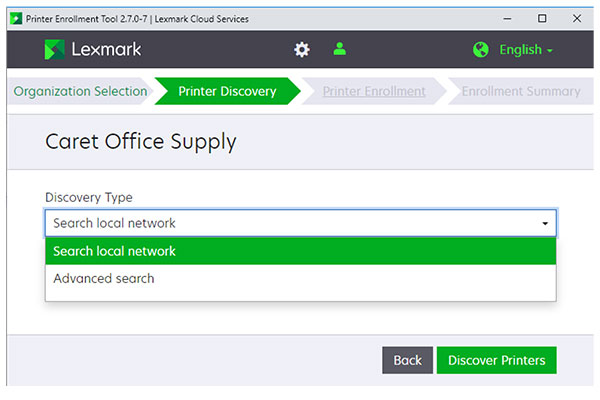
From the Discovery Type menu, select any of the following:
Search local network—Finds all printers on your local subnet. Use this method if you have several printers on the subnet but you do not know their network parameters. This method may take several minutes to complete.
Advanced search—Lets you refine the search by specifying network parameters to find printers. Use this method if you have a small number of printers or if the network parameters of the printers are known. This method is usually faster than the Search local network method.
The following are the network parameters:
Notes:
- To discover printers successfully, make sure that mDNS is enabled on the printer or that the SNMP configurations of the PET and the printers match.
- Printers in the Eligible to Enroll tab can be enrolled with the Native Agent if their agent type is set to Native.
Select one or more printers to enroll, and then click Enroll Printers.
Note: The selected printers do not have to be of the same agent type. Each selected printer is enrolled using the indicated agent type.
If necessary, log in to access the printer Embedded Web Server, and then click Apply Credentials. Otherwise, click Skip This Step.
Note: Login credentials can be applied to limit access to printer settings to authorized individuals only.
Notes:
- When using a Native Agent or Printer Agent and a Fleet Agent or multiple Fleet Agents within the same organization, care should be taken while defining the Printer Discovery settings. Only one agent can manage a printer. If overlapping Printer Discovery criteria exist, then printers may not be managed by the intended agent.
- The enrollment process may take several minutes to complete.
- After successful enrollment, wait several minutes for the printers to appear in the Cloud Fleet Management printers list.
Cloud-based pre-enrollment
Cloud-based Native Agent pre-enrollment lets you specify in advance the Lexmark printers that you want to enroll. You only need to enter an enrollment code at the printer. The enrollment code is obtained from the Fleet Management portal for an organization and can be used to enroll all pre-enrolled printers for that organization. The list of pre-enrolled printers can be entered one at a time or imported from a CSV or TXT file. This method is useful for large printer deployments.
Pre-enroll printers by doing the following:
Entering their serial number in the Cloud Fleet Management portal
Obtaining the organization’s enrollment code
Applying the organization’s enrollment code to the printer, using the control panel or the Embedded Web Server (EWS)
Note: Cloud-based pre-enrollment is supported only in current-generation IoT-capable Lexmark printers. If enrollment using this method is unsuccessful, then enroll using the Printer Enrollment Tool.
Entering printer serial numbers in the Cloud Fleet Management portal
From the Fleet Management web portal, do one of the following:
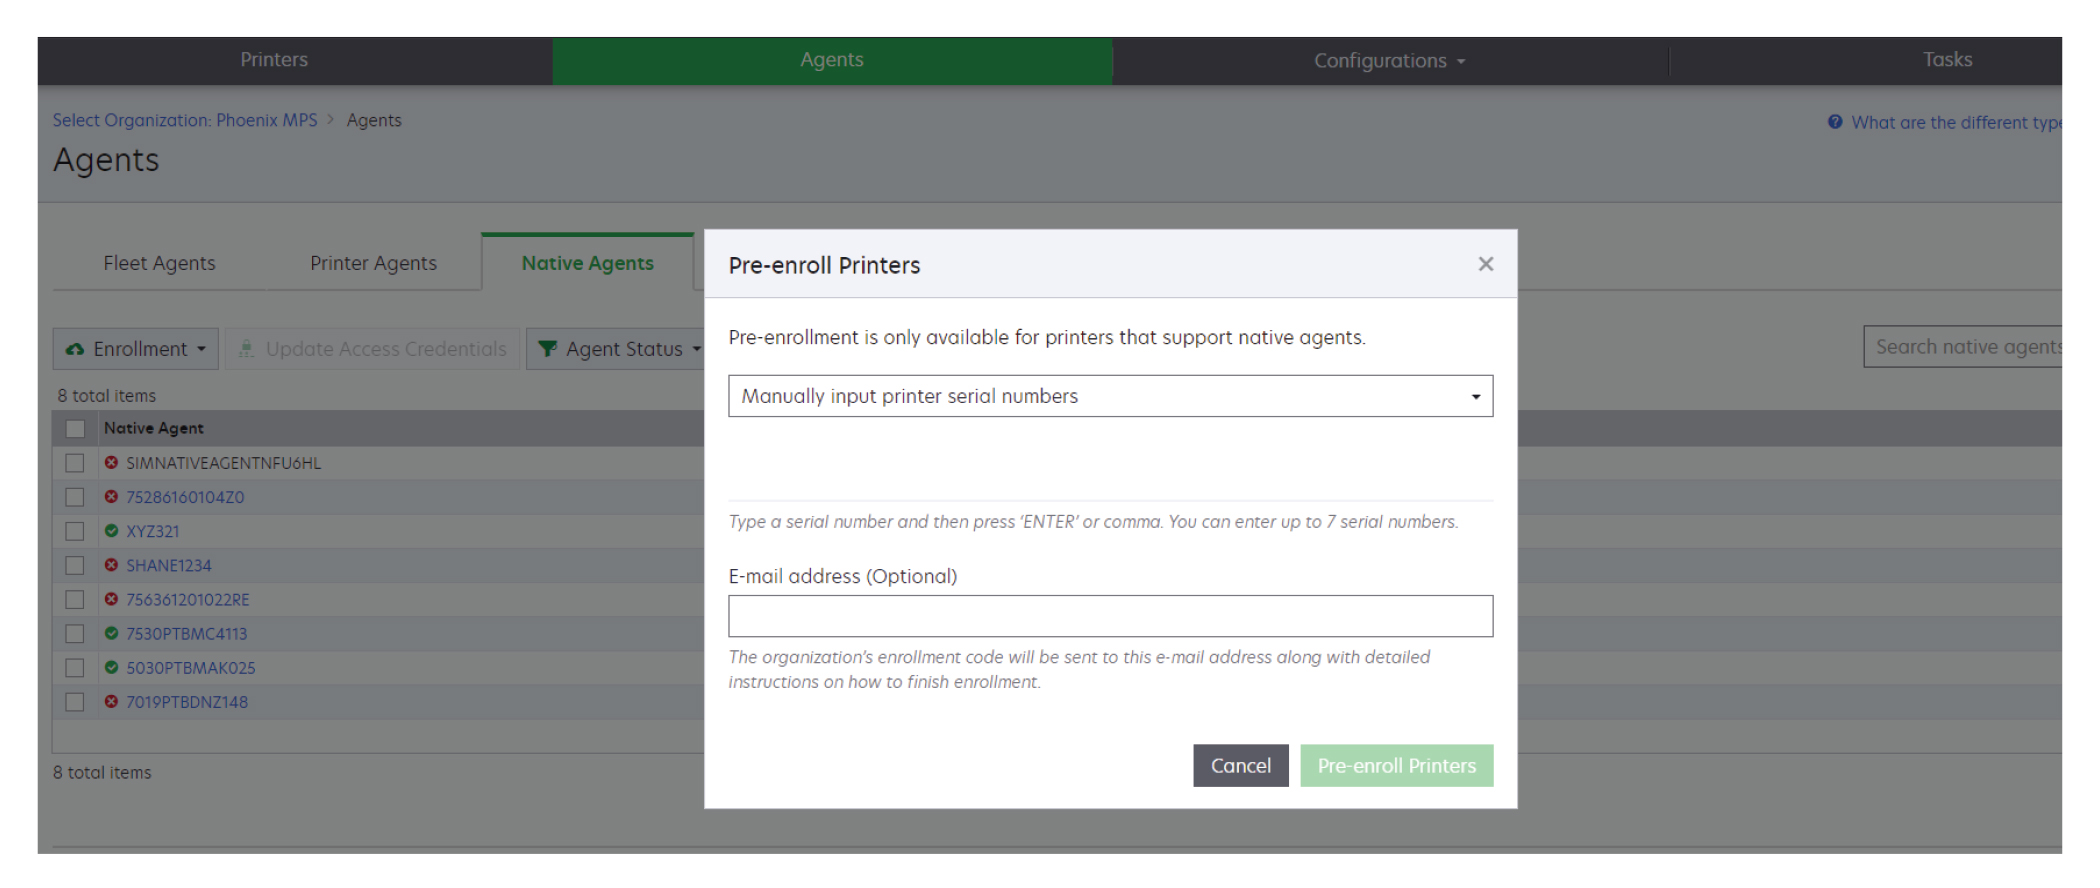
If some printers are already enrolled, then click Agents > Native Agents > Enrollment > Pre-enroll > Pre-enroll printers.
If enrolling printers for the first time, then click Agents > Native Agents > Pre-enroll Printers.
From the Pre-enroll Printers dialog, do one of the following:
Select Manually input serial number, type the printer serial number, and then press Enter.
Select Import printer serial number from file, and then browse to the CSV or TXT file.
Note: To receive the enrollment code and the complete enrollment instructions using email, type your email address.
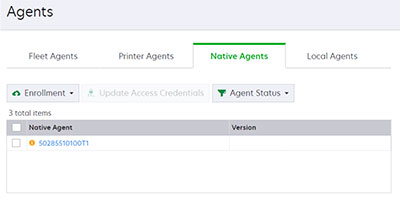
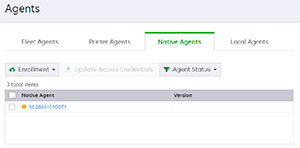
Once pre-enrolled, the printer serial number is listed on the Native Agent page with a Printer pre-enrolled icon.
Obtaining the enrollment code
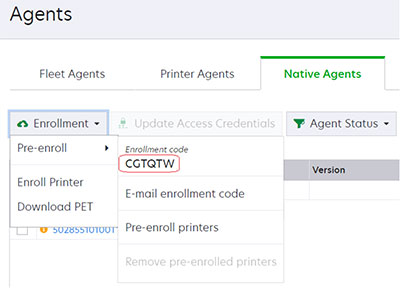
Click Agents > Native Agents > Enrollment > Pre-enroll.
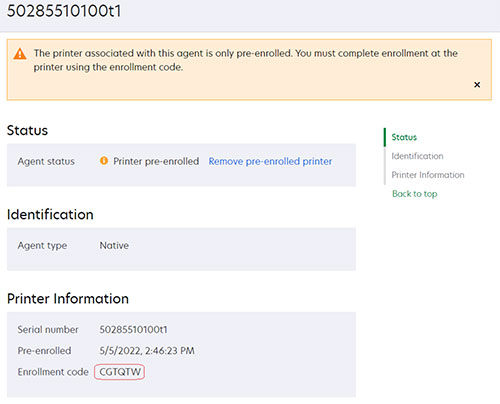
Copy the organization’s enrollment code.
Note: You can also obtain the enrollment code by clicking the pre-enrolled serial number. The code can be found in the Printer Information section.
Applying the enrollment code to the printer
Printer-based enrollment
Printer-based enrollment begins at the printer. You obtained an enrollment code from the printer, and enter it in the Fleet Management portal. This method is useful if you plan to only deploy a few printers or if you are unaware of the printer’s serial number.
Printer-based enrollment involves:
Obtaining the printer’s enrollment code.
Note: This is done from the printer control panel or using its Embedded Web Server (EWS).
Entering the printer’s enrollment code in the Cloud Fleet Management portal.
Note: The printer-based enrollment method is only supported for current generation Lexmark IoT-capable printers. If enrollment using this method is unsuccessful, then enroll using the Printer Enrollment Tool.
Obtaining the enrollment code
There are two methods for obtaining the printer enrollment code.
Obtaining enrollment code by using the control panel
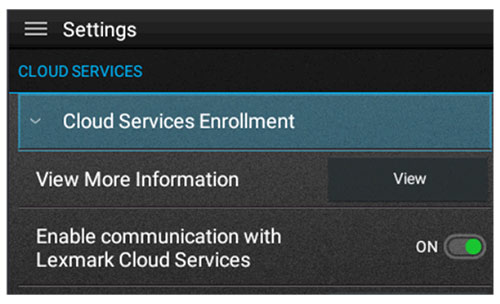
From the printer home screen, touch Settings > Cloud Services > Cloud Services Enrollment
From the Enable communication with Lexmark Cloud Services menu, touch On.
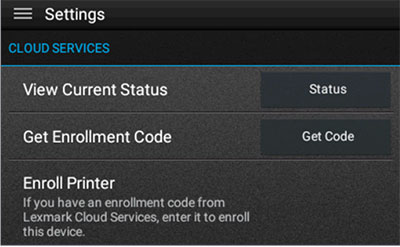
From the Get Enrollment Code menu, touch Get Code, copy the enrollment code, and then touch OK.
Obtaining the enrollment code by using the Embedded Web Server
From the Embedded Web Server, click Settings > Cloud Services > Cloud Services Enrollment.
Select Enable communication with Lexmark Cloud Services, and then click Save.
Click Refresh until the Get Enrollment Code is enabled. This may take a few minutes.
Click Get Enrollment Code, and then take note of the code.
Entering printer serial numbers in the Cloud Fleet Management portal
From the Fleet Management web portal, do one of the following:
If no devices are enrolled:
If devices are already enrolled:
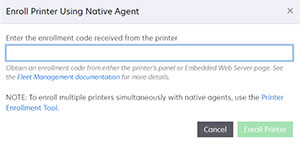
Enter the enrollment code, and click Enroll Printer.
Note: The enrollment code is case-sensitive.
Note: In case of invalid code, you will get an error message.

Using the Fleet Agent
Creating a Fleet Agent
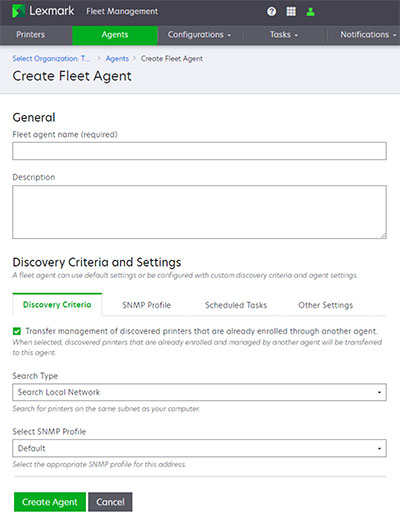
Before using Fleet Agent, you must create an agent and establish settings that work best for your environment.
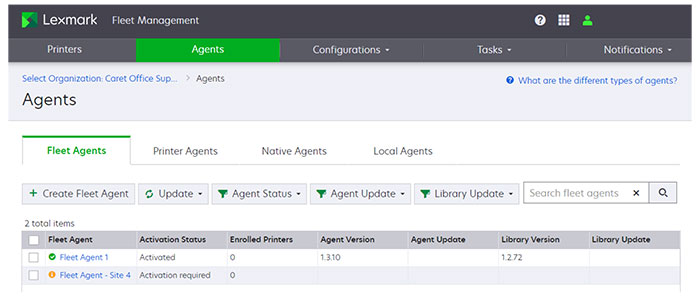
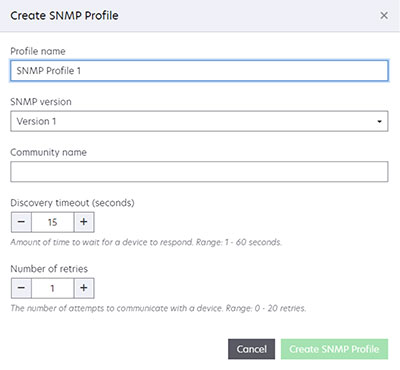
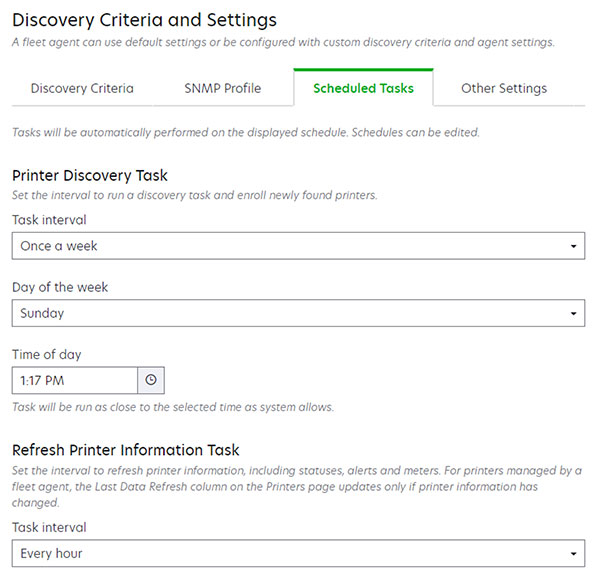
From the Fleet Management portal, click Agents > Fleet Agents > Create Fleet Agent.
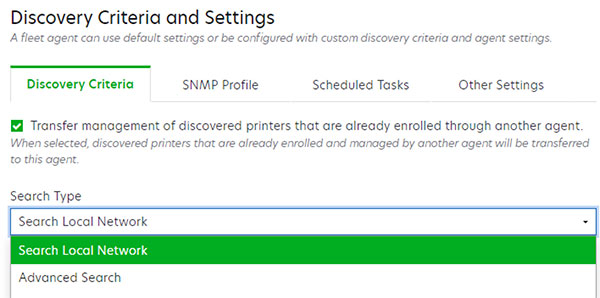
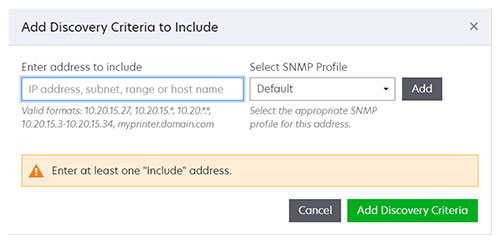
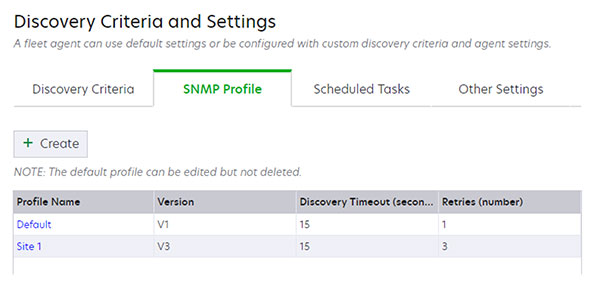
In the Create Fleet Agent form, configure the following:
Click Create Agent.
Installing a Fleet Agent
Fleet Agent installation package
After creating a Fleet Agent, install it on a server or host computer within the customer’s network. The Fleet Agent installation package can be downloaded or provided through a link emailed from the Cloud Fleet Management portal.
Note: The size of the installation package is about 140MB.
Fleet Agent activation code
You need an activation code during setup of the Fleet Agent. You can obtain the code by clicking the Generate activation code link. The code registers the installed Fleet Agent with a Fleet Agent definition. You can associate a Fleet Agent definition with only a single Fleet Agent installation. If the code is not used within 72 hours, then you must generate a new code.
Installing and activating a Fleet Agent
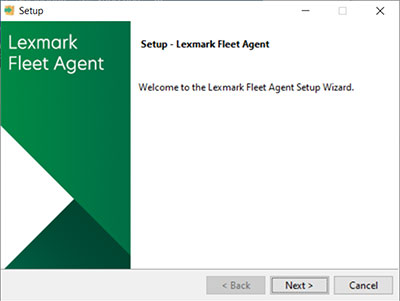
From a server or host computer, run the Fleet Agent installation package.
Accept the End-User License Agreement (EULA).
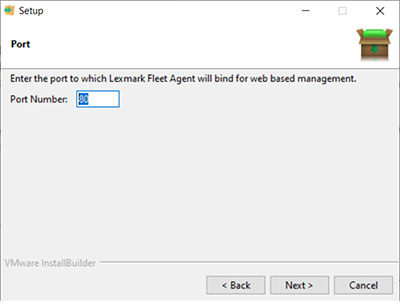
Enter the port number.
Notes:
- The default port number is 80.
- If port 80 is not available, then enter any available port, such as 8080 or 8088.
Click Finish to close the installation window, and launch the Fleet Agent on a web browser.
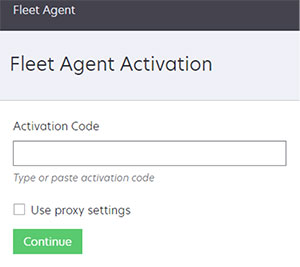
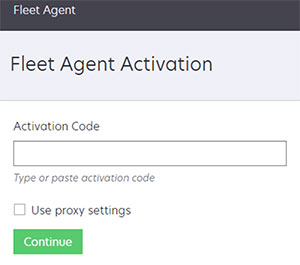
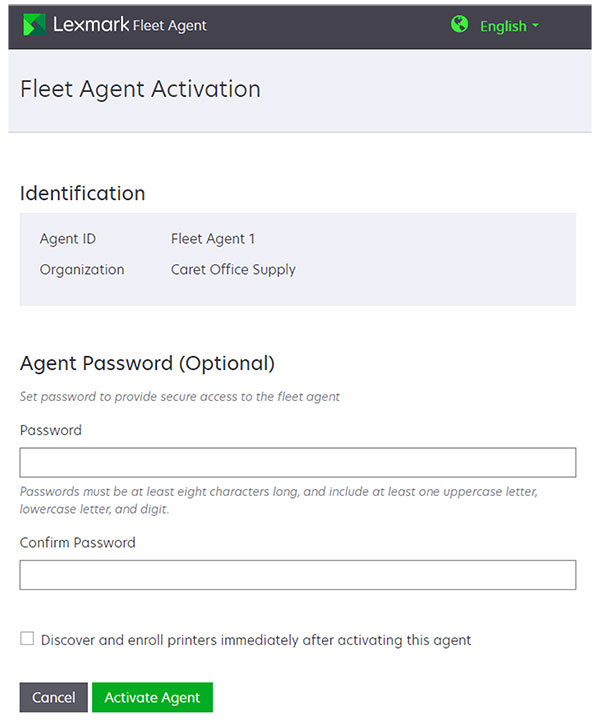
Enter the Fleet Agent's Activation Code, and then click Continue.
Notes:
- A proxy can be set.
- You can apply a password to restrict access to the Fleet Agent.
- You can also set the initial printer discovery and enrollment to be performed automatically after the Fleet Agent is activated.
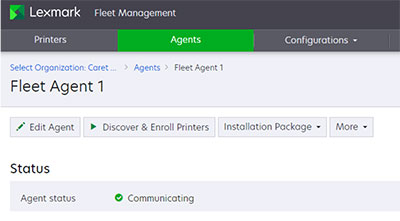
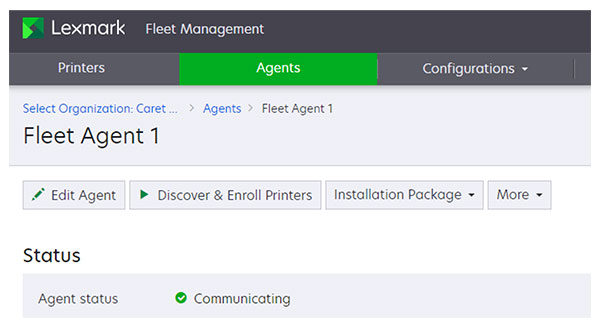
- After activation, the Fleet Agent details page shows its status as Communicating.
Using a proxy with the Fleet Agent
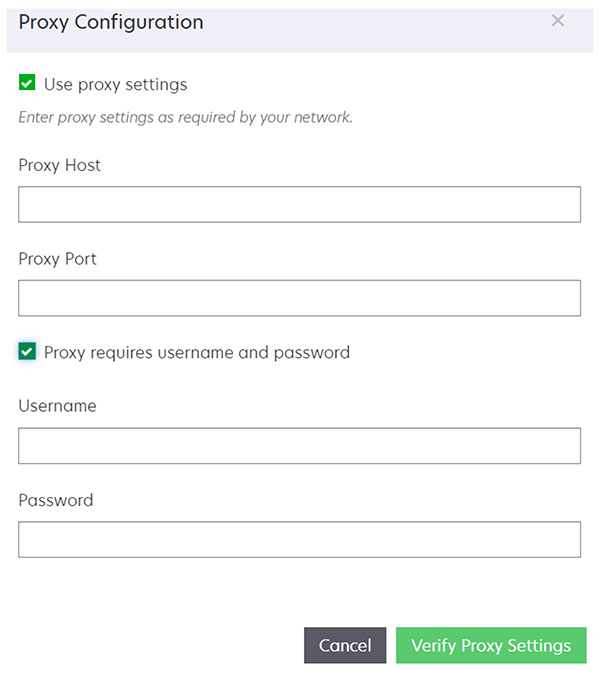
Sometimes you must change the proxy configuration after the Fleet Agent is installed. To change the proxy configuration, do the following:
Open a web browser, and then type https://localhost:<portnumber>.
Note: <portnumber> is the port used when the Fleet Agent was installed. The default port number is 80.
Click  on the upper-right corner of the Fleet Agent home screen to access the Proxy Configuration settings.
Click Verify Proxy Settings.
Discovering and enrolling printers
To manually initiate the printer discovery and enrollment process, click Discover & Enroll Printers on the Fleet Agent details page in the Fleet Management portal.
A Discover printers task is created on the Fleet Agent task queue. Discovered and enrolled printers appear on the Printers page in the Fleet Management portal.
The initial discovery and enrollment task can be done manually or as part of the Fleet Agent activation process. Afterward, the task is automatically repeated on the schedule that you set when creating the Fleet Agent. For more information on installing and activating a Fleet Agent, see Installing a Fleet Agent.
Printers not being discovered
You can use a MIB walk to determine why a printer is not being discovered. You can obtain a MIB walk log from the Cloud Fleet Management portal, and then contact Customer Support Center to review the log. To initiate a MIB walk, do the following:
From the Fleet Management web portal, click Agents > Fleet Agents.
Click the Fleet Agent name.
In the Log section, type the IP address of the printer, and then click Request.
Click Download.
Managing an installed Fleet Agent
After a Fleet Agent is installed, you may need to change it for the following reasons:
Printer discovery parameters
Task scheduling
Version update for the Fleet Agent or the Printer Support Library
Deactivated or deleted Fleet Agent
Editing a Fleet Agent
From the Fleet Management web portal, click Agents > Fleet Agents.
Click the Fleet Agent name.
Click Edit Agent.
Click Save Changes.
Notes:
- Changes made to the definition of an existing Fleet Agent take effect immediately.
- If the SNMP profile of a Fleet Agent definition is changed or deleted, then all printers associated with that profile are unenrolled and no longer discoverable by this Fleet Agent.
- After a Fleet Agent is updated, you can initiate a Discover printer task in the Fleet Agent details page by clicking Discover & Enroll Printers. This task discovers and enrolls printers based on the updated Fleet Agent definition.
Updating a Fleet Agent
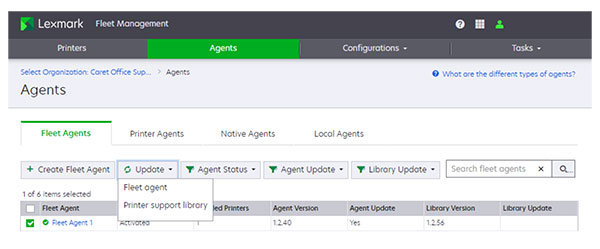
Available updates to the Fleet Agent executable file or for Printer Support Library used by the Fleet Agent appear on the Fleet Agents page.
From the Fleet Management web portal, click Agents > Fleet Agents.
Select one or more Fleet Agents, and then click Update > Fleet Agent.
Click Continue.
Deactivating a Fleet Agent
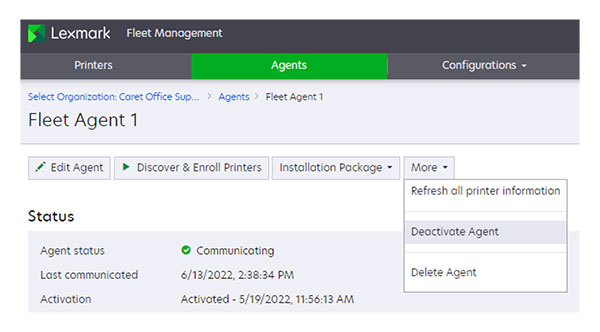
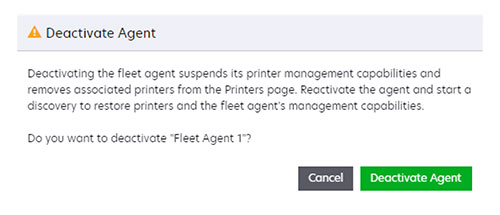
Deactivating a Fleet Agent stops it from collecting printer data. After it is deactivated, you can no longer manage printers associated with that Fleet Agent. Printers associated with the deactivated Fleet Agent are unenrolled and no longer appear on the Printers page. The Fleet Agent definition is not deleted. Device data associated with the deactivated Fleet Agent is also retained.
From the Fleet Management web portal, click Agents > Fleet Agents.
Click the Fleet Agent name.
Click More > Deactivate Agent.
Click Deactivate Agent.
Restoring a deactivated Fleet Agent
From the Fleet Management web portal, click Agents > Fleet Agents.
Click the Fleet Agent name.
In the Status section, click Generate activate code.
Copy the activation code.
Launch the Fleet Agent on a web browser, and then enter the activation code.
Click Continue > Activate Agent.
Note: Once the Fleet Agent has been reactivated, you must initiate the Discover & Enroll Printers task from the Cloud Fleet Management portal. This restores the data collection and printer management functions of the Fleet Agent.
Deleting a Fleet Agent
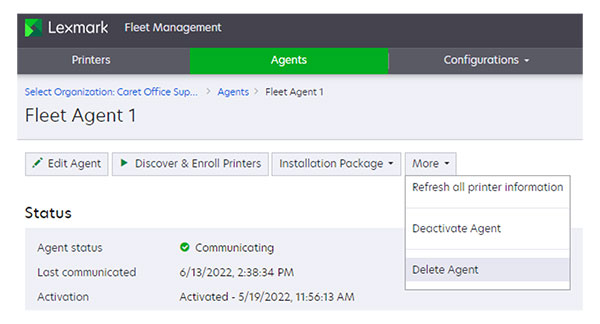
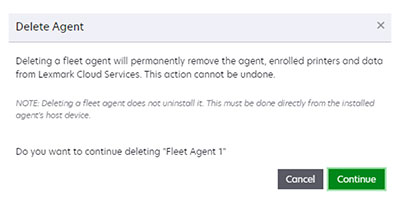
If a Fleet Agent installation is no longer required at a customer location, it must be deleted. Deleting a Fleet Agent removes the Fleet Agent definition from the Cloud Fleet Management portal. It also unenrolls any printers associated with the deleted Fleet Agent, and deletes any data associated with those printers. The Fleet Agent executable running in the customer’s environment will not be uninstalled. You must uninstall the Fleet Agent executable manually.
From the Fleet Management web portal, click Agents > Fleet Agents.
Click the Fleet Agent name.
Click More > Delete Agent.
Click Continue.
Notes:
- A deleted Fleet Agent cannot be restored.
- A new Fleet Agent definition must be created. Once created, a new activation code for the definition can be applied to the Fleet Agent executable, if it was not manually uninstalled.
- For more information, see Installing a Fleet Agent.
Using the Printer Agent
Using a Printer Agent
Downloading the Printer Enrollment Tool
If you do not have a copy of the Printer Enrollment Tool (PET), download it from the Cloud Fleet Management portal.
From the Fleet Management web portal, do one of the following:
If some printers are already enrolled, then click Printers > Enroll Printer using > Printer Agent > Download PET.
If enrolling printers for the first time, then click Use Printer Agent > Download PET.
To accept the End User License Agreement (EULA) and download, click Accept and Download.
Extract the compressed folder.
Using the Printer Enrollment Tool
Run the Printer Enrollment Tool launcher.
Log in using the same email address and password used to connect to the Cloud Fleet Management portal.
Note: If a newer version of the PET is available, then you will be prompted to download it.
If you manage multiple organizations, then select an organization, and then click Next.
Click  on the upper-right corner of the page, and then configure the following:
Discover and enroll native agent-capable printers using—Determines whether Native Agent-capable printers are enrolled using the Native Agent or Printer Agent.
Time out for Printer Discovery—Determines how long the PET waits for a response to each network broadcast. The value can be increased to improve printer discovery in slow networks.
Time out for Printer Enrollment—Determines how long the PET waits for the Printer Agent to enroll the printer. The value can be increased to improve the printer enrollment process of older printers.
Logging detail levels—Set the logging level to Detailed.
SNMP settings—The SNMP settings in the PET must match those of the printers to be discovered.
Note: Printer discovery first occurs using mDNS, and then by Simple Network Management Protocol (SNMP). If SNMP discovery is preferred, then mDNS must be disabled on the printers.
From the Discovery Type menu, select any of the following:
Search local network—Finds all printers on your local subnet. Use this method if you have several printers on the subnet but you do not know their network parameters. This method may take several minutes to locate complete.
Advanced search—Lets you refine the search by specifying network parameters to find printers. Use this method if you have a small number of printers or if the network parameters of the printers are known. This method is usually faster than the Search local network method.
The following are the network parameters:
Notes:
- To discover printers successfully, make sure that mDNS is enabled on the printer or that the SNMP configurations of the PET and the printers match.
- Printers in the Eligible to Enroll tab can be enrolled with the Native Agent if their agent type is set to Native.
Select one or more printers to enroll, and then click Enroll Printers.
Note: The selected printers do not have to be of the same agent type. Each selected printer is enrolled using the indicated agent type.
If necessary, log in to access the printer Embedded Web Server, and then click Apply Credentials. Otherwise, click Skip This Step.
Notes:
- When using a Native Agent or Printer Agent and a Fleet Agent, or multiple Fleet Agents within the same organization, care must taken while defining the Printer Discovery settings. Only one agent can manage a printer. If overlapping Printer Discovery criteria exist, then printers may not be managed by the intended agent.
- The enrollment process may take several minutes to complete.
- After successful enrollment, wait several minutes for the printers to appear in the Cloud Fleet Management printers list.
- When a printer is enrolled using the Printer Agent, the PET installs an embedded (eSF) application, called the Printer Configuration Agent (PCA), on the printer. The PCA is the communications path between the printer and the cloud.
Verifying the printer enrollment status
After running the PET to enroll printers, do the following to verify that an enrolled printer can communicate with Cloud Fleet Management. For more information on troubleshooting, see Fleet Management troubleshooting.
Check for printer enrollment failures in the PET.
For security-related failures, re-enroll printers using the correct security credentials.
If the printer date and time are not correct, then an error message appears.
Make sure that the printer firmware is at least at the minimum recommended level.
Verify that embedded applications appear on the printer Embedded Web Server (EWS) application page.
If no applications appear, then power cycle the printer.
If the issue persists, then re-enroll the printer.
Verify that the PCA embedded application is enabled or running on the printer. If the PCA is disabled or stopped, then enable or start it.
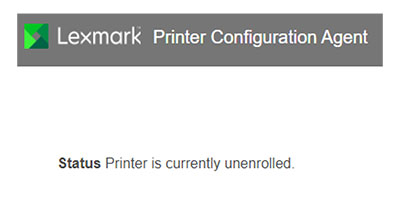
Verify that the PCA application status is enrolled.
Open the Printer Configuration Agent application from the printer EWS. If the PCA status is unenrolled, then re-enroll the printer.
Click Test Agent Connection to verify that the network and credential settings are correct.
Verifying the connection status after placing the printer in service
Do the following to verify the Cloud Fleet Management connection status of a printer after it is placed in service or its network environment is changed. For more troubleshooting information, see Fleet Management troubleshooting.
Click Test Agent Connection to verify that the network and credential settings are correct.
On e-Task v5 or later printers, do the following:
When editing contacts in the printer address book, do not modify or delete the Lexmark_PCA_User entry.
When importing or applying the contactmanager.xml file, edit the contactmanager.xml file to set <addressbook clear=”false”>.
On the Cloud Fleet Management portal Printers page, do the following:
Verify that the printer is listed. If it is not, then re-enroll the printer.
Check the communication status of the printer.
If it is Communicating, then verify communications by going to the Printer Details page clicking Refresh Printer Information, and then checking the status in Task History.
If it is Not communicating, then do the following:
Verify that the printer is in service and has network connectivity. Open the Printer Configuration Agent application from the EWS, and then click Test Agent Connection to verify that the network and credential settings are correct.
Verify that the printer is in service in this organization. If the printer that you are enrolling was previously enrolled in another organization, then its Communication status will be Not communicating in the previous organization. To prevent this scenario, unenroll printers that are being moved to a new organization.
Re-enroll the printer, in any of the following cases:
The application status of the PCA is unenrolled.
The printer security login has changed since the printer was enrolled.
The Lexmark_PCA_User account has been modified in any e-Task v5 or later printers.
The printer DHCP/DNS configuration has changed or does not match the customer’s environment.
The printer date and time settings are not correct.
If a firewall is being used, then verify that the appropriate Lexmark Cloud Services URLs have been added to the Allow List. For more information, see Deployment readiness checklist.
If “Agent needs credentials” appears, then the agent is communicating with Cloud Fleet Management, but administrator credentials have been applied to the printers after enrollment. A lock symbol appears in front of the IP addresses of these printers.
You can apply credentials from the Cloud Fleet Management portal. For more information, see Managing enrolled printers. You can also apply credentials by opening the Printer Configuration Agent eSF application and then clicking Update Credentials.
If “gent not communicating” appears, then the Fleet Agent associated with the printer is no longer communicating with Cloud Fleet Management. Verify that the Fleet Agent is still running and that it has a constant Internet connection.
If a firewall is being used, then verify that the appropriate Lexmark Cloud Services URLs have been added to the Allow List. For more information, see Deployment readiness checklist.
Setting the correct date and time
The printer date and time must be set correctly to avoid failures in printer enrollment or in the processing of Cloud Fleet Management tasks. If it is not set correctly, then printer enrollment or the processing of Cloud Fleet Management tasks may fail. It is best to configure the printer’s date and time by enabling the use of a Network Time Protocol (NTP) server. NTP servers are usually available from domain servers. Publicly available NTP servers can be found through an internet search.
If the printer’s date and time are not correct when it is enrolled, then the printer’s date and time will be set to the date and time of the Printer Enrollment Tool (PET) workstation if:
Managing user accounts and printer permissions
To use and manage the Printer Agent, you must set the function access controls (FACs) and maintain an administrator account on the current-generation Lexmark printers. When referring to the Printer Agent on printers, the printers can be Secured or Open.
e-Task version 5 or later printers
Printers with e-Task version 5 or later have a dark control panel background.
Secured Printers
If access to the Embedded Web Server (EWS) is protected, then provide the credentials in the Printer Enrollment Tool during enrollment.
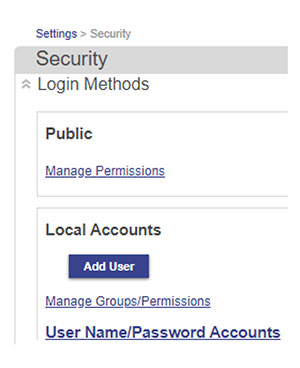
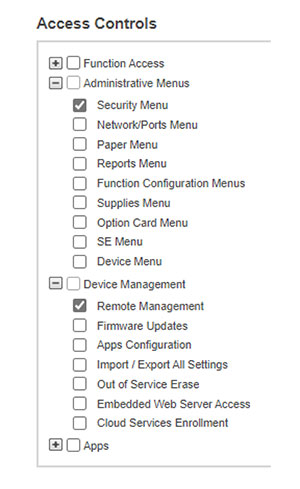
The following permissions must be enabled in either the Public or All Users permissions groups to avoid a failed enrollment.
Administration Menus | Security Menu |
Device Management | Remote Management |
Open Printers
If access to the Embedded Web Server is not protected, then the following permissions must be enabled in the Public permissions group to avoid a failed enrollment.
Administration Menus | Security Menu |
Device Management | Remote Management |
Lexmark_PCA_User account
When the Printer Configuration Agent (PCA) eSF application is installed on an e-Task version 5 or later printer, a Lexmark_PCA_User account and an administrator group are created. This account is used to process requests from Cloud Fleet Management.
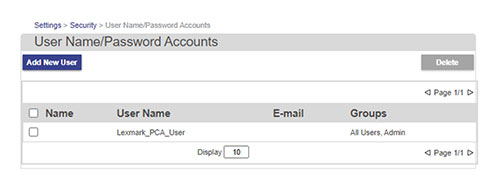
Note: The Lexmark_PCA_User account and the administrator group must not be changed or modified. Changing them after enrollment prevents the printer from processing Cloud Fleet Management requests.
If any of the following actions occur after the printer is enrolled, then Cloud Fleet Management functionality may be lost. To restore Cloud Fleet Management functionality without reenrolling the printer, do the following resolution actions:
Lexmark_PCA_User account has been deleted. | Recreate the Lexmark_PCA_User account. Open the Printer Configuration Agent application. Click Update Credentials, and then enter the credentials of an existing administrator account on the printer.
|
Lexmark_PCA_User account name has been changed. | Click Update Credentials, and then enter the credentials of an existing administrator account on the printer. |
Lexmark_PCA_User account password has been changed. | Open the Printer Configuration Agent application. Click Test Agent Connection. Click Update Credentials, and then enter the credentials of an existing administrator account on the printer.
|
Administrator group has been deleted. | Recreate the administrator group with all permissions enabled. Assign the recreated administrator group with the Lexmark_PCA_User account.
|
Administrator group permissions have been changed. | Re-enable all permissions under the administrator group. |
Lexmark_PCA_User account removed from the administrator group. | Reassign the Lexmark_PCA_User to the administrator group. |
e-Task version 4 or earlier printers
Printers with e-Task version or earlier have a light gray control panel background.
Secured Printers
If a Basic Security Setup template has been applied, then provide the credentials in the Printer Enrollment Tool during the device enrollment process. If this protection was applied or modified after the printer was initially enrolled, then the printer will not process requests from Cloud Fleet Management. For more information, see Managing enrolled printers.
The following access controls must be set to either the Basic Security Setup template or No Security.
e3 and e4 | Administration menus | Service Engineer Menus Remotely |
e3 and e4 | Management | Remote Management |
e3 and e4 | Management | Firmware Updates |
e4 | Management | Configuration File Import / Export |
Open Printers
If access to the Embedded Web Server is not protected, then the following access controls must be set to No Security to avoid a failed enrollment.
e3 and e4 | Administration menus | Service Engineer Menus Remotely |
e3 and e4 | Management | Remote Management |
e3 and e4 | Management | Firmware Updates |
e4 | Management | Configuration File Import / Export |
Using the Local Agent
Using a Local Agent
The Local Agent is a Fleet Management agent for managing USB-connected printers that otherwise do not have a means of communicating directly with Cloud Fleet Management. For more information on the Fleet Management Agents, see Selecting an agent.
Note: The Local Agent supports Windows 64-bit and Windows 32-bit operating systems only
To use a Local Agent, do the following:
Downloading the Local Agent
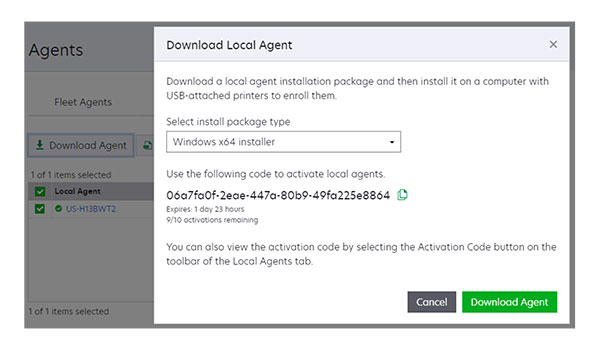
From the Fleet Management web portal, click Agents > Local Agents > Download Local Agent or Download Agent.
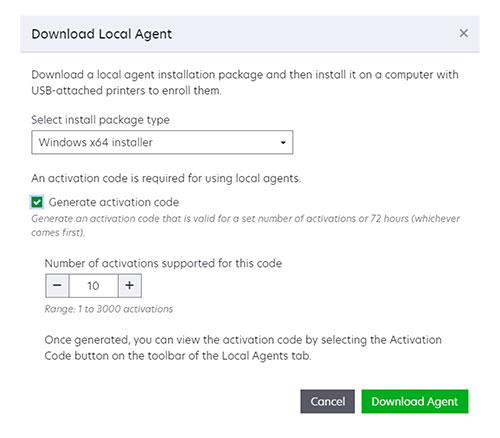
In the Download Local Agent window, select the installer package type.
Note: You can select the Windows x64 or x86 installer package.
Select Generate activation code.
Notes:
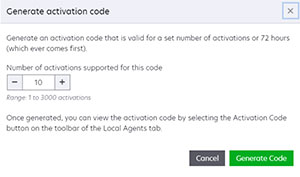
- The activation code is valid for 72 hours. If you are going to install the Local Agent before the activation code expires, then generate the code now.
- You can set the number of agents to be activated by the code.
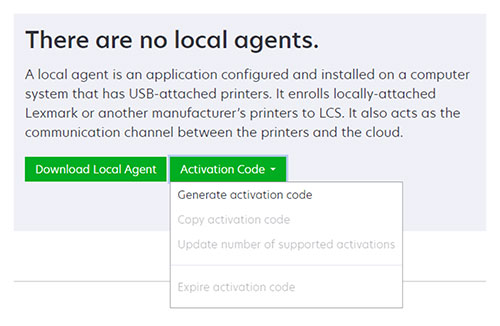
- If the code expires before activating the agent, then generate a new activation code. From the Fleet Management portal, click Agents > Local Agents > Activation Code > Generate activation code.
Click Download Agent.
Accept and download the End-User License Agreement (EULA).
Note: The Local Agent installation files and activation code can be reused up to the number of activations specified when the activation code was generated. After the specified number of activations, the code is no longer valid, to prevent using it on more workstations than intended.
Downloading the Local Agent again
If the Local Agent is downloaded while a valid activation code exists, then the activation code appears when the Local Agent installation package is downloaded. The time remaining until the activation code expires and the number of activations remaining are shown. Click Download Agent to download the installation package.
Obtaining the activation code
To use the Local Agent, you need an activation code. An activation code can be generated when the Local Agent installer is downloaded. For more information, see Downloading the Local Agent. You can also obtain the activation code by doing the following:
From the Fleet Management web portal, click Agents > Local Agents > Activation Code > Generate activation code.
In the Generate activation code window, set the number of agents to be activated by the code.
Click Generate Code.
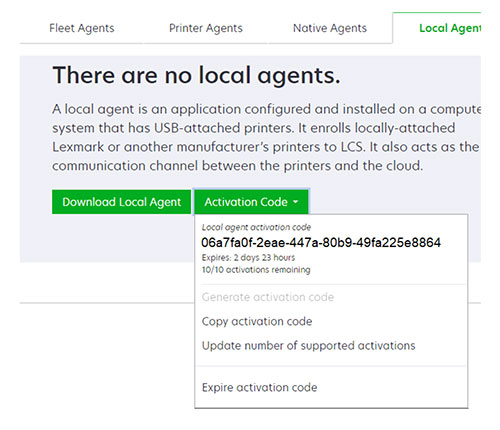
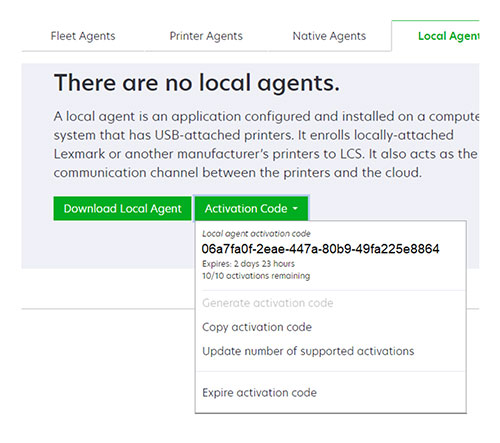
If a valid activation code already exists, then you can view it by clicking the Activation Code menu.
Click Copy activation code
Note: The time and the number of remaining activations for which the code is valid are shown.
Managing the activation code
If a valid activation code already exists, then you can view it by expanding the Activation Code menu.
Updating the number of activations allowed
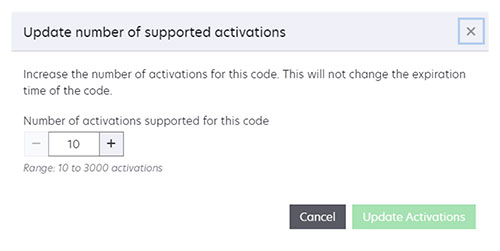
The Local Agent installation files and activation code can be reused up to the number of activations specified when the code was generated. After the specified number of activations, the code is no longer valid. To increase the number of allowed activations for a valid activation code, do the following:
From the Fleet Management web portal, click Agents > Local Agents > Activation Code > Update the number of supported activations.
In the Update the number of supported activations window, set the number.
Click Update Activations.
Note: If an activation code has expired, then you must generate a new one. You cannot increase the activations allowed for an expired activation code. Activation codes are valid for up to 72 hours.
Invalidating an activation code
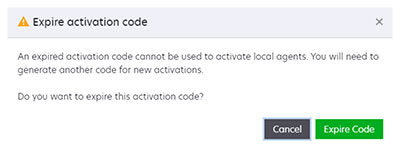
If you no longer need a valid activation code, then you can force its expiration.
From the Fleet Management web portal, click Agents > Local Agents > Activation Code > Expire activation code.
In the Expire activation code window, click Expire Code.
Installing and activating a Local Agent
The Local Agent is designed to be installed on a Windows 64-bit or Windows 32-bit operating system. The downloaded Local Agent package must be extracted before it can be installed and then activated.
Installing the agent manually
To manually install the Local Agent, execute the Local Agent msi file. Follow the on-screen prompts. After the installation has completed, the Local Agent must be activated.
Note: The Local Agent msi file must be executed from the same folder as the configuration .ini files.
Run the Local Agent MSI file.
Follow the instructions on the computer screen.
Activating the agent manually
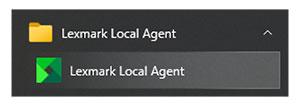
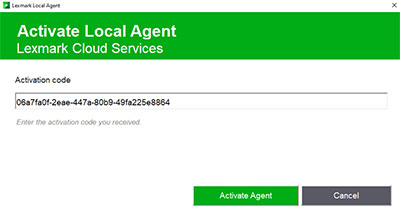
To manually activate the Local Agent, find and open the Lexmark Local Agent entry in the Windows menu.
Enter the activation code, and then click Activate Agent.
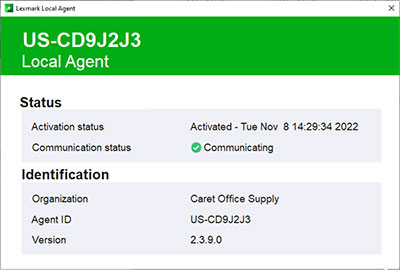
The following message appears
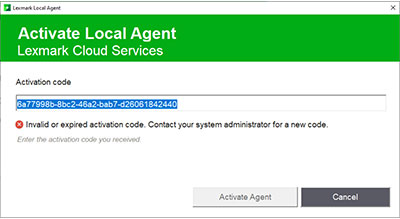
If the activation of the Local Agent fails, then the following message appears:
Make sure that the activation code is correct, or generate a new activation code.
Activating the agent during installation
You can configure the Local Agent to automatically activate during installation by adding the activation code to the LocalAgentConfig.ini file.
Unzip the installation package.
Open the LocalAgentConfig.ini file in a text editor.
Under the [IOT_HUB] block, add the CS_ACTIVATION_CODE parameter.
Enter the activation code generated from Lexmark Cloud Services as the value of the parameter.
Sample code:
[IOT_HUB]
   CS_ACTIVATION_CODE=ab23ftcd-12dt-edte-123hdtdk-ttrbd
Save the LocalAgentConfig.ini file.
Run the Local Agent MSI file.
Notes:
- The Local Agent msi file must be executed from the same folder as the configuration ini files.
- If the activation code has expired, or was incorrectly copied into the LocalAgentConfig.ini file, then the Local Agent is installed, but is not activated. To verify the activation status of the Local Agent, click Agents > Local Agents.
Managing an installed Local Agent
Managing Local Agents includes the following:
Editing the configurations of a Local Agent
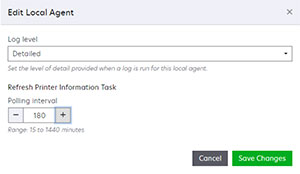
Local Agents have two configurable parameters:
Log level—Must be set to Detailed. Detailed logs provide information on errors, warnings, and debugging.
Polling Interval—How often the Local Agent reports printer data back to the Fleet Management services. The default value is 180 minutes.
Editing the Local Agents
From the Fleet Management web portal, click Agents > Local Agents.
Do either of the following:
To edit a single Local Agent, click the name of the Local Agent, and then click Edit Agent.
To edit multiple Local Agents at the same time, select multiple Local Agents, and then click Edit Settings.
Note: The Edit Local Agent window shows that Log level is set to Detailed and Polling Interval is set to 300. These changes are automatically applied regardless of the current settings of the selected Local Agents.
Deactivating a Local Agent
To stop the Local Agent from collecting and reporting printer information to the Fleet Management services, you can deactivate it. After reactivating a Local Agent, you can reactivate it only by applying a valid activation code.
From the Fleet Management web portal, click Agents > Local Agents.
Click the name of the Local Agent.
Click Deactivate Agent.
Click Deactivate Agent.
Deleting a Local Agent
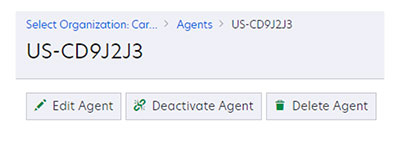
If a Local Agent is no longer needed, then it can be deleted from the Fleet Management portal. All information related to the agent is deleted.
From the Fleet Management web portal, click Agents > Local Agents.
Click the name of the Local Agent.
To delete a Local Agent, click Delete Agent.
Click Delete Agent.
Note: Deleting a Local Agent in the Fleet Management portal does not uninstall the Local Agent application installed on the workstation.

