Setup troubleshooting
 Jams and misfeeds troubleshooting
Error messages troubleshooting
Should the All-In-One have a problem, this section helps you find the solution. From the following list, select the category that best describes the type of problem you are having. Turn to the page listed, and use the table to find solutions to specific symptoms.
|
Symptom |
Solution |
|---|---|
|
The Power light is not lit |
|
|
Software will not install |
If the software does not launch automatically when you insert the CD:
For Windows XP, click Start to access the My Computer icon.
Note: After installing the software, be sure to re-enable your anti-virus software. |
|
The following operating systems are supported: |
|
|
Software will not install |
|
|
If the All-In-One is connected to the computer through another device: |
|
|
Page will not print |
Make sure the All-In-One is set as the default printer and is not on hold or paused. For more information, see Checking the All-In-One status. |
|
Make sure the tape has been removed from the print cartridge and that the print cartridge has been installed properly. For more information, see Replacing the print cartridge. |
If the All-In-One software is not functioning properly or a communications error message appears, you may need to remove and then reinstall the All-In-One software.
Note: Before reinstalling, shut down and restart the computer. If the problems persist, follow these steps:
 Programs Lexmark 2300 Series Uninstall.
If the All-In-One software installation screen does not appear:
For Windows XP, click Start to access the My Computer icon.
To prevent jams and misfeeds:
|
Symptom |
Solution |
|---|---|
|
Paper jam in the paper support |
|
|
Paper jam inside the All-In-One |
|
|
Paper or specialty media: |
Load a smaller amount of paper into the All-In-One. See Loading paper into the paper support for information about: |
|
Load paper with the print side facing you. |
|
|
Remove each page as it exits the All-In-One, and let it dry completely before stacking. |
|
|
Use only new, unwrinkled paper. |
|
Symptom |
Solution |
|---|---|
|
Poor text and graphic quality, including:
|
If you are using the scan or copy features, see Scan and copy troubleshooting. |
|
Check the ink levels, and install a new print cartridge if necessary. |
|
|
To avoid ink smudging when you are using the following types of media, remove each sheet as it exits and allow it to dry before stacking:
Note: Transparencies may take up to 15 minutes to dry. |
|
|
Use high quality paper or specialty media. For photo printing, we recommend Lexmark photo paper. |
|
|
Use only new, unwrinkled paper. |
|
|
Poor text and graphic quality at the edges of the page |
Unless you are using the borderless feature, use these minimum print margin settings: |
|
Poor quality at the edges of the page |
Select the Borderless print feature. |
|
Make sure that the paper size being used matches the printer setting. |
|
|
All-In-One does not print or respond |
See Page will not print. |
|
Uninstall the All-In-One software, and reinstall it. See Removing and reinstalling the software. |
|
|
|
|
Restart the computer. |
|
|
Print speed is slow |
Close all applications not in use. |
|
Try minimizing the number and size of graphics and images in the document. |
|
|
Consider purchasing more Random Access Memory (RAM) for the computer. |
Check the All-In-One status to make sure a document is not being held or paused and that the All-In-One is set as the default printer. To check the status:
Settings Printers and Faxes or Printers.
or
Click Start Control Panel Printers and Other Hardware Printers and Faxes.
|
Symptom |
Solution |
|---|---|
|
Scanner or copier does not respond |
If the |
|
Make sure the computer is on. |
|
|
Make sure the All-In-One is set as the default printer and is not on hold or paused. For more information, see Checking the All-In-One status. |
|
|
If none of the previous options fix the problem, uninstall the All-In-One software and reinstall it. For more information, see Removing and reinstalling the software. |
|
|
Scanner unit does not close |
|
|
Scanning takes too long or freezes the computer |
Close all programs not being used. |
|
To change the scanning resolution to a lower value: |
|
|
Poor quality from scan or copy feature including: |
Be sure the document is placed face down on the scanner glass. |
|
Gently wipe the scanner glass with a damp, clean, lint-free cloth. |
|
|
Try using another version of the document or image. |
|
|
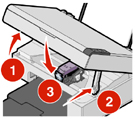
Replace the print cartridge with a new cartridge. For more information, see Replacing the print cartridge. |
|
Error Message |
Solution |
|---|---|
|
Ink Low |
Check the ink cartridge level, and install a new cartridge if necessary. To check the ink cartridge level, open the Lexmark Solution Center. See Using the Lexmark Solution Center. To install a new cartridge, see Replacing the print cartridge. The Ink Low warning occurs when the cartridge is 25% full, 15% full, and 10% full. |
|
Paper Jam |
|
|
Paper Out |
Load more paper into the All-In-One. For more information, see Loading paper into the paper support. |
|
Power light blinks twice |
If the blinking continues, replace the print cartridge with a new one. For more information, see Installing the print cartridge. |