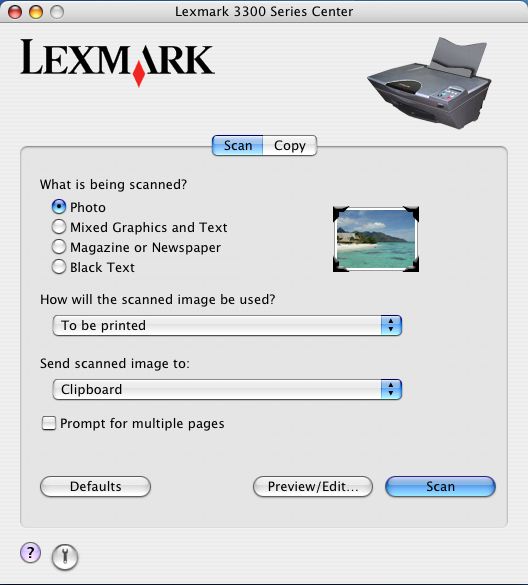
The Lexmark 3300 Series Center Main Page has two main sections: the Scan tab and Copy tab. If more than one Lexmark All-In-One is installed on your computer, the Device pop-up menu appears on top of the dialog. Choose Lexmark 3300 Series from this menu.

Scan tab | What is being scanned? | Select the option closest to the type of image you are scanning. the settings are optimized based on this selection. | |
How will the scanned image be used? | Choose the way the scan will be used. Resolution and other settings are optimized based on this selection. | ||
Send scanned image to: | Choose where to send scanned images, such as to file, to the Clipboard, or to an application. See Choosing where to send scanned images. For information on adding, removing, or modifying an application in the list of software applications, see Editing the Customize list.
| ||
Prompt for multiple pages | Prompt for multiple pages so that you are able to finish multiple-page scanning before sending the output to an application. You are prompted to add the next page after each page is scanned. If you still have more pages to scan, click Scan. If the multiple-page scan is complete, click Done. For more information, see Prompting for multiple pages.
| ||
Copy tab | Quantity & Copy Type | Choose the quantity and color for the copies. | |
Copy Quality | Select a quality setting for the copies. | ||
Output Paper Type | Choose the paper type for the output. | ||
Prompt for multiple pages | Prompt for multiple pages so that you are able to do multiple-page copying. You are prompted to add the next page after each page is scanned and copied. If you have more pages to copy, click Copy. If the multiple-page copy is complete, click Done. | ||
Original Image Size | Choose a paper size for the original document. If you do not know the original size, choose Auto. The All-In-One software detects the size and adjusts the scanning function accordingly.
| ||
Resize | Enlarge or reduce the copies by a percentage value, or choose a preset size from the drop-down menu.
|
| Note: | Click Preview/Edit to open the Scan dialog and the Copy dialog for more scan and copy settings. |
Click ![]() to open the Help Center for more information. Click the
to open the Help Center for more information. Click the ![]() for a direct link to the 3300 Series Utility.
for a direct link to the 3300 Series Utility.