Troubleshooting

  Setup troubleshooting

  Removing and reinstalling the software

If you are experiencing a problem with the All-In-One, this section helps you find the solution.

  1. From the following list, select the category that best fits the situation.
  1. Go to the reference to find the specific symptom and its solution.

Setup troubleshooting

Symptom

Cause

Solution

Power light is not lit

The All-In-One is not turned on.

Press the Power button.

The power supply is not pushed all the way into the All-In-One.

Disconnect the power supply cord from the wall outlet, and then from the All-In-One. Reconnect the power supply cord by pushing it all the way into the All-In-One. Then connect it back to the wall outlet.

The All-In-One may be connected to a non-working electrical outlet.

Connect the All-In-One to an electrical outlet that other electrical devices have been using.

Software will not install

The All-In-One software CD may not be running.

If nothing happens, follow these steps:

  1. Be sure the software CD is in the CD-ROM drive.
  2. From the desktop, double-click the My Computer icon.

In Windows XP, click Start to access the My Computer icon.

  1. Double-click the CD-ROM drive icon.
  2. If necessary, double-click setup.exe, and follow the instructions on the computer screen.

The operating system may not be compatible with the All-In-One.

The All-In-One supports these operating systems:

  • Windows 98, Me, 2000, XP
  • Mac OS X version 10.2.3 or higher.

Alignment page or test page will not print

The All-In-One is not turned on.

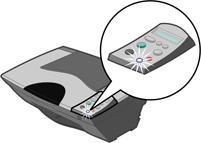
Press the Power button. If the light does not come on, see Power light is not lit.

The All-In-One displays an error message.

For more information, see Error messages troubleshooting.

The All-In-One is connected to the computer through another device, such as a USB hub or switch box.

Disconnect the USB cable from any other devices and directly connect it to the computer.

  • The transparent tape has not been removed from the bottom of each print cartridge.
  • The print cartridges are not installed properly.

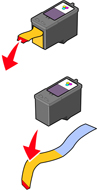
Remove the print cartridges, check for the tape, and then reinsert the cartridges. Aligning the print cartridges.

The paper is not loaded correctly.

For more information, see Loading paper into the paper support.

Symptom

Cause

Solution

All-In-One control panel is displaying text in the wrong language

Correct language has not been selected.

  1. Press the Power button.
  2. Press and hold both the Power and Cancel buttons for 5 seconds. Language text appears.
  3. Press or repeatedly until you see the correct language.
  4. Press to select the language.

PictBridge setup troubleshooting

Symptom

Cause

Solution

The camera is not recognized by the All-In-One and there is no message.

Is the All-In-One connected properly to the camera?

  1. Disconnect the USB cable from the All-In-One and the computer.
  2. Reconnect the USB cable to the computer and then the All-In-One.

You see a message stating, "The attached device is not communicating using PictBridge."


Is the digital camera PictBridge compatible?

Remove the device and use a PictBridge-enabled digital camera in the PictBridge port.

Refer to your digital camera documentation to determine if it is PictBridge compatible.

Is the PictBridge-enabled digital camera set to the correct USB mode?

Refer to your digital camera documentation for help selecting the correct USB mode.

Are you using the USB cable that came with your digital camera?

You must use the USB cable that came with your digital camera.

Refer to your digital camera documentation to determine which type of USB cable it supports.

You see a message stating, "PictBridge camera detected. Use camera to print photos."

The camera is connected to the All-In-One and you are trying to use a function not supported in this mode.

Use your camera to control the way the photo will print.

You see a message stating, "Unplug camera to use other printer features."

The camera is connected to the All-In-One and you are trying to use a function not supported in this mode.

Unplug the camera if you are trying to scan or copy.

You see a message stating, "Printing cancelled by camera."

You may be accidentally cancelled the printing task from your camera.

Send the printing task to the All-In-One again.


Removing and reinstalling the software

Note: Before reinstalling, shut down and restart the computer.

If the All-In-One software is not working or if a communications error message appears, you may need to remove and reinstall the software.

  1. From the desktop, click Start  Programs  Lexmark 3300 Series  Uninstall Lexmark 3300 Series  Yes  OK.

Or, click Start  Settings  Control Panel  Add/Remove Programs  Lexmark 3300 Series  Change/Remove  Yes  OK.

  1. Follow the instructions on the screenon the screen to remove the All-In-One software.
  2. Restart the computer.
  3. Click Cancel on any Add New Hardware screens.
  4. Eject and reinsert the All-In-One software CD.

If the All-In-One software installation screen does not appear:

  1. From the desktop, double-click My Computer.

In Windows XP, click Start to access the My Computer icon.

  1. Double-click the CD-ROM drive icon. If necessary, double-click setup.exe.
  2. When the All-In-One software installation screen appears, click Install or Install Now.
  3. Follow the instructions on the computer screen to complete the installation.